Compare commits
44 Commits
cli/feat/i
...
cli/fix/cl
| Author | SHA1 | Date | |
|---|---|---|---|
|
|
2f919ae313 | ||
|
|
fb5ae74c6e | ||
|
|
daf5dc2092 | ||
|
|
9ac793b479 | ||
|
|
072f28436c | ||
|
|
776848d2e2 | ||
|
|
480cecfe84 | ||
|
|
22a364d58a | ||
|
|
683e31c6ef | ||
|
|
1ae3a78286 | ||
|
|
7404674a20 | ||
|
|
f116970ad0 | ||
|
|
b6e866ce75 | ||
|
|
39bd546ac8 | ||
|
|
5820b5612e | ||
|
|
ef78e21933 | ||
|
|
8ce8b6c976 | ||
|
|
cbab40a597 | ||
|
|
14691ea3ec | ||
|
|
98f123fbf1 | ||
|
|
8f5023ce17 | ||
|
|
4467bc61df | ||
|
|
85f1224616 | ||
|
|
4b3a42d728 | ||
|
|
3c821cbedb | ||
|
|
3129b295ce | ||
|
|
76bde01b86 | ||
|
|
32c652205d | ||
|
|
817316c1d6 | ||
|
|
e03eb40ed8 | ||
|
|
79b7d82748 | ||
|
|
20344416f8 | ||
|
|
8c59050529 | ||
|
|
f932d10916 | ||
|
|
e4762d880b | ||
|
|
017b2e2acd | ||
|
|
d3adeced3f | ||
|
|
48038504a7 | ||
|
|
d17d8fca14 | ||
|
|
35770fbe46 | ||
|
|
39cb3335d6 | ||
|
|
0e1208d555 | ||
|
|
65fa0c0da8 | ||
|
|
cf7125aac8 |
22
.github/workflows/build-redis-231.yaml
vendored
@@ -11,10 +11,22 @@ jobs:
|
||||
- name: "Checkout source code"
|
||||
uses: actions/checkout@v3
|
||||
|
||||
# test
|
||||
- env:
|
||||
AWS_ACCESS_KEY_ID: ${{ secrets.AWS_ACCESS_KEY_ID }}
|
||||
AWS_SECRET_ACCESS_KEY: ${{ secrets.AWS_SECRET_ACCESS_KEY }}
|
||||
AWS_DEFAULT_REGION: "us-east-1"
|
||||
- name: Install coscmd
|
||||
run: pip install coscmd
|
||||
|
||||
- name: Configure coscmd
|
||||
env:
|
||||
TENCENT_SECRET_ID: ${{ secrets.TENCENT_SECRET_ID }}
|
||||
TENCENT_SECRET_KEY: ${{ secrets.TENCENT_SECRET_KEY }}
|
||||
COS_BUCKET: ${{ secrets.COS_BUCKET }}
|
||||
COS_REGION: ${{ secrets.COS_REGION }}
|
||||
END_POINT: ${{ secrets.END_POINT }}
|
||||
run: |
|
||||
coscmd config -a $TENCENT_SECRET_ID \
|
||||
-s $TENCENT_SECRET_KEY \
|
||||
-b $COS_BUCKET \
|
||||
-r $COS_REGION
|
||||
|
||||
# test
|
||||
- run: |
|
||||
bash build/build-redis.sh linux/amd64 glibc-231
|
||||
|
||||
44
.github/workflows/build-redis.yaml
vendored
@@ -11,12 +11,24 @@ jobs:
|
||||
- name: "Checkout source code"
|
||||
uses: actions/checkout@v3
|
||||
|
||||
# test
|
||||
- env:
|
||||
AWS_ACCESS_KEY_ID: ${{ secrets.AWS_ACCESS_KEY_ID }}
|
||||
AWS_SECRET_ACCESS_KEY: ${{ secrets.AWS_SECRET_ACCESS_KEY }}
|
||||
AWS_DEFAULT_REGION: "us-east-1"
|
||||
- name: Install coscmd
|
||||
run: pip install coscmd
|
||||
|
||||
- name: Configure coscmd
|
||||
env:
|
||||
TENCENT_SECRET_ID: ${{ secrets.TENCENT_SECRET_ID }}
|
||||
TENCENT_SECRET_KEY: ${{ secrets.TENCENT_SECRET_KEY }}
|
||||
COS_BUCKET: ${{ secrets.COS_BUCKET }}
|
||||
COS_REGION: ${{ secrets.COS_REGION }}
|
||||
END_POINT: ${{ secrets.END_POINT }}
|
||||
run: |
|
||||
coscmd config -a $TENCENT_SECRET_ID \
|
||||
-s $TENCENT_SECRET_KEY \
|
||||
-b $COS_BUCKET \
|
||||
-r $COS_REGION
|
||||
|
||||
# test
|
||||
- run: |
|
||||
bash build/build-redis.sh linux/amd64
|
||||
|
||||
push-arm64:
|
||||
@@ -34,10 +46,22 @@ jobs:
|
||||
run: |
|
||||
sudo apt install -y make gcc
|
||||
|
||||
# test
|
||||
- env:
|
||||
AWS_ACCESS_KEY_ID: ${{ secrets.AWS_ACCESS_KEY_ID }}
|
||||
AWS_SECRET_ACCESS_KEY: ${{ secrets.AWS_SECRET_ACCESS_KEY }}
|
||||
AWS_DEFAULT_REGION: "us-east-1"
|
||||
- name: Install coscmd
|
||||
run: pip install coscmd
|
||||
|
||||
- name: Configure coscmd
|
||||
env:
|
||||
TENCENT_SECRET_ID: ${{ secrets.TENCENT_SECRET_ID }}
|
||||
TENCENT_SECRET_KEY: ${{ secrets.TENCENT_SECRET_KEY }}
|
||||
COS_BUCKET: ${{ secrets.COS_BUCKET }}
|
||||
COS_REGION: ${{ secrets.COS_REGION }}
|
||||
END_POINT: ${{ secrets.END_POINT }}
|
||||
run: |
|
||||
coscmd config -a $TENCENT_SECRET_ID \
|
||||
-s $TENCENT_SECRET_KEY \
|
||||
-b $COS_BUCKET \
|
||||
-r $COS_REGION
|
||||
|
||||
# test
|
||||
- run: |
|
||||
sudo -E sh -c "bash build/build-redis.sh linux/arm64 && rm -rf redis*"
|
||||
|
||||
22
.github/workflows/build-ubuntu2204.yaml
vendored
@@ -11,10 +11,22 @@ jobs:
|
||||
- name: "Checkout source code"
|
||||
uses: actions/checkout@v3
|
||||
|
||||
# test
|
||||
- env:
|
||||
AWS_ACCESS_KEY_ID: ${{ secrets.AWS_ACCESS_KEY_ID }}
|
||||
AWS_SECRET_ACCESS_KEY: ${{ secrets.AWS_SECRET_ACCESS_KEY }}
|
||||
AWS_DEFAULT_REGION: "us-east-1"
|
||||
- name: Install coscmd
|
||||
run: pip install coscmd
|
||||
|
||||
- name: Configure coscmd
|
||||
env:
|
||||
TENCENT_SECRET_ID: ${{ secrets.TENCENT_SECRET_ID }}
|
||||
TENCENT_SECRET_KEY: ${{ secrets.TENCENT_SECRET_KEY }}
|
||||
COS_BUCKET: ${{ secrets.COS_BUCKET }}
|
||||
COS_REGION: ${{ secrets.COS_REGION }}
|
||||
END_POINT: ${{ secrets.END_POINT }}
|
||||
run: |
|
||||
coscmd config -a $TENCENT_SECRET_ID \
|
||||
-s $TENCENT_SECRET_KEY \
|
||||
-b $COS_BUCKET \
|
||||
-r $COS_REGION
|
||||
|
||||
# test
|
||||
- run: |
|
||||
bash build/build-ubuntu2204.sh
|
||||
23
.github/workflows/build-wsl2326.yaml
vendored
@@ -11,10 +11,23 @@ jobs:
|
||||
- name: "Checkout source code"
|
||||
uses: actions/checkout@v3
|
||||
|
||||
# test
|
||||
- env:
|
||||
AWS_ACCESS_KEY_ID: ${{ secrets.AWS_ACCESS_KEY_ID }}
|
||||
AWS_SECRET_ACCESS_KEY: ${{ secrets.AWS_SECRET_ACCESS_KEY }}
|
||||
AWS_DEFAULT_REGION: "us-east-1"
|
||||
- name: Install coscmd
|
||||
run: pip install coscmd
|
||||
|
||||
- name: Configure coscmd
|
||||
env:
|
||||
TENCENT_SECRET_ID: ${{ secrets.TENCENT_SECRET_ID }}
|
||||
TENCENT_SECRET_KEY: ${{ secrets.TENCENT_SECRET_KEY }}
|
||||
COS_BUCKET: ${{ secrets.COS_BUCKET }}
|
||||
COS_REGION: ${{ secrets.COS_REGION }}
|
||||
END_POINT: ${{ secrets.END_POINT }}
|
||||
run: |
|
||||
coscmd config -a $TENCENT_SECRET_ID \
|
||||
-s $TENCENT_SECRET_KEY \
|
||||
-b $COS_BUCKET \
|
||||
-r $COS_REGION
|
||||
|
||||
|
||||
# test
|
||||
- run: |
|
||||
bash build/build-wsl-install-msi.sh
|
||||
|
||||
107
.github/workflows/check.yaml
vendored
@@ -60,14 +60,6 @@ jobs:
|
||||
- name: Run chart-testing (lint)
|
||||
run: ct lint --chart-dirs .dist/wizard/config,.dist/wizard/config/apps,.dist/wizard/config/gpu --check-version-increment=false --all
|
||||
|
||||
# - name: Create kind cluster
|
||||
# if: steps.list-changed.outputs.changed == 'true'
|
||||
# uses: helm/kind-action@v1.7.0
|
||||
|
||||
# - name: Run chart-testing (install)
|
||||
# if: steps.list-changed.outputs.changed == 'true'
|
||||
# run: ct install --chart-dirs wizard/charts,wizard/config --target-branch ${{ github.event.repository.default_branch }}
|
||||
|
||||
test-version:
|
||||
runs-on: ubuntu-latest
|
||||
outputs:
|
||||
@@ -107,12 +99,23 @@ jobs:
|
||||
ref: ${{ github.event.pull_request.head.ref }}
|
||||
repository: ${{ github.event.pull_request.head.repo.full_name }}
|
||||
|
||||
# test
|
||||
- env:
|
||||
AWS_ACCESS_KEY_ID: ${{ secrets.AWS_ACCESS_KEY_ID }}
|
||||
AWS_SECRET_ACCESS_KEY: ${{ secrets.AWS_SECRET_ACCESS_KEY }}
|
||||
AWS_DEFAULT_REGION: "us-east-1"
|
||||
- name: Install coscmd
|
||||
run: pip install coscmd
|
||||
|
||||
- name: Configure coscmd
|
||||
env:
|
||||
TENCENT_SECRET_ID: ${{ secrets.TENCENT_SECRET_ID }}
|
||||
TENCENT_SECRET_KEY: ${{ secrets.TENCENT_SECRET_KEY }}
|
||||
COS_BUCKET: ${{ secrets.COS_BUCKET }}
|
||||
COS_REGION: ${{ secrets.COS_REGION }}
|
||||
END_POINT: ${{ secrets.END_POINT }}
|
||||
run: |
|
||||
coscmd config -a $TENCENT_SECRET_ID \
|
||||
-s $TENCENT_SECRET_KEY \
|
||||
-b $COS_BUCKET \
|
||||
-r $COS_REGION
|
||||
# test
|
||||
- run: |
|
||||
bash build/image-manifest.sh && bash build/upload-images.sh .manifest/images.mf
|
||||
|
||||
push-image-arm64:
|
||||
@@ -132,12 +135,23 @@ jobs:
|
||||
ref: ${{ github.event.pull_request.head.ref }}
|
||||
repository: ${{ github.event.pull_request.head.repo.full_name }}
|
||||
|
||||
- name: Install coscmd
|
||||
run: pip install coscmd
|
||||
|
||||
- env:
|
||||
AWS_ACCESS_KEY_ID: ${{ secrets.AWS_ACCESS_KEY_ID }}
|
||||
AWS_SECRET_ACCESS_KEY: ${{ secrets.AWS_SECRET_ACCESS_KEY }}
|
||||
AWS_DEFAULT_REGION: 'us-east-1'
|
||||
- name: Configure coscmd
|
||||
env:
|
||||
TENCENT_SECRET_ID: ${{ secrets.TENCENT_SECRET_ID }}
|
||||
TENCENT_SECRET_KEY: ${{ secrets.TENCENT_SECRET_KEY }}
|
||||
COS_BUCKET: ${{ secrets.COS_BUCKET }}
|
||||
COS_REGION: ${{ secrets.COS_REGION }}
|
||||
END_POINT: ${{ secrets.END_POINT }}
|
||||
run: |
|
||||
coscmd config -a $TENCENT_SECRET_ID \
|
||||
-s $TENCENT_SECRET_KEY \
|
||||
-b $COS_BUCKET \
|
||||
-r $COS_REGION
|
||||
|
||||
- run: |
|
||||
export PATH=$PATH:/usr/local/bin:/home/ubuntu/.local/bin
|
||||
bash build/image-manifest.sh && bash build/upload-images.sh .manifest/images.mf linux/arm64
|
||||
|
||||
@@ -154,11 +168,23 @@ jobs:
|
||||
ref: ${{ github.event.pull_request.head.ref }}
|
||||
repository: ${{ github.event.pull_request.head.repo.full_name }}
|
||||
|
||||
- name: Install coscmd
|
||||
run: pip install coscmd
|
||||
|
||||
- name: Configure coscmd
|
||||
env:
|
||||
TENCENT_SECRET_ID: ${{ secrets.TENCENT_SECRET_ID }}
|
||||
TENCENT_SECRET_KEY: ${{ secrets.TENCENT_SECRET_KEY }}
|
||||
COS_BUCKET: ${{ secrets.COS_BUCKET }}
|
||||
COS_REGION: ${{ secrets.COS_REGION }}
|
||||
END_POINT: ${{ secrets.END_POINT }}
|
||||
run: |
|
||||
coscmd config -a $TENCENT_SECRET_ID \
|
||||
-s $TENCENT_SECRET_KEY \
|
||||
-b $COS_BUCKET \
|
||||
-r $COS_REGION
|
||||
# test
|
||||
- env:
|
||||
AWS_ACCESS_KEY_ID: ${{ secrets.AWS_ACCESS_KEY_ID }}
|
||||
AWS_SECRET_ACCESS_KEY: ${{ secrets.AWS_SECRET_ACCESS_KEY }}
|
||||
AWS_DEFAULT_REGION: "us-east-1"
|
||||
VERSION: ${{ needs.test-version.outputs.version }}
|
||||
REPO_PATH: '${{ secrets.REPO_PATH }}'
|
||||
run: |
|
||||
@@ -179,11 +205,21 @@ jobs:
|
||||
- name: Install coscmd
|
||||
run: pip install coscmd
|
||||
|
||||
- name: Configure coscmd
|
||||
env:
|
||||
TENCENT_SECRET_ID: ${{ secrets.TENCENT_SECRET_ID }}
|
||||
TENCENT_SECRET_KEY: ${{ secrets.TENCENT_SECRET_KEY }}
|
||||
COS_BUCKET: ${{ secrets.COS_BUCKET }}
|
||||
COS_REGION: ${{ secrets.COS_REGION }}
|
||||
END_POINT: ${{ secrets.END_POINT }}
|
||||
run: |
|
||||
coscmd config -a $TENCENT_SECRET_ID \
|
||||
-s $TENCENT_SECRET_KEY \
|
||||
-b $COS_BUCKET \
|
||||
-r $COS_REGION
|
||||
|
||||
# test
|
||||
- env:
|
||||
AWS_ACCESS_KEY_ID: ${{ secrets.AWS_ACCESS_KEY_ID }}
|
||||
AWS_SECRET_ACCESS_KEY: ${{ secrets.AWS_SECRET_ACCESS_KEY }}
|
||||
AWS_DEFAULT_REGION: "us-east-1"
|
||||
VERSION: ${{ needs.test-version.outputs.version }}
|
||||
REPO_PATH: '${{ secrets.REPO_PATH }}'
|
||||
run: |
|
||||
@@ -206,15 +242,28 @@ jobs:
|
||||
run: |
|
||||
bash build/build.sh ${{ needs.test-version.outputs.version }}
|
||||
|
||||
- name: Upload package
|
||||
- name: Install coscmd
|
||||
run: pip install coscmd
|
||||
|
||||
- name: Configure coscmd
|
||||
env:
|
||||
AWS_ACCESS_KEY_ID: ${{ secrets.AWS_ACCESS_KEY_ID }}
|
||||
AWS_SECRET_ACCESS_KEY: ${{ secrets.AWS_SECRET_ACCESS_KEY }}
|
||||
AWS_DEFAULT_REGION: 'us-east-1'
|
||||
TENCENT_SECRET_ID: ${{ secrets.TENCENT_SECRET_ID }}
|
||||
TENCENT_SECRET_KEY: ${{ secrets.TENCENT_SECRET_KEY }}
|
||||
COS_BUCKET: ${{ secrets.COS_BUCKET }}
|
||||
COS_REGION: ${{ secrets.COS_REGION }}
|
||||
END_POINT: ${{ secrets.END_POINT }}
|
||||
run: |
|
||||
coscmd config -a $TENCENT_SECRET_ID \
|
||||
-s $TENCENT_SECRET_KEY \
|
||||
-b $COS_BUCKET \
|
||||
-r $COS_REGION
|
||||
|
||||
|
||||
- name: Upload package
|
||||
run: |
|
||||
md5sum install-wizard-v${{ needs.test-version.outputs.version }}.tar.gz > install-wizard-v${{ needs.test-version.outputs.version }}.md5sum.txt && \
|
||||
aws s3 cp install-wizard-v${{ needs.test-version.outputs.version }}.md5sum.txt s3://terminus-os-install/install-wizard-v${{ needs.test-version.outputs.version }}.md5sum.txt --acl=public-read && \
|
||||
aws s3 cp install-wizard-v${{ needs.test-version.outputs.version }}.tar.gz s3://terminus-os-install/install-wizard-v${{ needs.test-version.outputs.version }}.tar.gz --acl=public-read
|
||||
coscmd upload install-wizard-v${{ needs.test-version.outputs.version }}.md5sum.txt /install-wizard-v${{ needs.test-version.outputs.version }}.md5sum.txt && \
|
||||
coscmd upload install-wizard-v${{ needs.test-version.outputs.version }}.tar.gz /install-wizard-v${{ needs.test-version.outputs.version }}.tar.gz
|
||||
|
||||
|
||||
install-test:
|
||||
|
||||
22
.github/workflows/release-cli.yaml
vendored
@@ -60,12 +60,24 @@ jobs:
|
||||
OLARES_RELEASE_ID: ${{ inputs.release-id }}
|
||||
GITHUB_TOKEN: ${{ secrets.GITHUB_TOKEN }}
|
||||
|
||||
- name: Upload to S3
|
||||
- name: Install coscmd
|
||||
run: pip install coscmd
|
||||
|
||||
- name: Configure coscmd
|
||||
env:
|
||||
AWS_ACCESS_KEY_ID: ${{ secrets.AWS_ACCESS_KEY_ID }}
|
||||
AWS_SECRET_ACCESS_KEY: ${{ secrets.AWS_SECRET_ACCESS_KEY }}
|
||||
AWS_DEFAULT_REGION: "us-east-1"
|
||||
TENCENT_SECRET_ID: ${{ secrets.TENCENT_SECRET_ID }}
|
||||
TENCENT_SECRET_KEY: ${{ secrets.TENCENT_SECRET_KEY }}
|
||||
COS_BUCKET: ${{ secrets.COS_BUCKET }}
|
||||
COS_REGION: ${{ secrets.COS_REGION }}
|
||||
END_POINT: ${{ secrets.END_POINT }}
|
||||
run: |
|
||||
coscmd config -a $TENCENT_SECRET_ID \
|
||||
-s $TENCENT_SECRET_KEY \
|
||||
-b $COS_BUCKET \
|
||||
-r $COS_REGION
|
||||
|
||||
- name: Upload to CDN
|
||||
run: |
|
||||
cd cli/output && for file in $(ls *.tar.gz | grep -v no-release-id); do
|
||||
aws s3 cp "$file" s3://terminus-os-install${{ secrets.REPO_PATH }}${file} --acl=public-read
|
||||
coscmd upload "$file" ${{ secrets.REPO_PATH }}${file}
|
||||
done
|
||||
|
||||
23
.github/workflows/release-daemon.yaml
vendored
@@ -72,12 +72,25 @@ jobs:
|
||||
version: v1.18.2
|
||||
args: release --clean
|
||||
|
||||
- name: Upload to CDN
|
||||
- name: Install coscmd
|
||||
run: pip install coscmd
|
||||
|
||||
- name: Configure coscmd
|
||||
env:
|
||||
AWS_ACCESS_KEY_ID: ${{ secrets.AWS_ACCESS_KEY_ID }}
|
||||
AWS_SECRET_ACCESS_KEY: ${{ secrets.AWS_SECRET_ACCESS_KEY }}
|
||||
AWS_DEFAULT_REGION: 'us-east-1'
|
||||
TENCENT_SECRET_ID: ${{ secrets.TENCENT_SECRET_ID }}
|
||||
TENCENT_SECRET_KEY: ${{ secrets.TENCENT_SECRET_KEY }}
|
||||
COS_BUCKET: ${{ secrets.COS_BUCKET }}
|
||||
COS_REGION: ${{ secrets.COS_REGION }}
|
||||
END_POINT: ${{ secrets.END_POINT }}
|
||||
run: |
|
||||
coscmd config -a $TENCENT_SECRET_ID \
|
||||
-s $TENCENT_SECRET_KEY \
|
||||
-b $COS_BUCKET \
|
||||
-r $COS_REGION
|
||||
|
||||
|
||||
- name: Upload to CDN
|
||||
run: |
|
||||
cd daemon/output && for file in $(ls *.tar.gz | grep -v no-release-id); do
|
||||
aws s3 cp "$file" s3://terminus-os-install${{ secrets.REPO_PATH }}${file} --acl=public-read
|
||||
coscmd upload "$file" ${{ secrets.REPO_PATH }}${file}
|
||||
done
|
||||
|
||||
108
.github/workflows/release-daily.yaml
vendored
@@ -55,11 +55,23 @@ jobs:
|
||||
- name: 'Checkout source code'
|
||||
uses: actions/checkout@v3
|
||||
|
||||
- env:
|
||||
AWS_ACCESS_KEY_ID: ${{ secrets.AWS_ACCESS_KEY_ID }}
|
||||
AWS_SECRET_ACCESS_KEY: ${{ secrets.AWS_SECRET_ACCESS_KEY }}
|
||||
AWS_DEFAULT_REGION: 'us-east-1'
|
||||
- name: Install coscmd
|
||||
run: pip install coscmd
|
||||
|
||||
- name: Configure coscmd
|
||||
env:
|
||||
TENCENT_SECRET_ID: ${{ secrets.TENCENT_SECRET_ID }}
|
||||
TENCENT_SECRET_KEY: ${{ secrets.TENCENT_SECRET_KEY }}
|
||||
COS_BUCKET: ${{ secrets.COS_BUCKET }}
|
||||
COS_REGION: ${{ secrets.COS_REGION }}
|
||||
END_POINT: ${{ secrets.END_POINT }}
|
||||
run: |
|
||||
coscmd config -a $TENCENT_SECRET_ID \
|
||||
-s $TENCENT_SECRET_KEY \
|
||||
-b $COS_BUCKET \
|
||||
-r $COS_REGION
|
||||
|
||||
- run: |
|
||||
bash build/image-manifest.sh && bash build/upload-images.sh .manifest/images.mf
|
||||
|
||||
push-images-arm64:
|
||||
@@ -69,11 +81,23 @@ jobs:
|
||||
- name: 'Checkout source code'
|
||||
uses: actions/checkout@v3
|
||||
|
||||
- env:
|
||||
AWS_ACCESS_KEY_ID: ${{ secrets.AWS_ACCESS_KEY_ID }}
|
||||
AWS_SECRET_ACCESS_KEY: ${{ secrets.AWS_SECRET_ACCESS_KEY }}
|
||||
AWS_DEFAULT_REGION: 'us-east-1'
|
||||
- name: Install coscmd
|
||||
run: pip install coscmd
|
||||
|
||||
- name: Configure coscmd
|
||||
env:
|
||||
TENCENT_SECRET_ID: ${{ secrets.TENCENT_SECRET_ID }}
|
||||
TENCENT_SECRET_KEY: ${{ secrets.TENCENT_SECRET_KEY }}
|
||||
COS_BUCKET: ${{ secrets.COS_BUCKET }}
|
||||
COS_REGION: ${{ secrets.COS_REGION }}
|
||||
END_POINT: ${{ secrets.END_POINT }}
|
||||
run: |
|
||||
coscmd config -a $TENCENT_SECRET_ID \
|
||||
-s $TENCENT_SECRET_KEY \
|
||||
-b $COS_BUCKET \
|
||||
-r $COS_REGION
|
||||
|
||||
- run: |
|
||||
export PATH=$PATH:/usr/local/bin:/home/ubuntu/.local/bin
|
||||
bash build/image-manifest.sh && bash build/upload-images.sh .manifest/images.mf linux/arm64
|
||||
|
||||
@@ -85,11 +109,24 @@ jobs:
|
||||
- name: "Checkout source code"
|
||||
uses: actions/checkout@v3
|
||||
|
||||
- name: Install coscmd
|
||||
run: pip install coscmd
|
||||
|
||||
- name: Configure coscmd
|
||||
env:
|
||||
TENCENT_SECRET_ID: ${{ secrets.TENCENT_SECRET_ID }}
|
||||
TENCENT_SECRET_KEY: ${{ secrets.TENCENT_SECRET_KEY }}
|
||||
COS_BUCKET: ${{ secrets.COS_BUCKET }}
|
||||
COS_REGION: ${{ secrets.COS_REGION }}
|
||||
END_POINT: ${{ secrets.END_POINT }}
|
||||
run: |
|
||||
coscmd config -a $TENCENT_SECRET_ID \
|
||||
-s $TENCENT_SECRET_KEY \
|
||||
-b $COS_BUCKET \
|
||||
-r $COS_REGION
|
||||
|
||||
# test
|
||||
- env:
|
||||
AWS_ACCESS_KEY_ID: ${{ secrets.AWS_ACCESS_KEY_ID }}
|
||||
AWS_SECRET_ACCESS_KEY: ${{ secrets.AWS_SECRET_ACCESS_KEY }}
|
||||
AWS_DEFAULT_REGION: "us-east-1"
|
||||
VERSION: ${{ needs.daily-version.outputs.version }}
|
||||
RELEASE_ID: ${{ needs.release-id.outputs.id }}
|
||||
REPO_PATH: '${{ secrets.REPO_PATH }}'
|
||||
@@ -104,11 +141,24 @@ jobs:
|
||||
- name: "Checkout source code"
|
||||
uses: actions/checkout@v3
|
||||
|
||||
- name: Install coscmd
|
||||
run: pip install coscmd
|
||||
|
||||
- name: Configure coscmd
|
||||
env:
|
||||
TENCENT_SECRET_ID: ${{ secrets.TENCENT_SECRET_ID }}
|
||||
TENCENT_SECRET_KEY: ${{ secrets.TENCENT_SECRET_KEY }}
|
||||
COS_BUCKET: ${{ secrets.COS_BUCKET }}
|
||||
COS_REGION: ${{ secrets.COS_REGION }}
|
||||
END_POINT: ${{ secrets.END_POINT }}
|
||||
run: |
|
||||
coscmd config -a $TENCENT_SECRET_ID \
|
||||
-s $TENCENT_SECRET_KEY \
|
||||
-b $COS_BUCKET \
|
||||
-r $COS_REGION
|
||||
|
||||
# test
|
||||
- env:
|
||||
AWS_ACCESS_KEY_ID: ${{ secrets.AWS_ACCESS_KEY_ID }}
|
||||
AWS_SECRET_ACCESS_KEY: ${{ secrets.AWS_SECRET_ACCESS_KEY }}
|
||||
AWS_DEFAULT_REGION: "us-east-1"
|
||||
VERSION: ${{ needs.daily-version.outputs.version }}
|
||||
RELEASE_ID: ${{ needs.release-id.outputs.id }}
|
||||
REPO_PATH: '${{ secrets.REPO_PATH }}'
|
||||
@@ -129,19 +179,31 @@ jobs:
|
||||
run: |
|
||||
bash build/build.sh ${{ needs.daily-version.outputs.version }} ${{ needs.release-id.outputs.id }}
|
||||
|
||||
- name: Upload to S3
|
||||
- name: Install coscmd
|
||||
run: pip install coscmd
|
||||
|
||||
- name: Configure coscmd
|
||||
env:
|
||||
TENCENT_SECRET_ID: ${{ secrets.TENCENT_SECRET_ID }}
|
||||
TENCENT_SECRET_KEY: ${{ secrets.TENCENT_SECRET_KEY }}
|
||||
COS_BUCKET: ${{ secrets.COS_BUCKET }}
|
||||
COS_REGION: ${{ secrets.COS_REGION }}
|
||||
END_POINT: ${{ secrets.END_POINT }}
|
||||
run: |
|
||||
coscmd config -a $TENCENT_SECRET_ID \
|
||||
-s $TENCENT_SECRET_KEY \
|
||||
-b $COS_BUCKET \
|
||||
-r $COS_REGION
|
||||
|
||||
- name: Upload to COS
|
||||
id: upload
|
||||
env:
|
||||
AWS_ACCESS_KEY_ID: ${{ secrets.AWS_ACCESS_KEY_ID }}
|
||||
AWS_SECRET_ACCESS_KEY: ${{ secrets.AWS_SECRET_ACCESS_KEY }}
|
||||
AWS_DEFAULT_REGION: 'us-east-1'
|
||||
run: |
|
||||
md5sum install-wizard-v${{ needs.daily-version.outputs.version }}.tar.gz > install-wizard-v${{ needs.daily-version.outputs.version }}.md5sum.txt && \
|
||||
aws s3 cp install-wizard-v${{ needs.daily-version.outputs.version }}.md5sum.txt s3://terminus-os-install${{ secrets.REPO_PATH }}install-wizard-v${{ needs.daily-version.outputs.version }}.md5sum.txt --acl=public-read && \
|
||||
aws s3 cp install-wizard-v${{ needs.daily-version.outputs.version }}.tar.gz s3://terminus-os-install${{ secrets.REPO_PATH }}install-wizard-v${{ needs.daily-version.outputs.version }}.tar.gz --acl=public-read && \
|
||||
coscmd upload install-wizard-v${{ needs.daily-version.outputs.version }}.md5sum.txt ${{ secrets.REPO_PATH }}install-wizard-v${{ needs.daily-version.outputs.version }}.md5sum.txt && \
|
||||
coscmd upload install-wizard-v${{ needs.daily-version.outputs.version }}.tar.gz ${{ secrets.REPO_PATH }}install-wizard-v${{ needs.daily-version.outputs.version }}.tar.gz && \
|
||||
|
||||
aws s3 cp install-wizard-v${{ needs.daily-version.outputs.version }}.md5sum.txt s3://terminus-os-install${{ secrets.REPO_PATH }}install-wizard-v${{ needs.daily-version.outputs.version }}.${{ needs.release-id.outputs.id }}.md5sum.txt --acl=public-read && \
|
||||
aws s3 cp install-wizard-v${{ needs.daily-version.outputs.version }}.tar.gz s3://terminus-os-install${{ secrets.REPO_PATH }}install-wizard-v${{ needs.daily-version.outputs.version }}.${{ needs.release-id.outputs.id }}.tar.gz --acl=public-read
|
||||
coscmd upload install-wizard-v${{ needs.daily-version.outputs.version }}.md5sum.txt ${{ secrets.REPO_PATH }}install-wizard-v${{ needs.daily-version.outputs.version }}.${{ needs.release-id.outputs.id }}.md5sum.txt && \
|
||||
coscmd upload install-wizard-v${{ needs.daily-version.outputs.version }}.tar.gz ${{ secrets.REPO_PATH }}install-wizard-v${{ needs.daily-version.outputs.version }}.${{ needs.release-id.outputs.id }}.tar.gz
|
||||
|
||||
|
||||
release:
|
||||
|
||||
22
.github/workflows/release-mdns-agent.yaml
vendored
@@ -60,12 +60,24 @@ jobs:
|
||||
args: release --clean --skip-validate -f .goreleaser.agent.yml
|
||||
workdir: './daemon'
|
||||
|
||||
- name: Upload to CDN
|
||||
- name: Install coscmd
|
||||
run: pip install coscmd
|
||||
|
||||
- name: Configure coscmd
|
||||
env:
|
||||
AWS_ACCESS_KEY_ID: ${{ secrets.AWS_ACCESS_KEY_ID }}
|
||||
AWS_SECRET_ACCESS_KEY: ${{ secrets.AWS_SECRET_ACCESS_KEY }}
|
||||
AWS_DEFAULT_REGION: 'us-east-1'
|
||||
TENCENT_SECRET_ID: ${{ secrets.TENCENT_SECRET_ID }}
|
||||
TENCENT_SECRET_KEY: ${{ secrets.TENCENT_SECRET_KEY }}
|
||||
COS_BUCKET: ${{ secrets.COS_BUCKET }}
|
||||
COS_REGION: ${{ secrets.COS_REGION }}
|
||||
END_POINT: ${{ secrets.END_POINT }}
|
||||
run: |
|
||||
coscmd config -a $TENCENT_SECRET_ID \
|
||||
-s $TENCENT_SECRET_KEY \
|
||||
-b $COS_BUCKET \
|
||||
-r $COS_REGION
|
||||
|
||||
- name: Upload to CDN
|
||||
run: |
|
||||
cd daemon/output && for file in *.tar.gz; do
|
||||
aws s3 cp "$file" s3://terminus-os-install/$file --acl=public-read
|
||||
coscmd upload "$file" ${{ secrets.REPO_PATH }}$file
|
||||
done
|
||||
|
||||
108
.github/workflows/release.yaml
vendored
@@ -51,10 +51,23 @@ jobs:
|
||||
with:
|
||||
ref: ${{ github.event.inputs.tags }}
|
||||
|
||||
- name: Install coscmd
|
||||
run: pip install coscmd
|
||||
|
||||
- name: Configure coscmd
|
||||
env:
|
||||
TENCENT_SECRET_ID: ${{ secrets.TENCENT_SECRET_ID }}
|
||||
TENCENT_SECRET_KEY: ${{ secrets.TENCENT_SECRET_KEY }}
|
||||
COS_BUCKET: ${{ secrets.COS_BUCKET }}
|
||||
COS_REGION: ${{ secrets.COS_REGION }}
|
||||
END_POINT: ${{ secrets.END_POINT }}
|
||||
run: |
|
||||
coscmd config -a $TENCENT_SECRET_ID \
|
||||
-s $TENCENT_SECRET_KEY \
|
||||
-b $COS_BUCKET \
|
||||
-r $COS_REGION
|
||||
|
||||
- env:
|
||||
AWS_ACCESS_KEY_ID: ${{ secrets.AWS_ACCESS_KEY_ID }}
|
||||
AWS_SECRET_ACCESS_KEY: ${{ secrets.AWS_SECRET_ACCESS_KEY }}
|
||||
AWS_DEFAULT_REGION: 'us-east-1'
|
||||
VERSION: ${{ github.event.inputs.tags }}
|
||||
run: |
|
||||
bash build/image-manifest.sh && bash build/upload-images.sh .manifest/images.mf
|
||||
@@ -68,10 +81,24 @@ jobs:
|
||||
with:
|
||||
ref: ${{ github.event.inputs.tags }}
|
||||
|
||||
- name: Install coscmd
|
||||
run: pip install coscmd
|
||||
|
||||
- name: Configure coscmd
|
||||
env:
|
||||
TENCENT_SECRET_ID: ${{ secrets.TENCENT_SECRET_ID }}
|
||||
TENCENT_SECRET_KEY: ${{ secrets.TENCENT_SECRET_KEY }}
|
||||
COS_BUCKET: ${{ secrets.COS_BUCKET }}
|
||||
COS_REGION: ${{ secrets.COS_REGION }}
|
||||
END_POINT: ${{ secrets.END_POINT }}
|
||||
run: |
|
||||
coscmd config -a $TENCENT_SECRET_ID \
|
||||
-s $TENCENT_SECRET_KEY \
|
||||
-b $COS_BUCKET \
|
||||
-r $COS_REGION
|
||||
|
||||
|
||||
- env:
|
||||
AWS_ACCESS_KEY_ID: ${{ secrets.AWS_ACCESS_KEY_ID }}
|
||||
AWS_SECRET_ACCESS_KEY: ${{ secrets.AWS_SECRET_ACCESS_KEY }}
|
||||
AWS_DEFAULT_REGION: 'us-east-1'
|
||||
VERSION: ${{ github.event.inputs.tags }}
|
||||
run: |
|
||||
export PATH=$PATH:/usr/local/bin:/home/ubuntu/.local/bin
|
||||
@@ -85,11 +112,24 @@ jobs:
|
||||
- name: "Checkout source code"
|
||||
uses: actions/checkout@v3
|
||||
|
||||
- name: Install coscmd
|
||||
run: pip install coscmd
|
||||
|
||||
- name: Configure coscmd
|
||||
env:
|
||||
TENCENT_SECRET_ID: ${{ secrets.TENCENT_SECRET_ID }}
|
||||
TENCENT_SECRET_KEY: ${{ secrets.TENCENT_SECRET_KEY }}
|
||||
COS_BUCKET: ${{ secrets.COS_BUCKET }}
|
||||
COS_REGION: ${{ secrets.COS_REGION }}
|
||||
END_POINT: ${{ secrets.END_POINT }}
|
||||
run: |
|
||||
coscmd config -a $TENCENT_SECRET_ID \
|
||||
-s $TENCENT_SECRET_KEY \
|
||||
-b $COS_BUCKET \
|
||||
-r $COS_REGION
|
||||
|
||||
# test
|
||||
- env:
|
||||
AWS_ACCESS_KEY_ID: ${{ secrets.AWS_ACCESS_KEY_ID }}
|
||||
AWS_SECRET_ACCESS_KEY: ${{ secrets.AWS_SECRET_ACCESS_KEY }}
|
||||
AWS_DEFAULT_REGION: "us-east-1"
|
||||
VERSION: ${{ github.event.inputs.tags }}
|
||||
RELEASE_ID: ${{ needs.release-id.outputs.id }}
|
||||
REPO_PATH: '${{ secrets.REPO_PATH }}'
|
||||
@@ -104,11 +144,25 @@ jobs:
|
||||
- name: "Checkout source code"
|
||||
uses: actions/checkout@v3
|
||||
|
||||
- name: Install coscmd
|
||||
run: pip install coscmd
|
||||
|
||||
- name: Configure coscmd
|
||||
env:
|
||||
TENCENT_SECRET_ID: ${{ secrets.TENCENT_SECRET_ID }}
|
||||
TENCENT_SECRET_KEY: ${{ secrets.TENCENT_SECRET_KEY }}
|
||||
COS_BUCKET: ${{ secrets.COS_BUCKET }}
|
||||
COS_REGION: ${{ secrets.COS_REGION }}
|
||||
END_POINT: ${{ secrets.END_POINT }}
|
||||
run: |
|
||||
coscmd config -a $TENCENT_SECRET_ID \
|
||||
-s $TENCENT_SECRET_KEY \
|
||||
-b $COS_BUCKET \
|
||||
-r $COS_REGION
|
||||
|
||||
|
||||
# test
|
||||
- env:
|
||||
AWS_ACCESS_KEY_ID: ${{ secrets.AWS_ACCESS_KEY_ID }}
|
||||
AWS_SECRET_ACCESS_KEY: ${{ secrets.AWS_SECRET_ACCESS_KEY }}
|
||||
AWS_DEFAULT_REGION: "us-east-1"
|
||||
VERSION: ${{ github.event.inputs.tags }}
|
||||
RELEASE_ID: ${{ needs.release-id.outputs.id }}
|
||||
REPO_PATH: '${{ secrets.REPO_PATH }}'
|
||||
@@ -131,18 +185,30 @@ jobs:
|
||||
run: |
|
||||
bash build/build.sh ${{ github.event.inputs.tags }} ${{ needs.release-id.outputs.id }}
|
||||
|
||||
- name: Upload to S3
|
||||
env:
|
||||
AWS_ACCESS_KEY_ID: ${{ secrets.AWS_ACCESS_KEY_ID }}
|
||||
AWS_SECRET_ACCESS_KEY: ${{ secrets.AWS_SECRET_ACCESS_KEY }}
|
||||
AWS_DEFAULT_REGION: 'us-east-1'
|
||||
- name: Install coscmd
|
||||
run: pip install coscmd
|
||||
|
||||
- name: Configure coscmd
|
||||
env:
|
||||
TENCENT_SECRET_ID: ${{ secrets.TENCENT_SECRET_ID }}
|
||||
TENCENT_SECRET_KEY: ${{ secrets.TENCENT_SECRET_KEY }}
|
||||
COS_BUCKET: ${{ secrets.COS_BUCKET }}
|
||||
COS_REGION: ${{ secrets.COS_REGION }}
|
||||
END_POINT: ${{ secrets.END_POINT }}
|
||||
run: |
|
||||
coscmd config -a $TENCENT_SECRET_ID \
|
||||
-s $TENCENT_SECRET_KEY \
|
||||
-b $COS_BUCKET \
|
||||
-r $COS_REGION
|
||||
|
||||
- name: Upload to COS
|
||||
run: |
|
||||
md5sum install-wizard-v${{ github.event.inputs.tags }}.tar.gz > install-wizard-v${{ github.event.inputs.tags }}.md5sum.txt && \
|
||||
aws s3 cp install-wizard-v${{ github.event.inputs.tags }}.md5sum.txt s3://terminus-os-install${{ secrets.REPO_PATH }}install-wizard-v${{ github.event.inputs.tags }}.md5sum.txt --acl=public-read && \
|
||||
aws s3 cp install-wizard-v${{ github.event.inputs.tags }}.tar.gz s3://terminus-os-install${{ secrets.REPO_PATH }}install-wizard-v${{ github.event.inputs.tags }}.tar.gz --acl=public-read
|
||||
coscmd upload install-wizard-v${{ github.event.inputs.tags }}.md5sum.txt ${{ secrets.REPO_PATH }}install-wizard-v${{ github.event.inputs.tags }}.md5sum.txt && \
|
||||
coscmd upload install-wizard-v${{ github.event.inputs.tags }}.tar.gz ${{ secrets.REPO_PATH }}install-wizard-v${{ github.event.inputs.tags }}.tar.gz
|
||||
|
||||
aws s3 cp install-wizard-v${{ github.event.inputs.tags }}.md5sum.txt s3://terminus-os-install${{ secrets.REPO_PATH }}install-wizard-v${{ github.event.inputs.tags }}.${{ needs.release-id.outputs.id }}.md5sum.txt --acl=public-read && \
|
||||
aws s3 cp install-wizard-v${{ github.event.inputs.tags }}.tar.gz s3://terminus-os-install${{ secrets.REPO_PATH }}install-wizard-v${{ github.event.inputs.tags }}.${{ needs.release-id.outputs.id }}.tar.gz --acl=public-read
|
||||
coscmd upload install-wizard-v${{ github.event.inputs.tags }}.md5sum.txt ${{ secrets.REPO_PATH }}install-wizard-v${{ github.event.inputs.tags }}.${{ needs.release-id.outputs.id }}.md5sum.txt && \
|
||||
coscmd upload install-wizard-v${{ github.event.inputs.tags }}.tar.gz ${{ secrets.REPO_PATH }}install-wizard-v${{ github.event.inputs.tags }}.${{ needs.release-id.outputs.id }}.tar.gz
|
||||
|
||||
release:
|
||||
runs-on: ubuntu-latest
|
||||
|
||||
@@ -3,10 +3,10 @@
|
||||
# Olares: An Open-Source Personal Cloud to </br>Reclaim Your Data<!-- omit in toc -->
|
||||
|
||||
[](#)<br/>
|
||||
[](https://github.com/beclab/olares/commits/main)
|
||||
[](https://github.com/beclab/olares/commits/main)
|
||||

|
||||
[](https://github.com/beclab/olares/releases)
|
||||
[](https://github.com/beclab/olares/stargazers)
|
||||
[](https://github.com/beclab/olares/releases)
|
||||
[](https://github.com/beclab/Olares/stargazers)
|
||||
[](https://discord.gg/olares)
|
||||
[](https://github.com/beclab/olares/blob/main/LICENSE)
|
||||
|
||||
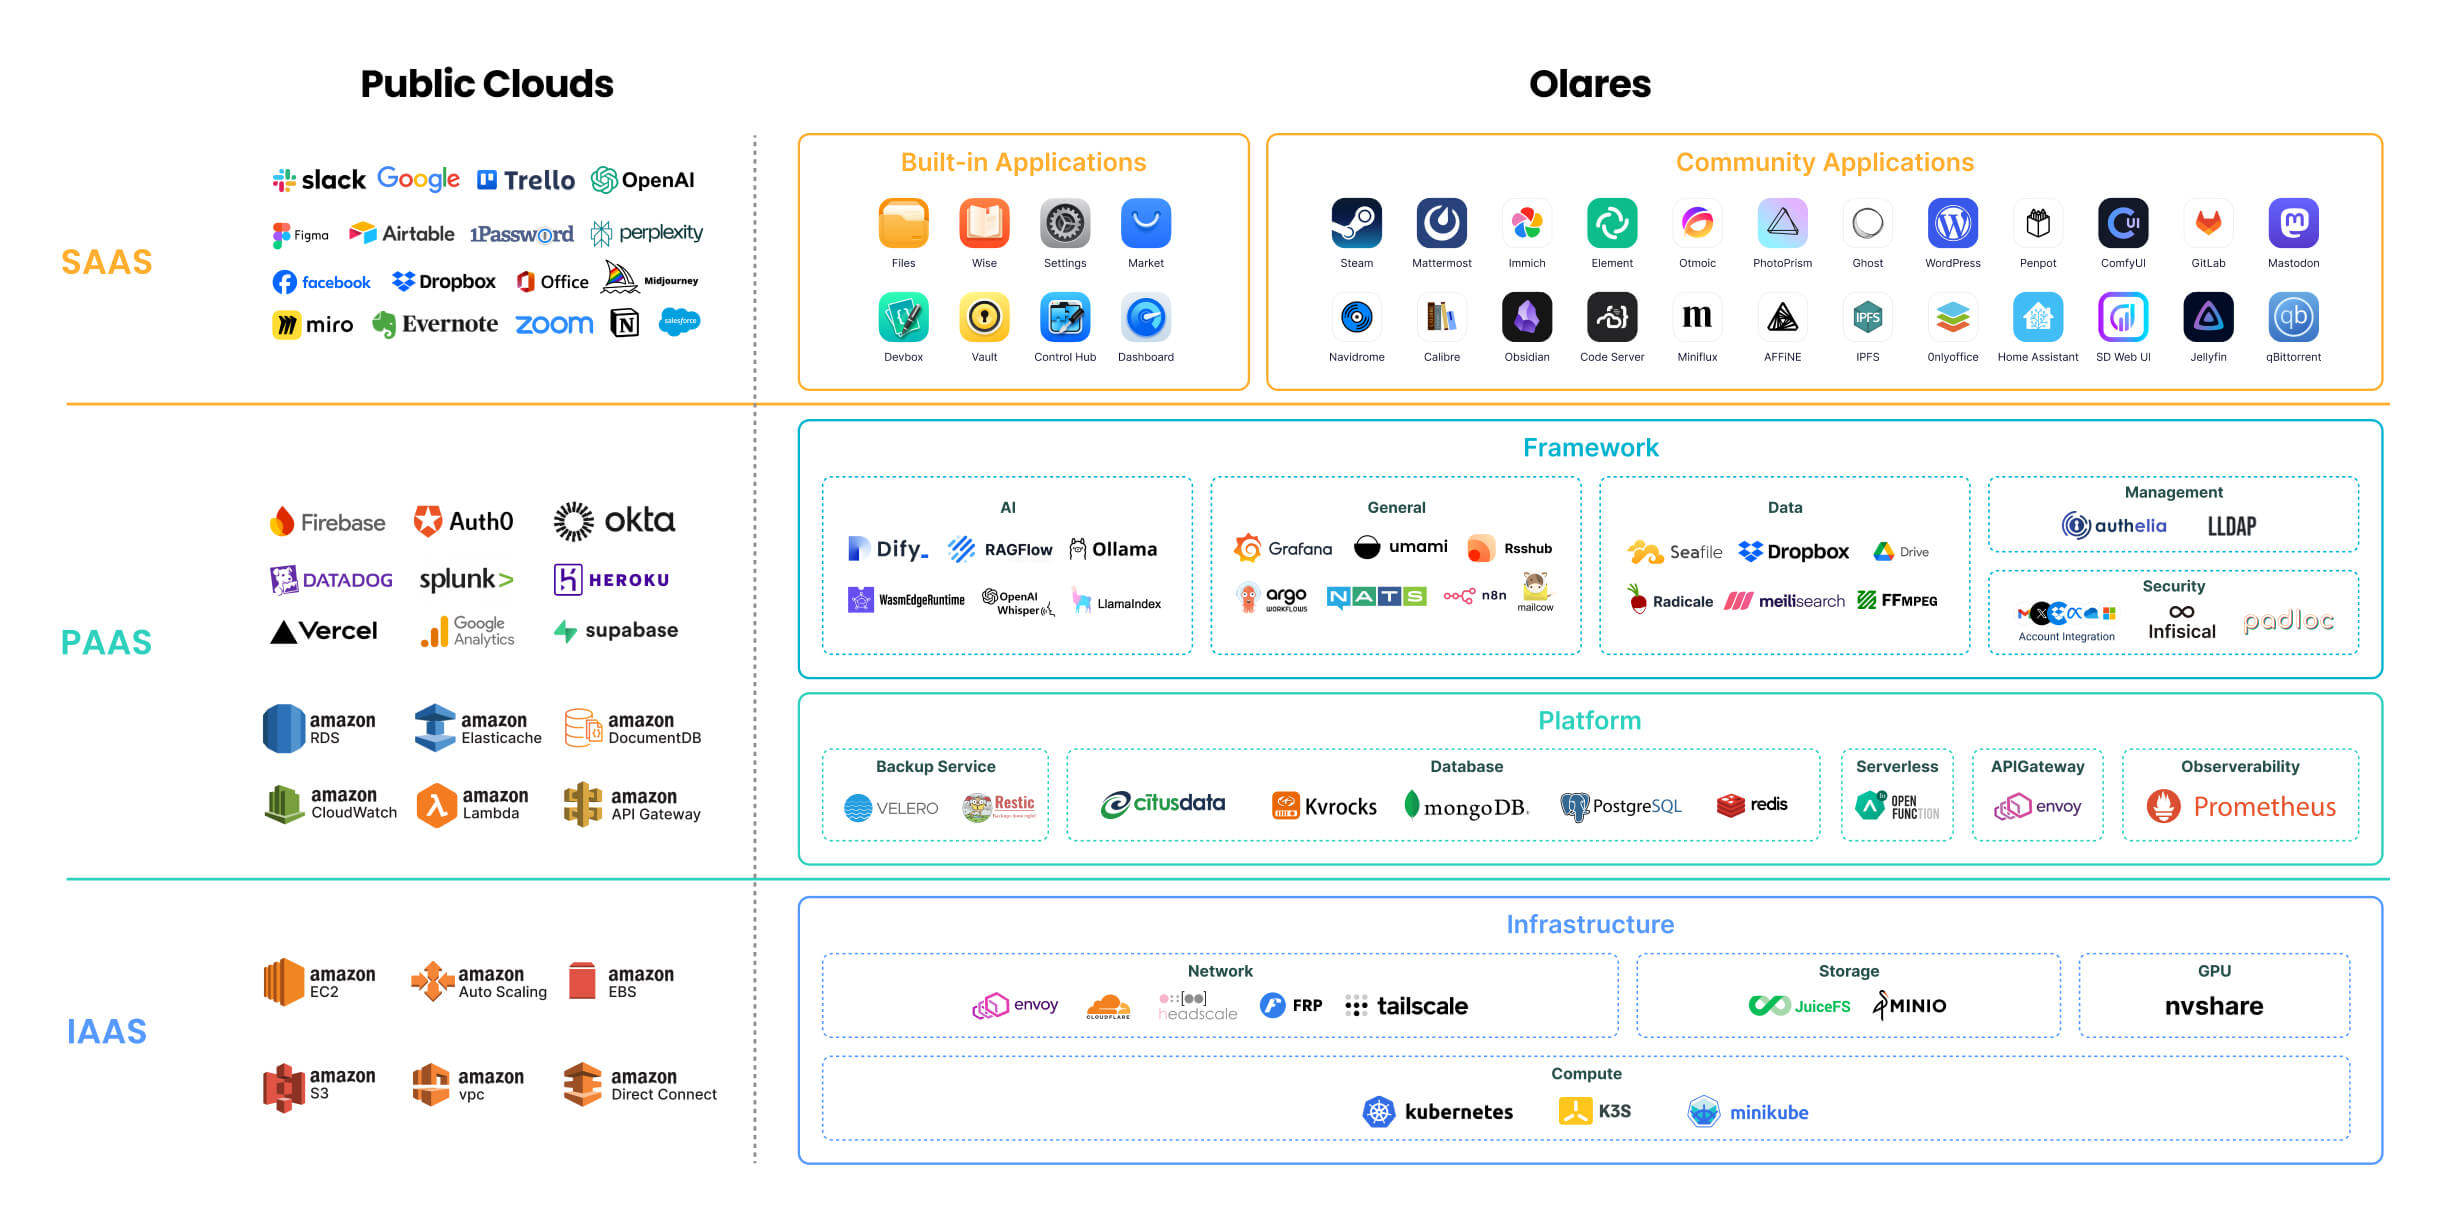
@@ -45,7 +45,7 @@ Just as Public clouds offer IaaS, PaaS, and SaaS layers, Olares provides open-so
|
||||
|
||||
|
||||
|
||||
For detailed description of each component, refer to [Olares architecture](https://docs.olares.com/manual/concepts/system-architecture.html).
|
||||
For detailed description of each component, refer to [Olares architecture](https://docs.olares.com/developer/concepts/system-architecture.html).
|
||||
|
||||
> 🔍 **How is Olares different from traditional NAS?**
|
||||
>
|
||||
|
||||
@@ -317,7 +317,7 @@ spec:
|
||||
chown -R 1000:1000 /uploadstemp && \
|
||||
chown -R 1000:1000 /appdata
|
||||
- name: olares-app-init
|
||||
image: beclab/system-frontend:v1.9.6
|
||||
image: beclab/system-frontend:v1.9.12
|
||||
imagePullPolicy: IfNotPresent
|
||||
command:
|
||||
- /bin/sh
|
||||
|
||||
@@ -27,4 +27,5 @@ mkdir redis-5.0.14 && \
|
||||
cp /usr/local/bin/redis* ./redis-5.0.14/
|
||||
|
||||
tar czvf ./redis-5.0.14.tar.gz ./redis-5.0.14/ && \
|
||||
aws s3 cp redis-5.0.14.tar.gz s3://terminus-os-install/redis-5.0.14_${os}_${arch}${SUFFIX}.tar.gz --acl=public-read
|
||||
# aws s3 cp redis-5.0.14.tar.gz s3://terminus-os-install/redis-5.0.14_${os}_${arch}${SUFFIX}.tar.gz --acl=public-read
|
||||
coscmd upload redis-5.0.14.tar.gz /redis-5.0.14_${os}_${arch}${SUFFIX}.tar.gz --acl=public-read
|
||||
|
||||
@@ -6,4 +6,5 @@ set -xe
|
||||
curl -Lo Ubuntu2204.appx https://wslstorestorage.blob.core.windows.net/wslblob/Ubuntu2204-221101.AppxBundle
|
||||
ubuntu2204=$(md5sum Ubuntu2204.appx|awk '{print $1}')
|
||||
|
||||
aws s3 cp Ubuntu2204.appx s3://terminus-os-install/${ubuntu2204} --acl=public-read
|
||||
# aws s3 cp Ubuntu2204.appx s3://terminus-os-install/${ubuntu2204} --acl=public-read
|
||||
coscmd upload Ubuntu2204.appx /${ubuntu2204} --acl=public-read
|
||||
|
||||
@@ -6,9 +6,11 @@ set -xe
|
||||
curl -Lo wsl.2.3.26.0.amd64.msi https://github.com/microsoft/WSL/releases/download/2.3.26/wsl.2.3.26.0.x64.msi
|
||||
wsl_2_3_26=$(md5sum wsl.2.3.26.0.amd64.msi|awk '{print $1}')
|
||||
|
||||
aws s3 cp wsl.2.3.26.0.amd64.msi s3://terminus-os-install/${wsl_2_3_26} --acl=public-read
|
||||
# aws s3 cp wsl.2.3.26.0.amd64.msi s3://terminus-os-install/${wsl_2_3_26} --acl=public-read
|
||||
coscmd upload wsl.2.3.26.0.amd64.msi /${wsl_2_3_26} --acl=public-read
|
||||
|
||||
curl -Lo wsl.2.3.26.0.arm64.msi https://github.com/microsoft/WSL/releases/download/2.3.26/wsl.2.3.26.0.arm64.msi
|
||||
wsl_2_3_26_arm64=$(md5sum wsl.2.3.26.0.arm64.msi|awk '{print $1}')
|
||||
|
||||
aws s3 cp wsl.2.3.26.0.arm64.msi s3://terminus-os-install/arm64/${wsl_2_3_26_arm64} --acl=public-read
|
||||
# aws s3 cp wsl.2.3.26.0.arm64.msi s3://terminus-os-install/arm64/${wsl_2_3_26_arm64} --acl=public-read
|
||||
coscmd upload wsl.2.3.26.0.arm64.msi /arm64/${wsl_2_3_26_arm64} --acl=public-read
|
||||
@@ -31,7 +31,7 @@ while read line; do
|
||||
curl -fsSLI https://cdn.olares.com/$path$name > /dev/null
|
||||
if [ $? -ne 0 ]; then
|
||||
code=$(curl -o /dev/null -fsSLI -w "%{http_code}" https://cdn.olares.com/$path$name)
|
||||
if [ $code -eq 403 ]; then
|
||||
if [[ $code -eq 403 || $code -eq 404 ]]; then
|
||||
|
||||
bash ${BASE_DIR}/download-deps.sh $PLATFORM $line
|
||||
if [ $? -ne 0 ]; then
|
||||
@@ -46,28 +46,25 @@ while read line; do
|
||||
fi
|
||||
|
||||
set -ex
|
||||
aws s3 cp $name s3://terminus-os-install/$path$name --acl=public-read
|
||||
aws s3 cp $name s3://terminus-os-install/backup/$path$backup_file --acl=public-read
|
||||
aws s3 cp $checksum s3://terminus-os-install/$path$checksum --acl=public-read
|
||||
echo "upload $name to s3 completed"
|
||||
# aws s3 cp $name s3://terminus-os-install/$path$name --acl=public-read
|
||||
# aws s3 cp $name s3://terminus-os-install/backup/$path$backup_file --acl=public-read
|
||||
# aws s3 cp $checksum s3://terminus-os-install/$path$checksum --acl=public-read
|
||||
# echo "upload $name to s3 completed"
|
||||
|
||||
coscmd upload ./$name /$path$name
|
||||
coscmd upload ./$name /backup/$path$backup_file
|
||||
coscmd upload ./$checksum /$path$checksum
|
||||
echo "upload $name to cos completed"
|
||||
|
||||
set +ex
|
||||
else
|
||||
if [ $code -ne 200 ]; then
|
||||
echo "failed to check image"
|
||||
echo "failed to check file"
|
||||
exit -1
|
||||
fi
|
||||
fi
|
||||
fi
|
||||
|
||||
# upload to tencent cloud cos
|
||||
# curl -fsSLI https://cdn.joinolares.cn/$path$name > /dev/null
|
||||
# if [ $? -ne 0 ]; then
|
||||
# set -ex
|
||||
# coscmd upload ./$name /$path$name
|
||||
# coscmd upload ./$checksum /$path$checksum
|
||||
# echo "upload $name to cos completed"
|
||||
# set +ex
|
||||
# fi
|
||||
done < components
|
||||
|
||||
popd
|
||||
|
||||
@@ -15,7 +15,7 @@ cat $1|while read image; do
|
||||
curl -fsSLI https://cdn.olares.com/$path$name.tar.gz > /dev/null
|
||||
if [ $? -ne 0 ]; then
|
||||
code=$(curl -o /dev/null -fsSLI -w "%{http_code}" https://cdn.olares.com/$path$name.tar.gz)
|
||||
if [ $code -eq 403 ]; then
|
||||
if [[ $code -eq 403 || $code -eq 404 ]]; then
|
||||
set -ex
|
||||
skopeo copy --insecure-policy docker://$image oci-archive:$name.tar
|
||||
gzip $name.tar
|
||||
@@ -28,11 +28,16 @@ cat $1|while read image; do
|
||||
fi
|
||||
|
||||
echo "start to upload [$name.tar.gz]"
|
||||
aws s3 cp $name.tar.gz s3://terminus-os-install/$path$name.tar.gz --acl=public-read
|
||||
aws s3 cp $name.tar.gz s3://terminus-os-install/backup/$path$backup_file --acl=public-read
|
||||
aws s3 cp $checksum s3://terminus-os-install/$path$checksum --acl=public-read
|
||||
echo "upload $name completed"
|
||||
|
||||
# aws s3 cp $name.tar.gz s3://terminus-os-install/$path$name.tar.gz --acl=public-read
|
||||
# aws s3 cp $name.tar.gz s3://terminus-os-install/backup/$path$backup_file --acl=public-read
|
||||
# aws s3 cp $checksum s3://terminus-os-install/$path$checksum --acl=public-read
|
||||
# echo "upload $name completed"
|
||||
|
||||
coscmd upload ./$name.tar.gz /$path$name.tar.gz
|
||||
coscmd upload ./$name.tar.gz /backup/$path$backup_file
|
||||
coscmd upload ./$checksum /$path$checksum
|
||||
echo "upload $name to cos completed"
|
||||
|
||||
set +ex
|
||||
else
|
||||
if [ $code -ne 200 ]; then
|
||||
@@ -48,7 +53,7 @@ cat $1|while read image; do
|
||||
curl -fsSLI https://cdn.olares.com/$path$checksum > /dev/null
|
||||
if [ $? -ne 0 ]; then
|
||||
code=$(curl -o /dev/null -fsSLI -w "%{http_code}" https://cdn.olares.com/$path$checksum)
|
||||
if [ $code -eq 403 ]; then
|
||||
if [[ $code -eq 403 || $code -eq 404 ]]; then
|
||||
set -ex
|
||||
skopeo copy --insecure-policy docker://$image oci-archive:$name.tar
|
||||
gzip $name.tar
|
||||
@@ -60,10 +65,16 @@ cat $1|while read image; do
|
||||
exit 1
|
||||
fi
|
||||
|
||||
aws s3 cp $name.tar.gz s3://terminus-os-install/$path$name.tar.gz --acl=public-read
|
||||
aws s3 cp $name.tar.gz s3://terminus-os-install/backup/$path$backup_file --acl=public-read
|
||||
aws s3 cp $checksum s3://terminus-os-install/$path$checksum --acl=public-read
|
||||
echo "upload $name completed"
|
||||
# aws s3 cp $name.tar.gz s3://terminus-os-install/$path$name.tar.gz --acl=public-read
|
||||
# aws s3 cp $name.tar.gz s3://terminus-os-install/backup/$path$backup_file --acl=public-read
|
||||
# aws s3 cp $checksum s3://terminus-os-install/$path$checksum --acl=public-read
|
||||
# echo "upload $name completed"
|
||||
|
||||
coscmd upload ./$name.tar.gz /$path$name.tar.gz
|
||||
coscmd upload ./$name.tar.gz /backup/$path$backup_file
|
||||
coscmd upload ./$checksum /$path$checksum
|
||||
echo "upload $name to cos completed"
|
||||
|
||||
set +ex
|
||||
else
|
||||
if [ $code -ne 200 ]; then
|
||||
@@ -77,13 +88,16 @@ cat $1|while read image; do
|
||||
curl -fsSLI https://cdn.olares.com/$path$manifest > /dev/null
|
||||
if [ $? -ne 0 ]; then
|
||||
code=$(curl -o /dev/null -fsSLI -w "%{http_code}" https://cdn.olares.com/$path$manifest)
|
||||
if [ $code -eq 403 ]; then
|
||||
if [[ $code -eq 403 || $code -eq 404 ]]; then
|
||||
set -ex
|
||||
BASE_DIR=$(dirname $(realpath -s $0))
|
||||
python3 $BASE_DIR/get-manifest.py $image -o $manifest
|
||||
|
||||
aws s3 cp $manifest s3://terminus-os-install/$path$manifest --acl=public-read
|
||||
# aws s3 cp $manifest s3://terminus-os-install/$path$manifest --acl=public-read
|
||||
|
||||
coscmd upload $manifest /$path$manifest
|
||||
echo "upload $name manifest completed"
|
||||
|
||||
set +ex
|
||||
else
|
||||
if [ $code -ne 200 ]; then
|
||||
|
||||
121
cli/pkg/amdgpu/module.go
Normal file
@@ -0,0 +1,121 @@
|
||||
package amdgpu
|
||||
|
||||
import (
|
||||
"time"
|
||||
|
||||
"github.com/beclab/Olares/cli/pkg/common"
|
||||
"github.com/beclab/Olares/cli/pkg/core/prepare"
|
||||
"github.com/beclab/Olares/cli/pkg/core/task"
|
||||
)
|
||||
|
||||
// InstallAmdContainerToolkitModule installs AMD container toolkit on supported Ubuntu if ROCm is installed.
|
||||
type InstallAmdContainerToolkitModule struct {
|
||||
common.KubeModule
|
||||
Skip bool // conditional execution based on ROCm detection
|
||||
SkipRocmCheck bool
|
||||
}
|
||||
|
||||
func (m *InstallAmdContainerToolkitModule) IsSkip() bool {
|
||||
return m.Skip
|
||||
}
|
||||
|
||||
func (m *InstallAmdContainerToolkitModule) Init() {
|
||||
m.Name = "InstallAmdContainerToolkit"
|
||||
if m.IsSkip() {
|
||||
return
|
||||
}
|
||||
|
||||
prepareCollection := prepare.PrepareCollection{}
|
||||
if !m.SkipRocmCheck {
|
||||
prepareCollection = append(prepareCollection, new(RocmInstalled))
|
||||
}
|
||||
|
||||
updateAmdSource := &task.RemoteTask{
|
||||
Name: "UpdateAmdContainerToolkitSource",
|
||||
Hosts: m.Runtime.GetHostsByRole(common.Master),
|
||||
Action: new(UpdateAmdContainerToolkitSource),
|
||||
Prepare: &prepareCollection,
|
||||
Parallel: false,
|
||||
Retry: 1,
|
||||
}
|
||||
|
||||
installAmdContainerToolkit := &task.RemoteTask{
|
||||
Name: "InstallAmdContainerToolkit",
|
||||
Hosts: m.Runtime.GetHostsByRole(common.Master),
|
||||
Prepare: &prepareCollection,
|
||||
Action: new(InstallAmdContainerToolkit),
|
||||
Parallel: false,
|
||||
Retry: 1,
|
||||
}
|
||||
|
||||
generateAndValidateCDI := &task.RemoteTask{
|
||||
Name: "GenerateAndValidateAmdCDI",
|
||||
Hosts: m.Runtime.GetHostsByRole(common.Master),
|
||||
Prepare: &prepareCollection,
|
||||
Action: new(GenerateAndValidateAmdCDI),
|
||||
Parallel: false,
|
||||
Retry: 1,
|
||||
}
|
||||
|
||||
m.Tasks = []task.Interface{
|
||||
updateAmdSource,
|
||||
installAmdContainerToolkit,
|
||||
generateAndValidateCDI,
|
||||
}
|
||||
}
|
||||
|
||||
// InstallAmdPluginModule installs AMD GPU device plugin on Kubernetes.
|
||||
type InstallAmdPluginModule struct {
|
||||
common.KubeModule
|
||||
Skip bool // conditional execution based on GPU enablement
|
||||
}
|
||||
|
||||
func (m *InstallAmdPluginModule) IsSkip() bool {
|
||||
return m.Skip
|
||||
}
|
||||
|
||||
func (m *InstallAmdPluginModule) Init() {
|
||||
m.Name = "InstallAmdPlugin"
|
||||
|
||||
// update node with AMD GPU labels
|
||||
updateNode := &task.RemoteTask{
|
||||
Name: "UpdateNodeAmdGPUInfo",
|
||||
Hosts: m.Runtime.GetHostsByRole(common.Master),
|
||||
Prepare: &prepare.PrepareCollection{
|
||||
new(common.OnlyFirstMaster),
|
||||
},
|
||||
Action: new(UpdateNodeAmdGPUInfo),
|
||||
Parallel: false,
|
||||
Retry: 1,
|
||||
}
|
||||
|
||||
installPlugin := &task.RemoteTask{
|
||||
Name: "InstallAmdPlugin",
|
||||
Hosts: m.Runtime.GetHostsByRole(common.Master),
|
||||
Prepare: &prepare.PrepareCollection{
|
||||
new(common.OnlyFirstMaster),
|
||||
},
|
||||
Action: new(InstallAmdPlugin),
|
||||
Parallel: false,
|
||||
Retry: 1,
|
||||
}
|
||||
|
||||
checkGpuState := &task.RemoteTask{
|
||||
Name: "CheckAmdGPUState",
|
||||
Hosts: m.Runtime.GetHostsByRole(common.Master),
|
||||
Prepare: &prepare.PrepareCollection{
|
||||
new(common.OnlyFirstMaster),
|
||||
new(RocmInstalled),
|
||||
},
|
||||
Action: new(CheckAmdGpuStatus),
|
||||
Parallel: false,
|
||||
Retry: 50,
|
||||
Delay: 10 * time.Second,
|
||||
}
|
||||
|
||||
m.Tasks = []task.Interface{
|
||||
updateNode,
|
||||
installPlugin,
|
||||
checkGpuState,
|
||||
}
|
||||
}
|
||||
56
cli/pkg/amdgpu/prepares.go
Normal file
@@ -0,0 +1,56 @@
|
||||
package amdgpu
|
||||
|
||||
import (
|
||||
"github.com/beclab/Olares/cli/pkg/bootstrap/precheck"
|
||||
"github.com/beclab/Olares/cli/pkg/common"
|
||||
"github.com/beclab/Olares/cli/pkg/core/connector"
|
||||
"github.com/beclab/Olares/cli/pkg/core/logger"
|
||||
)
|
||||
|
||||
// RocmInstalled checks if AMD ROCm is installed on the system.
|
||||
type RocmInstalled struct {
|
||||
common.KubePrepare
|
||||
}
|
||||
|
||||
func (p *RocmInstalled) PreCheck(runtime connector.Runtime) (bool, error) {
|
||||
rocmV, err := connector.RocmVersion()
|
||||
if err != nil {
|
||||
logger.Debugf("ROCm version check error: %v", err)
|
||||
return false, nil
|
||||
}
|
||||
if rocmV == nil {
|
||||
return false, nil
|
||||
}
|
||||
|
||||
logger.Infof("Detected ROCm version: %s", rocmV.Original())
|
||||
return true, nil
|
||||
}
|
||||
|
||||
// RocmNotInstalled checks if AMD ROCm is NOT installed on the system.
|
||||
type RocmNotInstalled struct {
|
||||
common.KubePrepare
|
||||
RocmInstalled
|
||||
}
|
||||
|
||||
func (p *RocmNotInstalled) PreCheck(runtime connector.Runtime) (bool, error) {
|
||||
installed, err := p.RocmInstalled.PreCheck(runtime)
|
||||
if err != nil {
|
||||
return false, err
|
||||
}
|
||||
return !installed, nil
|
||||
}
|
||||
|
||||
// ContainerdInstalled checks if containerd is installed on the system.
|
||||
type ContainerdInstalled struct {
|
||||
common.KubePrepare
|
||||
}
|
||||
|
||||
func (p *ContainerdInstalled) PreCheck(runtime connector.Runtime) (bool, error) {
|
||||
containerdCheck := precheck.ConflictingContainerdCheck{}
|
||||
if err := containerdCheck.Check(runtime); err != nil {
|
||||
return true, nil
|
||||
}
|
||||
|
||||
logger.Info("containerd is not installed, ignore task")
|
||||
return false, nil
|
||||
}
|
||||
@@ -1,17 +1,20 @@
|
||||
package amdgpu
|
||||
|
||||
import (
|
||||
"context"
|
||||
"fmt"
|
||||
"os/exec"
|
||||
"path"
|
||||
"path/filepath"
|
||||
|
||||
"github.com/beclab/Olares/cli/pkg/clientset"
|
||||
"github.com/beclab/Olares/cli/pkg/common"
|
||||
cc "github.com/beclab/Olares/cli/pkg/core/common"
|
||||
"github.com/beclab/Olares/cli/pkg/core/connector"
|
||||
"github.com/beclab/Olares/cli/pkg/core/logger"
|
||||
"github.com/beclab/Olares/cli/pkg/core/task"
|
||||
"github.com/beclab/Olares/cli/pkg/utils"
|
||||
"github.com/beclab/Olares/cli/pkg/core/util"
|
||||
"github.com/beclab/Olares/cli/pkg/gpu"
|
||||
|
||||
"github.com/Masterminds/semver/v3"
|
||||
"github.com/pkg/errors"
|
||||
@@ -26,8 +29,8 @@ func (m *InstallAmdRocmModule) Init() {
|
||||
m.Name = "InstallAMDGPU"
|
||||
|
||||
installAmd := &task.RemoteTask{
|
||||
Name: "InstallAmdRocm",
|
||||
Hosts: m.Runtime.GetHostsByRole(common.Master),
|
||||
Name: "InstallAmdRocm",
|
||||
Hosts: m.Runtime.GetHostsByRole(common.Master),
|
||||
Action: &InstallAmdRocm{
|
||||
// no manifest needed
|
||||
},
|
||||
@@ -51,7 +54,7 @@ func (t *InstallAmdRocm) Execute(runtime connector.Runtime) error {
|
||||
return nil
|
||||
}
|
||||
|
||||
amdGPUExists, err := utils.HasAmdIGPU(runtime)
|
||||
amdGPUExists, err := connector.HasAmdAPUOrGPU(runtime)
|
||||
if err != nil {
|
||||
return err
|
||||
}
|
||||
@@ -59,7 +62,7 @@ func (t *InstallAmdRocm) Execute(runtime connector.Runtime) error {
|
||||
if !amdGPUExists {
|
||||
return nil
|
||||
}
|
||||
rocmV, _ := utils.RocmVersion()
|
||||
rocmV, _ := connector.RocmVersion()
|
||||
min := semver.MustParse("7.1.1")
|
||||
if rocmV != nil && rocmV.LessThan(min) {
|
||||
return fmt.Errorf("detected ROCm version %s, which is lower than required %s; please uninstall existing ROCm/AMDGPU components before installation with command: olares-cli amdgpu uninstall", rocmV.Original(), min.Original())
|
||||
@@ -131,3 +134,163 @@ func (t *AmdgpuUninstallAction) Execute(runtime connector.Runtime) error {
|
||||
logger.Warn("Warning: Please reboot your machine after uninstall to fully remove ROCm components.")
|
||||
return nil
|
||||
}
|
||||
|
||||
// UpdateAmdContainerToolkitSource configures the AMD container toolkit APT repository.
|
||||
type UpdateAmdContainerToolkitSource struct {
|
||||
common.KubeAction
|
||||
}
|
||||
|
||||
func (t *UpdateAmdContainerToolkitSource) Execute(runtime connector.Runtime) error {
|
||||
// Install prerequisites
|
||||
if _, err := runtime.GetRunner().SudoCmd("apt update && apt install -y wget gnupg2", false, true); err != nil {
|
||||
return errors.Wrap(errors.WithStack(err), "failed to install prerequisites for AMD container toolkit")
|
||||
}
|
||||
|
||||
if _, err := runtime.GetRunner().SudoCmd("install -d -m 0755 /etc/apt/keyrings", false, true); err != nil {
|
||||
return errors.Wrap(errors.WithStack(err), "failed to create /etc/apt/keyrings directory")
|
||||
}
|
||||
|
||||
cmd := "wget https://repo.radeon.com/rocm/rocm.gpg.key -O - | gpg --dearmor | tee /etc/apt/keyrings/rocm.gpg > /dev/null"
|
||||
if _, err := runtime.GetRunner().SudoCmd(cmd, false, true); err != nil {
|
||||
return errors.Wrap(errors.WithStack(err), "failed to download and install AMD ROCm GPG key")
|
||||
}
|
||||
|
||||
si := runtime.GetSystemInfo()
|
||||
var ubuntuCodename string
|
||||
if si.IsUbuntuVersionEqual(connector.Ubuntu2404) {
|
||||
ubuntuCodename = "noble"
|
||||
} else if si.IsUbuntuVersionEqual(connector.Ubuntu2204) {
|
||||
ubuntuCodename = "jammy"
|
||||
} else {
|
||||
return fmt.Errorf("unsupported Ubuntu version for AMD container toolkit")
|
||||
}
|
||||
|
||||
aptSourceLine := fmt.Sprintf("deb [signed-by=/etc/apt/keyrings/rocm.gpg] https://repo.radeon.com/amd-container-toolkit/apt/ %s main", ubuntuCodename)
|
||||
cmd = fmt.Sprintf("echo '%s' > /etc/apt/sources.list.d/amd-container-toolkit.list", aptSourceLine)
|
||||
if _, err := runtime.GetRunner().SudoCmd(cmd, false, true); err != nil {
|
||||
return errors.Wrap(errors.WithStack(err), "failed to add AMD container toolkit APT source")
|
||||
}
|
||||
|
||||
logger.Infof("AMD container toolkit repository configured successfully")
|
||||
return nil
|
||||
}
|
||||
|
||||
// InstallAmdContainerToolkit installs the AMD container toolkit package.
|
||||
type InstallAmdContainerToolkit struct {
|
||||
common.KubeAction
|
||||
}
|
||||
|
||||
func (t *InstallAmdContainerToolkit) Execute(runtime connector.Runtime) error {
|
||||
logger.Infof("Installing AMD container toolkit...")
|
||||
if _, err := runtime.GetRunner().SudoCmd("apt update && apt install -y amd-container-toolkit", false, true); err != nil {
|
||||
return errors.Wrap(errors.WithStack(err), "failed to install AMD container toolkit")
|
||||
}
|
||||
logger.Infof("AMD container toolkit installed successfully")
|
||||
return nil
|
||||
}
|
||||
|
||||
// GenerateAndValidateAmdCDI generates and validates the AMD CDI spec.
|
||||
type GenerateAndValidateAmdCDI struct {
|
||||
common.KubeAction
|
||||
}
|
||||
|
||||
func (t *GenerateAndValidateAmdCDI) Execute(runtime connector.Runtime) error {
|
||||
// Ensure /etc/cdi directory exists
|
||||
if _, err := runtime.GetRunner().SudoCmd("install -d -m 0755 /etc/cdi", false, true); err != nil {
|
||||
return errors.Wrap(errors.WithStack(err), "failed to create /etc/cdi directory")
|
||||
}
|
||||
|
||||
// Generate CDI spec
|
||||
logger.Infof("Generating AMD CDI spec...")
|
||||
if _, err := runtime.GetRunner().SudoCmd("amd-ctk cdi generate --output=/etc/cdi/amd.json", false, true); err != nil {
|
||||
return errors.Wrap(errors.WithStack(err), "failed to generate AMD CDI spec")
|
||||
}
|
||||
|
||||
// Validate CDI spec
|
||||
logger.Infof("Validating AMD CDI spec...")
|
||||
if _, err := runtime.GetRunner().SudoCmd("amd-ctk cdi validate --path=/etc/cdi/amd.json", false, true); err != nil {
|
||||
return errors.Wrap(errors.WithStack(err), "failed to validate AMD CDI spec")
|
||||
}
|
||||
|
||||
logger.Infof("AMD CDI spec generated and validated successfully")
|
||||
return nil
|
||||
}
|
||||
|
||||
// UpdateNodeAmdGPUInfo updates Kubernetes node labels with AMD GPU information.
|
||||
type UpdateNodeAmdGPUInfo struct {
|
||||
common.KubeAction
|
||||
}
|
||||
|
||||
func (u *UpdateNodeAmdGPUInfo) Execute(runtime connector.Runtime) error {
|
||||
client, err := clientset.NewKubeClient()
|
||||
if err != nil {
|
||||
return errors.Wrap(errors.WithStack(err), "kubeclient create error")
|
||||
}
|
||||
|
||||
// Check if AMD GPU/APU exists
|
||||
amdGPUExists, err := connector.HasAmdAPUOrGPU(runtime)
|
||||
if err != nil {
|
||||
return err
|
||||
}
|
||||
if !amdGPUExists {
|
||||
logger.Info("AMD GPU/APU is not detected")
|
||||
return nil
|
||||
}
|
||||
|
||||
// Get ROCm version
|
||||
rocmV, err := connector.RocmVersion()
|
||||
if err != nil || rocmV == nil {
|
||||
logger.Info("ROCm is not installed")
|
||||
return nil
|
||||
}
|
||||
|
||||
rocmVersion := rocmV.Original()
|
||||
|
||||
// Determine GPU type (APU vs discrete GPU)
|
||||
gpuType := gpu.AmdGpuCardType
|
||||
if runtime.GetSystemInfo().IsAmdApu() {
|
||||
gpuType = gpu.AmdApuCardType
|
||||
}
|
||||
|
||||
// Use ROCm version as both driver and "cuda" version for AMD
|
||||
return gpu.UpdateNodeGpuLabel(context.Background(), client.Kubernetes(), &rocmVersion, nil, nil, &gpuType)
|
||||
}
|
||||
|
||||
// InstallAmdPlugin installs the AMD GPU device plugin DaemonSet.
|
||||
type InstallAmdPlugin struct {
|
||||
common.KubeAction
|
||||
}
|
||||
|
||||
func (t *InstallAmdPlugin) Execute(runtime connector.Runtime) error {
|
||||
amdPluginPath := path.Join(runtime.GetInstallerDir(), "wizard/config/gpu/nvidia/amdgpu-device-plugin.yaml")
|
||||
_, err := runtime.GetRunner().SudoCmd(fmt.Sprintf("kubectl apply -f %s", amdPluginPath), false, true)
|
||||
if err != nil {
|
||||
return errors.Wrap(errors.WithStack(err), "failed to apply AMD GPU device plugin")
|
||||
}
|
||||
|
||||
logger.Infof("AMD GPU device plugin installed successfully")
|
||||
return nil
|
||||
}
|
||||
|
||||
// CheckAmdGpuStatus checks if the AMD GPU device plugin pod is running.
|
||||
type CheckAmdGpuStatus struct {
|
||||
common.KubeAction
|
||||
}
|
||||
|
||||
func (t *CheckAmdGpuStatus) Execute(runtime connector.Runtime) error {
|
||||
kubectlpath, err := util.GetCommand(common.CommandKubectl)
|
||||
if err != nil {
|
||||
return fmt.Errorf("kubectl not found")
|
||||
}
|
||||
|
||||
// Check AMD device plugin pod status using the label from amdgpu-device-plugin.yaml
|
||||
selector := "name=amdgpu-dp-ds"
|
||||
cmd := fmt.Sprintf("%s get pod -n kube-system -l '%s' -o jsonpath='{.items[*].status.phase}'", kubectlpath, selector)
|
||||
|
||||
rphase, _ := runtime.GetRunner().SudoCmd(cmd, false, false)
|
||||
if rphase == "Running" {
|
||||
logger.Infof("AMD GPU device plugin is running")
|
||||
return nil
|
||||
}
|
||||
return fmt.Errorf("AMD GPU device plugin state is not Running (current: %s)", rphase)
|
||||
}
|
||||
|
||||
@@ -59,7 +59,7 @@ func (t *PatchTask) Execute(runtime connector.Runtime) error {
|
||||
pre_reqs = pre_reqs + " network-manager "
|
||||
}
|
||||
|
||||
pre_reqs += " conntrack socat apache2-utils net-tools make gcc bison flex tree unzip "
|
||||
pre_reqs += " conntrack socat apache2-utils net-tools make gcc bison flex tree unzip lshw"
|
||||
|
||||
var systemInfo = runtime.GetSystemInfo()
|
||||
var platformFamily = systemInfo.GetOsPlatformFamily()
|
||||
|
||||
@@ -338,7 +338,9 @@ func (c *CudaChecker) Name() string {
|
||||
}
|
||||
|
||||
func (c *CudaChecker) Check(runtime connector.Runtime) error {
|
||||
if !runtime.GetSystemInfo().IsLinux() {
|
||||
if !runtime.GetSystemInfo().IsLinux() ||
|
||||
// Skip check on NVIDIA DGX Spark systems, which have their own GPU management
|
||||
runtime.GetSystemInfo().IsGB10Chip() {
|
||||
return nil
|
||||
}
|
||||
|
||||
@@ -388,17 +390,17 @@ func (r *RocmChecker) Check(runtime connector.Runtime) error {
|
||||
return nil
|
||||
}
|
||||
|
||||
// detect AMD GPU presence
|
||||
amdGPUExists, err := utils.HasAmdIGPU(runtime)
|
||||
// detect AMD APU/GPU presence
|
||||
amdGPUExists, err := connector.HasAmdAPUOrGPU(runtime)
|
||||
if err != nil {
|
||||
return err
|
||||
}
|
||||
// no AMD GPU found, no need to check rocm
|
||||
// no AMD APU/GPU found, no need to check rocm
|
||||
if !amdGPUExists {
|
||||
return nil
|
||||
}
|
||||
|
||||
curV, err := utils.RocmVersion()
|
||||
curV, err := connector.RocmVersion()
|
||||
if err != nil && !os.IsNotExist(err) {
|
||||
return err
|
||||
}
|
||||
|
||||
@@ -159,6 +159,7 @@ const (
|
||||
CommandUpdatePciids = "update-pciids"
|
||||
CommandNmcli = "nmcli"
|
||||
CommandZRAMCtl = "zramctl"
|
||||
CommandChronyc = "chronyc"
|
||||
|
||||
CacheCommandKubectlPath = "kubectl_bin_path"
|
||||
CacheCommandMinikubePath = "minikube_bin_path"
|
||||
|
||||
@@ -210,6 +210,7 @@ func NewArgument() *Argument {
|
||||
arg.IsCloudInstance, _ = strconv.ParseBool(os.Getenv(ENV_TERMINUS_IS_CLOUD_VERSION))
|
||||
arg.IsOlaresInContainer = os.Getenv(ENV_CONTAINER_MODE) == "oic"
|
||||
si.IsOIC = arg.IsOlaresInContainer
|
||||
si.ProductName = arg.GetProductName()
|
||||
|
||||
// Ensure BaseDir is initialized before loading master.conf
|
||||
// so master host config can be loaded from ${base-dir}/master.conf reliably.
|
||||
@@ -415,6 +416,57 @@ func (a *Argument) SetSwapConfig(config SwapConfig) {
|
||||
a.Swappiness = config.Swappiness
|
||||
}
|
||||
|
||||
func (a *Argument) SetMasterHostOverride(config MasterHostConfig) {
|
||||
if config.MasterHost != "" {
|
||||
a.MasterHost = config.MasterHost
|
||||
}
|
||||
if config.MasterNodeName != "" {
|
||||
a.MasterNodeName = config.MasterNodeName
|
||||
}
|
||||
|
||||
// set a dummy name to bypass validity checks
|
||||
// as it will be overridden later when the node name is fetched
|
||||
if a.MasterNodeName == "" {
|
||||
a.MasterNodeName = "master"
|
||||
}
|
||||
if config.MasterSSHPassword != "" {
|
||||
a.MasterSSHPassword = config.MasterSSHPassword
|
||||
}
|
||||
if config.MasterSSHUser != "" {
|
||||
a.MasterSSHUser = config.MasterSSHUser
|
||||
}
|
||||
if config.MasterSSHPort != 0 {
|
||||
a.MasterSSHPort = config.MasterSSHPort
|
||||
}
|
||||
if config.MasterSSHPrivateKeyPath != "" {
|
||||
a.MasterSSHPrivateKeyPath = config.MasterSSHPrivateKeyPath
|
||||
}
|
||||
}
|
||||
|
||||
func (a *Argument) LoadMasterHostConfigIfAny() error {
|
||||
if a.BaseDir == "" {
|
||||
return errors.New("basedir unset")
|
||||
}
|
||||
content, err := os.ReadFile(filepath.Join(a.BaseDir, MasterHostConfigFile))
|
||||
if os.IsNotExist(err) {
|
||||
return nil
|
||||
}
|
||||
if err != nil {
|
||||
return err
|
||||
}
|
||||
return json.Unmarshal(content, a.MasterHostConfig)
|
||||
}
|
||||
|
||||
func (a *Argument) GetProductName() string {
|
||||
data, err := os.ReadFile("/sys/class/dmi/id/product_name")
|
||||
if err != nil {
|
||||
fmt.Printf("\nCannot get product name on this device, %s\n", err)
|
||||
return ""
|
||||
}
|
||||
|
||||
return strings.TrimSpace(string(data))
|
||||
}
|
||||
|
||||
func NewKubeRuntime(arg Argument) (*KubeRuntime, error) {
|
||||
loader := NewLoader(arg)
|
||||
cluster, err := loader.Load()
|
||||
|
||||
@@ -98,4 +98,6 @@ const (
|
||||
|
||||
const (
|
||||
ZfsSnapshotter = "/var/lib/containerd/io.containerd.snapshotter.v1.zfs"
|
||||
|
||||
ENV_GB10_CHIP = "GB10_CHIP" // for building images for NVIDIA GB10 Superchip systems
|
||||
)
|
||||
|
||||
117
cli/pkg/core/connector/amdgpu.go
Normal file
@@ -0,0 +1,117 @@
|
||||
package connector
|
||||
|
||||
import (
|
||||
"fmt"
|
||||
"os"
|
||||
"os/exec"
|
||||
"strings"
|
||||
|
||||
"github.com/Masterminds/semver/v3"
|
||||
)
|
||||
|
||||
func hasAmdAPU(cmdExec func(s string) (string, error)) (bool, error) {
|
||||
// Detect by CPU model names that bundle AMD AI NPU/graphics
|
||||
targets := []string{
|
||||
"AMD Ryzen AI Max+ 395",
|
||||
"AMD Ryzen AI Max 390",
|
||||
"AMD Ryzen AI Max 385",
|
||||
"AMD Ryzen AI 9 HX 375",
|
||||
"AMD Ryzen AI 9 HX 370",
|
||||
"AMD Ryzen AI 9 365",
|
||||
}
|
||||
// try lscpu first: extract 'Model name' field
|
||||
out, err := cmdExec("lscpu 2>/dev/null | awk -F': *' '/^Model name/{print $2; exit}' || true")
|
||||
if err != nil {
|
||||
return false, err
|
||||
}
|
||||
if out != "" {
|
||||
lo := strings.ToLower(strings.TrimSpace(out))
|
||||
for _, t := range targets {
|
||||
if strings.Contains(lo, strings.ToLower(t)) {
|
||||
return true, nil
|
||||
}
|
||||
}
|
||||
}
|
||||
// fallback to /proc/cpuinfo
|
||||
out, err = cmdExec("awk -F': *' '/^model name/{print $2; exit}' /proc/cpuinfo 2>/dev/null || true")
|
||||
if err != nil {
|
||||
return false, err
|
||||
}
|
||||
if out != "" {
|
||||
lo := strings.ToLower(strings.TrimSpace(out))
|
||||
for _, t := range targets {
|
||||
if strings.Contains(lo, strings.ToLower(t)) {
|
||||
return true, nil
|
||||
}
|
||||
}
|
||||
}
|
||||
return false, nil
|
||||
}
|
||||
|
||||
func hasAmdAPUOrGPU(cmdExec func(s string) (string, error)) (bool, error) {
|
||||
out, err := cmdExec("lspci -d '1002:' 2>/dev/null | grep 'AMD' || true")
|
||||
if err != nil {
|
||||
return false, err
|
||||
}
|
||||
if out != "" {
|
||||
return true, nil
|
||||
}
|
||||
out, err = cmdExec("lshw -c display -numeric -disable network 2>/dev/null | grep 'vendor: .* \\[1002\\]' || true")
|
||||
if err != nil {
|
||||
return false, err
|
||||
}
|
||||
if out != "" {
|
||||
return true, nil
|
||||
}
|
||||
return false, nil
|
||||
}
|
||||
|
||||
func HasAmdAPU(execRuntime Runtime) (bool, error) {
|
||||
return hasAmdAPU(func(s string) (string, error) {
|
||||
return execRuntime.GetRunner().SudoCmd(s, false, false)
|
||||
})
|
||||
}
|
||||
|
||||
func HasAmdAPULocal() (bool, error) {
|
||||
return hasAmdAPU(func(s string) (string, error) {
|
||||
out, err := exec.Command("sh", "-c", s).Output()
|
||||
if err != nil {
|
||||
return "", err
|
||||
}
|
||||
return string(out), nil
|
||||
})
|
||||
}
|
||||
|
||||
func HasAmdAPUOrGPULocal() (bool, error) {
|
||||
return hasAmdAPUOrGPU(func(s string) (string, error) {
|
||||
out, err := exec.Command("sh", "-c", s).Output()
|
||||
if err != nil {
|
||||
return "", err
|
||||
}
|
||||
return string(out), nil
|
||||
})
|
||||
}
|
||||
|
||||
func HasAmdAPUOrGPU(execRuntime Runtime) (bool, error) {
|
||||
return hasAmdAPUOrGPU(func(s string) (string, error) {
|
||||
return execRuntime.GetRunner().SudoCmd(s, false, false)
|
||||
})
|
||||
}
|
||||
|
||||
func RocmVersion() (*semver.Version, error) {
|
||||
const rocmVersionFile = "/opt/rocm/.info/version"
|
||||
data, err := os.ReadFile(rocmVersionFile)
|
||||
if err != nil {
|
||||
// no ROCm installed, nothing to check
|
||||
if os.IsNotExist(err) {
|
||||
return nil, err
|
||||
}
|
||||
return nil, err
|
||||
}
|
||||
curStr := strings.TrimSpace(string(data))
|
||||
cur, err := semver.NewVersion(curStr)
|
||||
if err != nil {
|
||||
return nil, fmt.Errorf("invalid rocm version: %s", curStr)
|
||||
}
|
||||
return cur, nil
|
||||
}
|
||||
@@ -76,6 +76,10 @@ type Systems interface {
|
||||
IsPveOrPveLxc() bool
|
||||
IsRaspbian() bool
|
||||
IsLinux() bool
|
||||
IsGB10Chip() bool
|
||||
IsAmdApu() bool
|
||||
IsAmdGPU() bool
|
||||
IsAmdGPUOrAPU() bool
|
||||
|
||||
IsUbuntu() bool
|
||||
IsDebian() bool
|
||||
@@ -111,16 +115,18 @@ type Systems interface {
|
||||
}
|
||||
|
||||
type SystemInfo struct {
|
||||
HostInfo *HostInfo `json:"host"`
|
||||
CpuInfo *CpuInfo `json:"cpu"`
|
||||
DiskInfo *DiskInfo `json:"disk"`
|
||||
MemoryInfo *MemoryInfo `json:"memory"`
|
||||
FsInfo *FileSystemInfo `json:"filesystem"`
|
||||
CgroupInfo *CgroupInfo `json:"cgroup,omitempty"`
|
||||
LocalIp string `json:"local_ip"`
|
||||
NatGateway string `json:"nat_gateway"`
|
||||
PkgManager string `json:"pkg_manager"`
|
||||
IsOIC bool `json:"is_oic,omitempty"`
|
||||
ProductName string `json:"product_name,omitempty"`
|
||||
HasAmdGPU bool `json:"has_amd_gpu,omitempty"`
|
||||
}
|
||||
|
||||
func (s *SystemInfo) IsSupport() error {
|
||||
@@ -235,6 +241,22 @@ func (s *SystemInfo) IsLinux() bool {
|
||||
return s.HostInfo.OsType == common.Linux
|
||||
}
|
||||
|
||||
func (s *SystemInfo) IsGB10Chip() bool {
|
||||
return s.CpuInfo.IsGB10Chip
|
||||
}
|
||||
|
||||
func (s *SystemInfo) IsAmdApu() bool {
|
||||
return s.CpuInfo.HasAmdAPU
|
||||
}
|
||||
|
||||
func (s *SystemInfo) IsAmdGPU() bool {
|
||||
return s.HasAmdGPU
|
||||
}
|
||||
|
||||
func (s *SystemInfo) IsAmdGPUOrAPU() bool {
|
||||
return s.CpuInfo.HasAmdAPU || s.HasAmdGPU
|
||||
}
|
||||
|
||||
func (s *SystemInfo) IsUbuntu() bool {
|
||||
return s.HostInfo.OsPlatformFamily == common.Ubuntu
|
||||
}
|
||||
@@ -322,6 +344,12 @@ func GetSystemInfo() *SystemInfo {
|
||||
si.MemoryInfo = getMem()
|
||||
si.FsInfo = getFs()
|
||||
|
||||
hasAmdGPU, err := getAmdGPU()
|
||||
if err != nil {
|
||||
panic(errors.Wrap(err, "failed to get amd apu/gpu"))
|
||||
}
|
||||
si.HasAmdGPU = hasAmdGPU
|
||||
|
||||
localIP, err := util.GetLocalIP()
|
||||
if err != nil {
|
||||
panic(errors.Wrap(err, "failed to get local ip"))
|
||||
@@ -437,6 +465,28 @@ type CpuInfo struct {
|
||||
CpuModel string `json:"cpu_model"`
|
||||
CpuLogicalCount int `json:"cpu_logical_count"`
|
||||
CpuPhysicalCount int `json:"cpu_physical_count"`
|
||||
IsGB10Chip bool `json:"is_gb10_chip,omitempty"`
|
||||
HasAmdAPU bool `json:"has_amd_apu,omitempty"`
|
||||
}
|
||||
|
||||
// Not considering the case where AMD GPU and AMD APU coexist.
|
||||
func getAmdGPU() (bool, error) {
|
||||
APUOrGPUExists, err := HasAmdAPUOrGPULocal()
|
||||
if err != nil {
|
||||
fmt.Printf("Error checking AMD APU/GPU: %v\n", err)
|
||||
return false, err
|
||||
}
|
||||
|
||||
hasAmdAPU, err := HasAmdAPULocal()
|
||||
if err != nil {
|
||||
fmt.Printf("Error checking AMD APU: %v\n", err)
|
||||
return false, err
|
||||
}
|
||||
|
||||
if APUOrGPUExists && !hasAmdAPU {
|
||||
return true, nil
|
||||
}
|
||||
return false, nil
|
||||
}
|
||||
|
||||
func getCpu() *CpuInfo {
|
||||
@@ -452,10 +502,35 @@ func getCpu() *CpuInfo {
|
||||
cpuModel = cpuInfo[0].ModelName
|
||||
}
|
||||
|
||||
// check if is GB10 chip
|
||||
isGB10Chip := false
|
||||
|
||||
// In Linux systems, it is recognized via lspci as "NVIDIA Corporation Device 2e12 (rev a1)
|
||||
// or NVIDIA Corporation GB20B [GB10] (rev a1)
|
||||
cmd := exec.Command("sh", "-c", "lspci | grep -i vga | egrep 'GB10|2e12'")
|
||||
output, err := cmd.Output()
|
||||
if err == nil && strings.TrimSpace(string(output)) != "" {
|
||||
isGB10Chip = true
|
||||
} else {
|
||||
gb10env := os.Getenv(common.ENV_GB10_CHIP)
|
||||
if gb10env == "1" || strings.EqualFold(gb10env, "true") {
|
||||
isGB10Chip = true
|
||||
}
|
||||
}
|
||||
|
||||
// check if it has amd igpu
|
||||
hasAmdAPU, err := HasAmdAPULocal()
|
||||
if err != nil {
|
||||
fmt.Printf("Error checking AMD iGPU: %v\n", err)
|
||||
hasAmdAPU = false
|
||||
}
|
||||
|
||||
return &CpuInfo{
|
||||
CpuModel: cpuModel,
|
||||
CpuLogicalCount: cpuLogicalCount,
|
||||
CpuPhysicalCount: cpuPhysicalCount,
|
||||
IsGB10Chip: isGB10Chip,
|
||||
HasAmdAPU: hasAmdAPU,
|
||||
}
|
||||
}
|
||||
|
||||
|
||||
@@ -27,7 +27,7 @@ var (
|
||||
ETCDService = template.Must(template.New("etcd.service").Parse(
|
||||
dedent.Dedent(`[Unit]
|
||||
Description=etcd
|
||||
After=network.target
|
||||
After=network-online.target
|
||||
StartLimitIntervalSec=0
|
||||
|
||||
[Service]
|
||||
|
||||
@@ -37,6 +37,11 @@ type CudaInstalled struct {
|
||||
}
|
||||
|
||||
func (p *CudaInstalled) PreCheck(runtime connector.Runtime) (bool, error) {
|
||||
if runtime.GetSystemInfo().IsGB10Chip() {
|
||||
logger.Debug("Assume DGX Spark or GB10 OEM system has CUDA installed")
|
||||
return true, nil
|
||||
}
|
||||
|
||||
st, err := utils.GetNvidiaStatus(runtime)
|
||||
if err != nil {
|
||||
return false, err
|
||||
@@ -50,17 +55,15 @@ func (p *CudaInstalled) PreCheck(runtime connector.Runtime) (bool, error) {
|
||||
|
||||
type CudaNotInstalled struct {
|
||||
common.KubePrepare
|
||||
CudaInstalled
|
||||
}
|
||||
|
||||
func (p *CudaNotInstalled) PreCheck(runtime connector.Runtime) (bool, error) {
|
||||
st, err := utils.GetNvidiaStatus(runtime)
|
||||
installed, err := p.CudaInstalled.PreCheck(runtime)
|
||||
if err != nil {
|
||||
return false, err
|
||||
}
|
||||
if st == nil || !st.Installed {
|
||||
return true, nil
|
||||
}
|
||||
return false, nil
|
||||
return !installed, nil
|
||||
}
|
||||
|
||||
type CurrentNodeInK8s struct {
|
||||
|
||||
@@ -325,7 +325,8 @@ func (t *CheckGpuStatus) Execute(runtime connector.Runtime) error {
|
||||
return fmt.Errorf("kubectl not found")
|
||||
}
|
||||
|
||||
cmd := fmt.Sprintf("%s get pod -n kube-system -l 'app.kubernetes.io/component=hami-device-plugin' -o jsonpath='{.items[*].status.phase}'", kubectlpath)
|
||||
selector := "app.kubernetes.io/component=hami-device-plugin"
|
||||
cmd := fmt.Sprintf("%s get pod -n kube-system -l '%s' -o jsonpath='{.items[*].status.phase}'", kubectlpath, selector)
|
||||
|
||||
rphase, _ := runtime.GetRunner().SudoCmd(cmd, false, false)
|
||||
if rphase == "Running" {
|
||||
@@ -363,7 +364,16 @@ func (u *UpdateNodeGPUInfo) Execute(runtime connector.Runtime) error {
|
||||
driverVersion = st.LibraryVersion
|
||||
}
|
||||
|
||||
return UpdateNodeGpuLabel(context.Background(), client.Kubernetes(), &driverVersion, &st.CudaVersion, &supported)
|
||||
// TODO:
|
||||
gpuType := NvidiaCardType
|
||||
switch {
|
||||
case runtime.GetSystemInfo().IsAmdApu():
|
||||
gpuType = AmdApuCardType
|
||||
case runtime.GetSystemInfo().IsGB10Chip():
|
||||
gpuType = GB10ChipType
|
||||
}
|
||||
|
||||
return UpdateNodeGpuLabel(context.Background(), client.Kubernetes(), &driverVersion, &st.CudaVersion, &supported, &gpuType)
|
||||
}
|
||||
|
||||
type RemoveNodeLabels struct {
|
||||
@@ -376,12 +386,12 @@ func (u *RemoveNodeLabels) Execute(runtime connector.Runtime) error {
|
||||
return errors.Wrap(errors.WithStack(err), "kubeclient create error")
|
||||
}
|
||||
|
||||
return UpdateNodeGpuLabel(context.Background(), client.Kubernetes(), nil, nil, nil)
|
||||
return UpdateNodeGpuLabel(context.Background(), client.Kubernetes(), nil, nil, nil, nil)
|
||||
}
|
||||
|
||||
// update k8s node labels gpu.bytetrade.io/driver and gpu.bytetrade.io/cuda.
|
||||
// if labels are not exists, create it.
|
||||
func UpdateNodeGpuLabel(ctx context.Context, client kubernetes.Interface, driver, cuda *string, supported *string) error {
|
||||
func UpdateNodeGpuLabel(ctx context.Context, client kubernetes.Interface, driver, cuda *string, supported *string, gpuType *string) error {
|
||||
// get node name from hostname
|
||||
nodeName, err := os.Hostname()
|
||||
if err != nil {
|
||||
@@ -408,6 +418,7 @@ func UpdateNodeGpuLabel(ctx context.Context, client kubernetes.Interface, driver
|
||||
{GpuDriverLabel, driver},
|
||||
{GpuCudaLabel, cuda},
|
||||
{GpuCudaSupportedLabel, supported},
|
||||
{GpuType, gpuType},
|
||||
} {
|
||||
old, ok := labels[label.key]
|
||||
switch {
|
||||
|
||||
@@ -8,4 +8,13 @@ var (
|
||||
GpuDriverLabel = GpuLabelGroup + "/driver"
|
||||
GpuCudaLabel = GpuLabelGroup + "/cuda"
|
||||
GpuCudaSupportedLabel = GpuLabelGroup + "/cuda-supported"
|
||||
GpuType = GpuLabelGroup + "/type"
|
||||
)
|
||||
|
||||
const (
|
||||
NvidiaCardType = "nvidia" // handling by HAMi
|
||||
AmdGpuCardType = "amd-gpu" //
|
||||
AmdApuCardType = "amd-apu" // AMD APU with integrated GPU , AI Max 395 etc.
|
||||
GB10ChipType = "nvidia-gb10" // NVIDIA GB10 Superchip & unified system memory
|
||||
StrixHaloChipType = "strix-halo" // AMD Strix Halo GPU & unified system memory
|
||||
)
|
||||
|
||||
@@ -1,6 +1,7 @@
|
||||
package cluster
|
||||
|
||||
import (
|
||||
"github.com/beclab/Olares/cli/pkg/amdgpu"
|
||||
"github.com/beclab/Olares/cli/pkg/common"
|
||||
"github.com/beclab/Olares/cli/pkg/core/module"
|
||||
"github.com/beclab/Olares/cli/pkg/gpu"
|
||||
@@ -58,6 +59,12 @@ func (l *linuxInstallPhaseBuilder) installGpuPlugin() phase {
|
||||
return []module.Module{
|
||||
&gpu.RestartK3sServiceModule{Skip: !(l.runtime.Arg.Kubetype == common.K3s)},
|
||||
&gpu.InstallPluginModule{Skip: skipGpuPlugin},
|
||||
&amdgpu.InstallAmdPluginModule{Skip: func() bool {
|
||||
if l.runtime.GetSystemInfo().IsAmdGPUOrAPU() {
|
||||
return false
|
||||
}
|
||||
return true
|
||||
}()},
|
||||
}
|
||||
}
|
||||
|
||||
|
||||
@@ -83,6 +83,13 @@ func (l *linuxPhaseBuilder) build() []module.Module {
|
||||
addModule(gpuModuleBuilder(func() []module.Module {
|
||||
return []module.Module{
|
||||
&amdgpu.InstallAmdRocmModule{},
|
||||
&amdgpu.InstallAmdContainerToolkitModule{Skip: func() bool {
|
||||
if l.runtime.GetSystemInfo().IsAmdGPUOrAPU() {
|
||||
return false
|
||||
}
|
||||
return true
|
||||
}(),
|
||||
},
|
||||
&gpu.InstallDriversModule{
|
||||
ManifestModule: manifest.ManifestModule{
|
||||
Manifest: l.manifestMap,
|
||||
|
||||
@@ -32,6 +32,7 @@ func PrepareSystemPipeline(components []string) error {
|
||||
arg.SetMinikubeProfile(viper.GetString(common.FlagMiniKubeProfile))
|
||||
arg.SetOlaresVersion(viper.GetString(common.FlagVersion))
|
||||
arg.SetStorage(getStorageConfig())
|
||||
arg.ClearMasterHostConfig()
|
||||
|
||||
runtime, err := common.NewKubeRuntime(*arg)
|
||||
if err != nil {
|
||||
|
||||
@@ -116,8 +116,14 @@ func (m *CheckPreparedModule) Init() {
|
||||
Action: &CheckPrepared{Force: m.Force},
|
||||
}
|
||||
|
||||
checkTimeSync := &task.LocalTask{
|
||||
Name: "CheckTimeSynced",
|
||||
Action: &WaitTimeSyncTask{},
|
||||
}
|
||||
|
||||
m.Tasks = []task.Interface{
|
||||
checkPrepared,
|
||||
checkTimeSync,
|
||||
}
|
||||
}
|
||||
|
||||
|
||||
@@ -1033,3 +1033,37 @@ func (a *SaveMasterHostConfig) Execute(runtime connector.Runtime) error {
|
||||
}
|
||||
return os.WriteFile(filepath.Join(runtime.GetBaseDir(), common.MasterHostConfigFile), content, 0644)
|
||||
}
|
||||
|
||||
type WaitTimeSyncTask struct {
|
||||
common.KubeAction
|
||||
}
|
||||
|
||||
func (t *WaitTimeSyncTask) Execute(runtime connector.Runtime) error {
|
||||
if chronyc, err := util.GetCommand(common.CommandChronyc); err == nil && chronyc != "" {
|
||||
ticker := time.NewTicker(2 * time.Second)
|
||||
timeout := time.NewTimer(5 * time.Minute)
|
||||
defer ticker.Stop()
|
||||
defer timeout.Stop()
|
||||
for {
|
||||
select {
|
||||
case <-ticker.C:
|
||||
// output format:
|
||||
// 68839BAF,104.131.155.175,3,1772592384.619310832,-0.001840593,0.001674238,0.001874871,-5.194,-0.001,0.112,0.162520304,0.010412607,1035.0,Normal
|
||||
if res, err := runtime.GetRunner().Cmd(fmt.Sprintf("%s -c tracking", chronyc), false, true); err != nil {
|
||||
logger.Errorf("failed to execute chronyc tracking: %v", err)
|
||||
return err
|
||||
} else {
|
||||
resToken := strings.Split(res, ",")
|
||||
// if the stratum of the server is 10 which means the local reference (hardware RTC) is active.
|
||||
if strings.ToLower(resToken[2]) != "10" { // Stratum
|
||||
logger.Infof("time synchronization is normal")
|
||||
return nil
|
||||
}
|
||||
}
|
||||
case <-timeout.C:
|
||||
return fmt.Errorf("timeout waiting for time synchronization")
|
||||
}
|
||||
}
|
||||
}
|
||||
return nil
|
||||
}
|
||||
|
||||
@@ -9,7 +9,6 @@ import (
|
||||
"github.com/beclab/Olares/cli/pkg/core/connector"
|
||||
"github.com/beclab/Olares/cli/pkg/core/logger"
|
||||
"github.com/beclab/Olares/cli/pkg/core/task"
|
||||
"github.com/beclab/Olares/cli/pkg/utils"
|
||||
)
|
||||
|
||||
type WelcomeMessage struct {
|
||||
@@ -73,7 +72,7 @@ func (t *WelcomeMessage) Execute(runtime connector.Runtime) error {
|
||||
|
||||
// If AMD GPU on Ubuntu 22.04/24.04, print warning about reboot for ROCm
|
||||
if si := runtime.GetSystemInfo(); si.IsUbuntu() && (si.IsUbuntuVersionEqual(connector.Ubuntu2204) || si.IsUbuntuVersionEqual(connector.Ubuntu2404)) {
|
||||
if hasAmd, _ := utils.HasAmdIGPU(runtime); hasAmd {
|
||||
if hasAmd, _ := connector.HasAmdAPUOrGPU(runtime); hasAmd {
|
||||
logger.Warnf("\x1b[31mWarning: To enable ROCm, please reboot your machine after activation.\x1b[0m")
|
||||
fmt.Println()
|
||||
}
|
||||
|
||||
@@ -380,7 +380,7 @@ func (a *upgradeGPUDriverIfNeeded) Execute(runtime connector.Runtime) error {
|
||||
if err != nil {
|
||||
return errors.Wrap(errors.WithStack(err), "kubeclient create error")
|
||||
}
|
||||
err = gpu.UpdateNodeGpuLabel(context.Background(), client.Kubernetes(), &targetDriverVersionStr, ptr.To(common.CurrentVerifiedCudaVersion), ptr.To("true"))
|
||||
err = gpu.UpdateNodeGpuLabel(context.Background(), client.Kubernetes(), &targetDriverVersionStr, ptr.To(common.CurrentVerifiedCudaVersion), ptr.To("true"), ptr.To(gpu.NvidiaCardType))
|
||||
if err != nil {
|
||||
return err
|
||||
}
|
||||
|
||||
@@ -1,67 +0,0 @@
|
||||
package utils
|
||||
|
||||
import (
|
||||
"fmt"
|
||||
"os"
|
||||
"strings"
|
||||
|
||||
"github.com/Masterminds/semver/v3"
|
||||
"github.com/beclab/Olares/cli/pkg/core/connector"
|
||||
)
|
||||
|
||||
func HasAmdIGPU(execRuntime connector.Runtime) (bool, error) {
|
||||
// Detect by CPU model names that bundle AMD AI NPU/graphics
|
||||
targets := []string{
|
||||
"AMD Ryzen AI Max+ 395",
|
||||
"AMD Ryzen AI Max 390",
|
||||
"AMD Ryzen AI Max 385",
|
||||
"AMD Ryzen AI 9 HX 375",
|
||||
"AMD Ryzen AI 9 HX 370",
|
||||
"AMD Ryzen AI 9 365",
|
||||
}
|
||||
// try lscpu first: extract 'Model name' field
|
||||
out, err := execRuntime.GetRunner().SudoCmd("lscpu 2>/dev/null | awk -F': *' '/^Model name/{print $2; exit}' || true", false, false)
|
||||
if err != nil {
|
||||
return false, err
|
||||
}
|
||||
if out != "" {
|
||||
lo := strings.ToLower(strings.TrimSpace(out))
|
||||
for _, t := range targets {
|
||||
if strings.Contains(lo, strings.ToLower(t)) {
|
||||
return true, nil
|
||||
}
|
||||
}
|
||||
}
|
||||
// fallback to /proc/cpuinfo
|
||||
out, err = execRuntime.GetRunner().SudoCmd("awk -F': *' '/^model name/{print $2; exit}' /proc/cpuinfo 2>/dev/null || true", false, false)
|
||||
if err != nil {
|
||||
return false, err
|
||||
}
|
||||
if out != "" {
|
||||
lo := strings.ToLower(strings.TrimSpace(out))
|
||||
for _, t := range targets {
|
||||
if strings.Contains(lo, strings.ToLower(t)) {
|
||||
return true, nil
|
||||
}
|
||||
}
|
||||
}
|
||||
return false, nil
|
||||
}
|
||||
|
||||
func RocmVersion() (*semver.Version, error) {
|
||||
const rocmVersionFile = "/opt/rocm/.info/version"
|
||||
data, err := os.ReadFile(rocmVersionFile)
|
||||
if err != nil {
|
||||
// no ROCm installed, nothing to check
|
||||
if os.IsNotExist(err) {
|
||||
return nil, err
|
||||
}
|
||||
return nil, err
|
||||
}
|
||||
curStr := strings.TrimSpace(string(data))
|
||||
cur, err := semver.NewVersion(curStr)
|
||||
if err != nil {
|
||||
return nil, fmt.Errorf("invalid rocm version: %s", curStr)
|
||||
}
|
||||
return cur, nil
|
||||
}
|
||||
@@ -1,7 +1,7 @@
|
||||
project_name: olaresd
|
||||
builds:
|
||||
- env:
|
||||
- CGO_ENABLED=0
|
||||
- CGO_ENABLED=1
|
||||
# - CC=aarch64-linux-gnu-gcc
|
||||
# - CXX=aarch64-linux-gnu-g++
|
||||
main: ./cmd/terminusd/main.go
|
||||
@@ -17,6 +17,12 @@ builds:
|
||||
goamd64: v1
|
||||
env:
|
||||
- CGO_ENABLED=1
|
||||
- goarch: arm64
|
||||
goos: linux
|
||||
env:
|
||||
- CGO_ENABLED=1
|
||||
- CC=aarch64-linux-gnu-gcc
|
||||
- CXX=aarch64-linux-gnu-g++
|
||||
tags:
|
||||
containers_image_openpgp
|
||||
ldflags:
|
||||
|
||||
@@ -20,6 +20,9 @@ build: fmt vet ;$(info $(M)...Begin to build terminusd.) @
|
||||
build-linux: fmt vet ;$(info $(M)...Begin to build terminusd (linux version).) @
|
||||
CGO_ENABLED=1 GOOS=linux GOARCH=amd64 go build -o bin/olaresd cmd/terminusd/main.go
|
||||
|
||||
build-arm: fmt vet ;$(info $(M)...Begin to build terminusd (linux version).) @
|
||||
CGO_ENABLED=1 GOOS=linux GOARCH=arm64 go build -o bin/olaresd cmd/terminusd/main.go
|
||||
|
||||
build-linux-in-docker:
|
||||
docker run -it --platform linux/amd64 --rm \
|
||||
-v $(current_dir):/olaresd \
|
||||
@@ -27,3 +30,11 @@ build-linux-in-docker:
|
||||
-e DEBIAN_FRONTEND=noninteractive \
|
||||
golang:1.24.11 \
|
||||
sh -c "apt-get -y update; apt-get -y install libudev-dev libpcap-dev; make build-linux"
|
||||
|
||||
build-arm-in-docker:
|
||||
docker run -it --platform linux/arm64 --rm \
|
||||
-v $(current_dir):/olaresd \
|
||||
-w /olaresd \
|
||||
-e DEBIAN_FRONTEND=noninteractive \
|
||||
golang:1.24.11 \
|
||||
sh -c "apt-get -y update; apt-get -y install libudev-dev libpcap-dev; make build-arm"
|
||||
|
||||
@@ -31,7 +31,7 @@ require (
|
||||
github.com/jaypipes/ghw v0.13.0
|
||||
github.com/jochenvg/go-udev v0.0.0-20171110120927-d6b62d56d37b
|
||||
github.com/joho/godotenv v1.5.1
|
||||
github.com/klauspost/cpuid/v2 v2.2.8
|
||||
github.com/klauspost/cpuid/v2 v2.3.0
|
||||
github.com/labstack/echo/v4 v4.0.0-00010101000000-000000000000
|
||||
github.com/libp2p/go-netroute v0.2.2
|
||||
github.com/mackerelio/go-osstat v0.2.5
|
||||
|
||||
@@ -205,8 +205,8 @@ github.com/kisielk/errcheck v1.5.0/go.mod h1:pFxgyoBC7bSaBwPgfKdkLd5X25qrDl4LWUI
|
||||
github.com/kisielk/gotool v1.0.0/go.mod h1:XhKaO+MFFWcvkIS/tQcRk01m1F5IRFswLeQ+oQHNcck=
|
||||
github.com/klauspost/compress v1.18.0 h1:c/Cqfb0r+Yi+JtIEq73FWXVkRonBlf0CRNYc8Zttxdo=
|
||||
github.com/klauspost/compress v1.18.0/go.mod h1:2Pp+KzxcywXVXMr50+X0Q/Lsb43OQHYWRCY2AiWywWQ=
|
||||
github.com/klauspost/cpuid/v2 v2.2.8 h1:+StwCXwm9PdpiEkPyzBXIy+M9KUb4ODm0Zarf1kS5BM=
|
||||
github.com/klauspost/cpuid/v2 v2.2.8/go.mod h1:Lcz8mBdAVJIBVzewtcLocK12l3Y+JytZYpaMropDUws=
|
||||
github.com/klauspost/cpuid/v2 v2.3.0 h1:S4CRMLnYUhGeDFDqkGriYKdfoFlDnMtqTiI/sFzhA9Y=
|
||||
github.com/klauspost/cpuid/v2 v2.3.0/go.mod h1:hqwkgyIinND0mEev00jJYCxPNVRVXFQeu1XKlok6oO0=
|
||||
github.com/konsorten/go-windows-terminal-sequences v1.0.1/go.mod h1:T0+1ngSBFLxvqU3pZ+m/2kptfBszLMUkC4ZK/EgS/cQ=
|
||||
github.com/kr/pretty v0.3.1 h1:flRD4NNwYAUpkphVc1HcthR4KEIFJ65n8Mw5qdRn3LE=
|
||||
github.com/kr/pretty v0.3.1/go.mod h1:hoEshYVHaxMs3cyo3Yncou5ZscifuDolrwPKZanG3xk=
|
||||
@@ -471,7 +471,6 @@ golang.org/x/sys v0.0.0-20211025201205-69cdffdb9359/go.mod h1:oPkhp1MJrh7nUepCBc
|
||||
golang.org/x/sys v0.0.0-20220715151400-c0bba94af5f8/go.mod h1:oPkhp1MJrh7nUepCBck5+mAzfO9JrbApNNgaTdGDITg=
|
||||
golang.org/x/sys v0.0.0-20220908164124-27713097b956/go.mod h1:oPkhp1MJrh7nUepCBck5+mAzfO9JrbApNNgaTdGDITg=
|
||||
golang.org/x/sys v0.2.0/go.mod h1:oPkhp1MJrh7nUepCBck5+mAzfO9JrbApNNgaTdGDITg=
|
||||
golang.org/x/sys v0.5.0/go.mod h1:oPkhp1MJrh7nUepCBck5+mAzfO9JrbApNNgaTdGDITg=
|
||||
golang.org/x/sys v0.6.0/go.mod h1:oPkhp1MJrh7nUepCBck5+mAzfO9JrbApNNgaTdGDITg=
|
||||
golang.org/x/sys v0.10.0/go.mod h1:oPkhp1MJrh7nUepCBck5+mAzfO9JrbApNNgaTdGDITg=
|
||||
golang.org/x/sys v0.38.0 h1:3yZWxaJjBmCWXqhN1qh02AkOnCQ1poK6oF+a7xWL6Gc=
|
||||
|
||||
@@ -1,5 +1,5 @@
|
||||
//go:build !(linux && amd64)
|
||||
// +build !linux !amd64
|
||||
//go:build !linux
|
||||
// +build !linux
|
||||
|
||||
package intranet
|
||||
|
||||
|
||||
@@ -1,5 +1,5 @@
|
||||
//go:build linux && amd64
|
||||
// +build linux,amd64
|
||||
//go:build linux
|
||||
// +build linux
|
||||
|
||||
package intranet
|
||||
|
||||
|
||||
@@ -27,7 +27,7 @@ func WithSerial(ctx context.Context, serial string) context.Context {
|
||||
}
|
||||
|
||||
func (w *usbWatcher) Watch(ctx context.Context) {
|
||||
retry := 1
|
||||
retry := 3
|
||||
devs, err := utils.DetectdUsbDevices(ctx)
|
||||
for {
|
||||
if err != nil {
|
||||
|
||||
@@ -43,11 +43,12 @@ type state struct {
|
||||
Disk string `json:"disk"`
|
||||
|
||||
// network info
|
||||
WikiConnected bool `json:"wifiConnected"`
|
||||
WifiSSID *string `json:"wifiSSID,omitempty"`
|
||||
WiredConnected bool `json:"wiredConnected"`
|
||||
HostIP string `json:"hostIp"`
|
||||
ExternalIP string `json:"externalIp"`
|
||||
WikiConnected bool `json:"wifiConnected"`
|
||||
WifiSSID *string `json:"wifiSSID,omitempty"`
|
||||
WiredConnected bool `json:"wiredConnected"`
|
||||
HostIP string `json:"hostIp"`
|
||||
ExternalIP string `json:"externalIp"`
|
||||
ExternalIPProbeTime time.Time `json:"-"`
|
||||
|
||||
// installing / uninstalling / upgrading state
|
||||
InstallingState ProcessingState `json:"installingState"`
|
||||
@@ -130,7 +131,8 @@ func CheckCurrentStatus(ctx context.Context) error {
|
||||
klog.Info("current state: ", CurrentState.TerminusState)
|
||||
}()
|
||||
|
||||
utils.ForceMountHdd(ctx)
|
||||
// Deprecated, only for Olares Zero
|
||||
// utils.ForceMountHdd(ctx)
|
||||
|
||||
// set default value
|
||||
if CurrentState.TerminusVersion == nil {
|
||||
@@ -237,11 +239,18 @@ func CheckCurrentStatus(ctx context.Context) error {
|
||||
return nil
|
||||
}
|
||||
|
||||
if !slices.ContainsFunc(ips, func(i *nets.NetInterface) bool { return i.IP == hostIp }) {
|
||||
// wrong host ip
|
||||
klog.Warningf("host ip %s not in internal ips, try to fix it", hostIp)
|
||||
if err = fix(); err != nil {
|
||||
return err
|
||||
if hostIp != "" {
|
||||
if !slices.ContainsFunc(ips, func(i *nets.NetInterface) bool { return i.IP == hostIp }) {
|
||||
// wrong host ip
|
||||
klog.Warningf("host ip %s not in internal ips, try to fix it", hostIp)
|
||||
if err = fix(); err != nil {
|
||||
klog.Warning("fix host ip failed,", err)
|
||||
}
|
||||
} else if hostIpInFile, err := nets.GetHostIpFromHostsFile(hostname); err == nil && hostIpInFile != "" && hostIpInFile != hostIp {
|
||||
klog.Warningf("host ip %s in hosts file is different from current host ip %s, try to fix it", hostIpInFile, hostIp)
|
||||
if err = fix(); err != nil {
|
||||
klog.Warning("fix host ip failed,", err)
|
||||
}
|
||||
}
|
||||
}
|
||||
|
||||
@@ -250,12 +259,15 @@ func CheckCurrentStatus(ctx context.Context) error {
|
||||
} else if conflict {
|
||||
klog.Warningf("domain %s conflict with internal ip, try to fix it", hostname)
|
||||
if err = fix(); err != nil {
|
||||
return err
|
||||
klog.Warning("fix host ip failed,", err)
|
||||
}
|
||||
}
|
||||
|
||||
CurrentState.HostIP = hostIp
|
||||
CurrentState.ExternalIP = nets.GetMyExternalIPAddr()
|
||||
if time.Since(CurrentState.ExternalIPProbeTime) > 1*time.Minute {
|
||||
CurrentState.ExternalIP = nets.GetMyExternalIPAddr()
|
||||
CurrentState.ExternalIPProbeTime = time.Now()
|
||||
}
|
||||
|
||||
// get olares state
|
||||
|
||||
|
||||
@@ -181,6 +181,7 @@ var (
|
||||
// {"installing k8s and kubesphere", "3%", 3},
|
||||
// {"Generating \"ca\" certificate and key", "3%", 3},
|
||||
// {"PatchKsCoreStatus success", "6%", 6},
|
||||
{"time synchronization is normal", "3%", 3},
|
||||
{"k8s and kubesphere installation is complete", "10%", 10},
|
||||
{"Installing account ...", "15%", 15},
|
||||
{"Installing settings ...", "20%", 20},
|
||||
|
||||
@@ -4,14 +4,17 @@ import (
|
||||
"crypto/tls"
|
||||
"encoding/json"
|
||||
"errors"
|
||||
"io/ioutil"
|
||||
"io"
|
||||
"net"
|
||||
"net/http"
|
||||
"net/netip"
|
||||
"net/url"
|
||||
"os"
|
||||
"strings"
|
||||
"time"
|
||||
|
||||
"github.com/beclab/Olares/daemon/pkg/commands"
|
||||
"github.com/gofiber/fiber/v2/log"
|
||||
"github.com/libp2p/go-netroute"
|
||||
pkg_errors "github.com/pkg/errors"
|
||||
"github.com/txn2/txeh"
|
||||
@@ -267,15 +270,7 @@ func GetHostIpFromHostsFile(domain string) (string, error) {
|
||||
return ip, nil
|
||||
}
|
||||
|
||||
// GetMyExternalIPAddr get my network outgoing ip address
|
||||
func GetMyExternalIPAddr() string {
|
||||
sites := map[string]string{
|
||||
"httpbin": "https://httpbin.org/ip",
|
||||
"ifconfigme": "https://ifconfig.me/all.json",
|
||||
"externalip": "https://myexternalip.com/json",
|
||||
"joinolares": "https://myip.joinolares.cn/ip",
|
||||
}
|
||||
|
||||
type httpBin struct {
|
||||
Origin string `json:"origin"`
|
||||
}
|
||||
@@ -295,80 +290,80 @@ func GetMyExternalIPAddr() string {
|
||||
IP string `json:"ip"`
|
||||
}
|
||||
|
||||
var unmarshalFuncs = map[string]func(v []byte) string{
|
||||
"httpbin": func(v []byte) string {
|
||||
var hb httpBin
|
||||
if err := json.Unmarshal(v, &hb); err == nil && hb.Origin != "" {
|
||||
return hb.Origin
|
||||
}
|
||||
return ""
|
||||
},
|
||||
"ifconfigme": func(v []byte) string {
|
||||
var ifMe ifconfigMe
|
||||
if err := json.Unmarshal(v, &ifMe); err == nil && ifMe.IPAddr != "" {
|
||||
return ifMe.IPAddr
|
||||
}
|
||||
return ""
|
||||
},
|
||||
"externalip": func(v []byte) string {
|
||||
var extip externalIP
|
||||
if err := json.Unmarshal(v, &extip); err == nil && extip.IP != "" {
|
||||
return extip.IP
|
||||
}
|
||||
return ""
|
||||
},
|
||||
"joinolares": func(v []byte) string {
|
||||
return strings.TrimSpace(string(v))
|
||||
},
|
||||
type siteConfig struct {
|
||||
url string
|
||||
unmarshalFunc func(v []byte) string
|
||||
}
|
||||
|
||||
ch := make(chan any, len(sites))
|
||||
|
||||
for site := range sites {
|
||||
go func(name string) {
|
||||
http.DefaultTransport.(*http.Transport).TLSClientConfig = &tls.Config{InsecureSkipVerify: true}
|
||||
c := http.Client{Timeout: 5 * time.Second}
|
||||
resp, err := c.Get(sites[name])
|
||||
if err != nil {
|
||||
ch <- err
|
||||
return
|
||||
}
|
||||
defer resp.Body.Close()
|
||||
respBytes, err := ioutil.ReadAll(resp.Body)
|
||||
if err != nil {
|
||||
ch <- err
|
||||
return
|
||||
}
|
||||
|
||||
ip := unmarshalFuncs[name](respBytes)
|
||||
//println(name, site, ip)
|
||||
ch <- ip
|
||||
}(site)
|
||||
externalIPServiceURL, err := url.JoinPath(commands.OLARES_REMOTE_SERVICE, "/myip/ip")
|
||||
if err != nil {
|
||||
klog.Error("failed to parse external IP service URL, ", err)
|
||||
return ""
|
||||
}
|
||||
|
||||
tr := time.NewTimer(time.Duration(5*len(sites)+3) * time.Second)
|
||||
|
||||
LOOP:
|
||||
for i := 0; i < len(sites); i++ {
|
||||
select {
|
||||
case r, ok := <-ch:
|
||||
if !ok {
|
||||
continue
|
||||
}
|
||||
|
||||
switch v := r.(type) {
|
||||
case string:
|
||||
ip := net.ParseIP(v)
|
||||
if ip != nil && ip.To4() != nil && !ip.IsLoopback() && !ip.IsMulticast() {
|
||||
return v
|
||||
sites := []siteConfig{
|
||||
{
|
||||
url: externalIPServiceURL,
|
||||
unmarshalFunc: func(v []byte) string {
|
||||
return strings.TrimSpace(string(v))
|
||||
},
|
||||
},
|
||||
{
|
||||
url: "https://httpbin.org/ip",
|
||||
unmarshalFunc: func(v []byte) string {
|
||||
var hb httpBin
|
||||
if err := json.Unmarshal(v, &hb); err == nil && hb.Origin != "" {
|
||||
return hb.Origin
|
||||
}
|
||||
case error:
|
||||
klog.Warningf("got an error, %v", v)
|
||||
}
|
||||
case <-tr.C:
|
||||
tr.Stop()
|
||||
klog.Warning("timed out")
|
||||
break LOOP
|
||||
return ""
|
||||
},
|
||||
},
|
||||
{
|
||||
url: "https://ifconfig.me/all.json",
|
||||
unmarshalFunc: func(v []byte) string {
|
||||
var ifMe ifconfigMe
|
||||
if err := json.Unmarshal(v, &ifMe); err == nil && ifMe.IPAddr != "" {
|
||||
return ifMe.IPAddr
|
||||
}
|
||||
return ""
|
||||
},
|
||||
},
|
||||
{
|
||||
url: "https://myexternalip.com/json",
|
||||
unmarshalFunc: func(v []byte) string {
|
||||
var extip externalIP
|
||||
if err := json.Unmarshal(v, &extip); err == nil && extip.IP != "" {
|
||||
return extip.IP
|
||||
}
|
||||
return ""
|
||||
},
|
||||
},
|
||||
}
|
||||
|
||||
client := http.Client{
|
||||
Timeout: 3 * time.Second,
|
||||
Transport: &http.Transport{
|
||||
TLSClientConfig: &tls.Config{InsecureSkipVerify: true},
|
||||
},
|
||||
}
|
||||
for _, site := range sites {
|
||||
resp, err := client.Get(site.url)
|
||||
if err != nil {
|
||||
log.Warnf("failed to get external ip from %s, %v", site.url, err)
|
||||
continue
|
||||
}
|
||||
|
||||
respBytes, readErr := io.ReadAll(resp.Body)
|
||||
resp.Body.Close()
|
||||
if readErr != nil {
|
||||
log.Warnf("failed to read response from %s, %v", site.url, readErr)
|
||||
continue
|
||||
}
|
||||
|
||||
ipStr := site.unmarshalFunc(respBytes)
|
||||
ip := net.ParseIP(ipStr)
|
||||
if ip != nil && ip.To4() != nil && !ip.IsLoopback() && !ip.IsMulticast() {
|
||||
return ipStr
|
||||
}
|
||||
}
|
||||
|
||||
|
||||
@@ -5,6 +5,7 @@ package utils
|
||||
|
||||
import (
|
||||
"context"
|
||||
"encoding/json"
|
||||
"errors"
|
||||
"fmt"
|
||||
"net"
|
||||
@@ -42,7 +43,7 @@ func detectdStorageDevices(ctx context.Context, bus string) (usbDevs []storageDe
|
||||
for _, d := range ds {
|
||||
if d.Properties()["ID_BUS"] == bus {
|
||||
usbs = append(usbs, d)
|
||||
} else if d.Properties()["ID_BUS"] == "ata" &&
|
||||
} else if (d.Properties()["ID_BUS"] == "ata" || d.Properties()["ID_BUS"] == "scsi") &&
|
||||
d.Properties()["ID_USB_TYPE"] == "disk" &&
|
||||
bus == "usb" {
|
||||
usbs = append(usbs, d)
|
||||
@@ -97,14 +98,18 @@ func detectdStorageDevices(ctx context.Context, bus string) (usbDevs []storageDe
|
||||
|
||||
idSerial := device.Properties()["ID_SERIAL"]
|
||||
idSerialShort := device.Properties()["ID_SERIAL_SHORT"]
|
||||
idUsbSerial := device.Properties()["ID_USB_SERIAL"]
|
||||
idUsbSerialShort := device.Properties()["ID_USB_SERIAL_SHORT"]
|
||||
partUUID := device.Properties()["ID_PART_ENTRY_UUID"]
|
||||
|
||||
usbDevs = append(usbDevs, storageDevice{
|
||||
DevPath: devPath,
|
||||
Vender: vender,
|
||||
IDSerial: idSerial,
|
||||
IDSerialShort: idSerialShort,
|
||||
PartitionUUID: partUUID,
|
||||
DevPath: devPath,
|
||||
Vender: vender,
|
||||
IDSerial: idSerial,
|
||||
IDSerialShort: idSerialShort,
|
||||
IDUsbSerial: idUsbSerial,
|
||||
IDUsbSerialShort: idUsbSerialShort,
|
||||
PartitionUUID: partUUID,
|
||||
})
|
||||
}
|
||||
|
||||
@@ -199,7 +204,10 @@ func MountedHddPath(ctx context.Context) ([]string, error) {
|
||||
|
||||
func FilterBySerial(serial string) func(dev storageDevice) bool {
|
||||
return func(dev storageDevice) bool {
|
||||
return strings.HasSuffix(serial, dev.IDSerial) || strings.HasSuffix(serial, dev.IDSerialShort)
|
||||
return strings.HasSuffix(serial, dev.IDSerial) ||
|
||||
strings.HasSuffix(serial, dev.IDSerialShort) ||
|
||||
strings.HasSuffix(serial, dev.IDUsbSerial) ||
|
||||
strings.HasSuffix(serial, dev.IDUsbSerialShort)
|
||||
}
|
||||
}
|
||||
|
||||
@@ -270,7 +278,17 @@ func MountUsbDevice(ctx context.Context, mountBaseDir string, dev []storageDevic
|
||||
continue
|
||||
}
|
||||
|
||||
if err = mounter.Mount(d.DevPath, mkMountDir, "", []string{"uid=1000", "gid=1000"}); err != nil {
|
||||
options := []string{}
|
||||
fsType, err := getFsTypeOfDevice(ctx, d.DevPath)
|
||||
if err != nil {
|
||||
klog.Warning("get fs type of device error, ", err, ", ", d.DevPath)
|
||||
} else {
|
||||
if strings.Contains(fsType, "FAT") || strings.Contains(fsType, "NTFS") {
|
||||
options = append(options, "uid=1000", "gid=1000")
|
||||
}
|
||||
}
|
||||
|
||||
if err = mounter.Mount(d.DevPath, mkMountDir, "", options); err != nil {
|
||||
klog.Warning("mount usb error, ", err, ", ", d.DevPath, ", ", mkMountDir)
|
||||
// clear the empty mount dir
|
||||
// do not use remove all, only remove the mount point path, assume it's an empty dir
|
||||
@@ -685,3 +703,35 @@ func isDeviceExists(devicePath string) bool {
|
||||
_, err := os.Stat(devicePath)
|
||||
return !os.IsNotExist(err)
|
||||
}
|
||||
|
||||
func getFsTypeOfDevice(ctx context.Context, devicePath string) (string, error) {
|
||||
// output format
|
||||
// {
|
||||
// "blockdevices": [
|
||||
// {
|
||||
// "fstype": "ext4"
|
||||
// }
|
||||
// ]
|
||||
// }
|
||||
cmd := exec.CommandContext(ctx, "lsblk", "-f", devicePath, "-o", "fstype", "-J")
|
||||
output, err := cmd.CombinedOutput()
|
||||
if err != nil {
|
||||
return "", err
|
||||
}
|
||||
|
||||
var result struct {
|
||||
BlockDevices []struct {
|
||||
FsType string `json:"fstype"`
|
||||
} `json:"blockdevices"`
|
||||
}
|
||||
|
||||
if err := json.Unmarshal(output, &result); err != nil {
|
||||
return "", err
|
||||
}
|
||||
|
||||
if len(result.BlockDevices) == 0 {
|
||||
return "", fmt.Errorf("no block devices found for %s", devicePath)
|
||||
}
|
||||
|
||||
return result.BlockDevices[0].FsType, nil
|
||||
}
|
||||
|
||||
@@ -3,11 +3,13 @@ package utils
|
||||
import "strings"
|
||||
|
||||
type storageDevice struct {
|
||||
DevPath string
|
||||
Vender string
|
||||
IDSerial string
|
||||
IDSerialShort string
|
||||
PartitionUUID string
|
||||
DevPath string
|
||||
Vender string
|
||||
IDSerial string
|
||||
IDSerialShort string
|
||||
IDUsbSerial string
|
||||
IDUsbSerialShort string
|
||||
PartitionUUID string
|
||||
}
|
||||
|
||||
type mountedPath struct {
|
||||
|
||||
@@ -213,12 +213,28 @@ export const developerSidebar: DefaultTheme.Sidebar = {
|
||||
// },
|
||||
// ],
|
||||
// },
|
||||
{
|
||||
text: "Application environment variables",
|
||||
link: "/developer/develop/app-env-index",
|
||||
collapsed: true,
|
||||
items: [
|
||||
{
|
||||
text: "Declarative environment variables",
|
||||
link: "/developer/develop/app-env-vars",
|
||||
collapsed: true,
|
||||
},
|
||||
{
|
||||
text: "System-injected variables",
|
||||
link: "/developer/develop/app-sys-injected-variables",
|
||||
},
|
||||
]
|
||||
},
|
||||
{
|
||||
text: "Middleware",
|
||||
link: "/developer/develop/mw-overview",
|
||||
collapsed: true,
|
||||
items: [
|
||||
{
|
||||
/*{
|
||||
text: "Elasticsearch",
|
||||
collapsed: true,
|
||||
items :[
|
||||
@@ -230,7 +246,7 @@ export const developerSidebar: DefaultTheme.Sidebar = {
|
||||
link: "/developer/develop/mw-view-es-data",
|
||||
},
|
||||
]
|
||||
},
|
||||
},*/
|
||||
{
|
||||
text: "Grafana",
|
||||
link :"/developer/develop/mw-view-grafana-data",
|
||||
|
||||
@@ -228,12 +228,27 @@ export const developerSidebar: DefaultTheme.Sidebar = {
|
||||
// },
|
||||
// ],
|
||||
// },
|
||||
{
|
||||
text: "应用环境变量",
|
||||
link: "/zh/developer/develop/app-env-index",
|
||||
collapsed: true,
|
||||
items: [
|
||||
{
|
||||
text: "声明式环境变量",
|
||||
link: "/zh/developer/develop/app-env-vars",
|
||||
},
|
||||
{
|
||||
text: "系统注入的运行时变量",
|
||||
link: "/zh/developer/develop/app-sys-injected-variables",
|
||||
},
|
||||
]
|
||||
},
|
||||
{
|
||||
text: "中间件",
|
||||
link: "/zh/developer/develop/mw-overview",
|
||||
collapsed: true,
|
||||
items: [
|
||||
{
|
||||
/*{
|
||||
text: "Elasticsearch",
|
||||
collapsed: true,
|
||||
items :[
|
||||
@@ -245,7 +260,7 @@ export const developerSidebar: DefaultTheme.Sidebar = {
|
||||
link: "zh/developer/develop/mw-view-es-data",
|
||||
},
|
||||
]
|
||||
},
|
||||
},*/
|
||||
{
|
||||
text: "Grafana",
|
||||
link: "zh/developer/develop/mw-view-grafana-data",
|
||||
|
||||
@@ -45,6 +45,10 @@ const side = {
|
||||
text: "Missing apps in Market",
|
||||
link: "/manual/help/ts-missing-apps",
|
||||
},
|
||||
{
|
||||
text: "LarePass VPN not working",
|
||||
link: "/manual/help/ts-larepass-vpn-not-working",
|
||||
},
|
||||
],
|
||||
},
|
||||
],
|
||||
@@ -148,7 +152,6 @@ const side = {
|
||||
},
|
||||
{
|
||||
text: "Olares applications",
|
||||
link: "/manual/olares/",
|
||||
items: [
|
||||
{ text: "Desktop", link: "/manual/olares/desktop", },
|
||||
{
|
||||
|
||||
@@ -24,9 +24,13 @@ export const oneSidebar: DefaultTheme.Sidebar = {
|
||||
link: "/one/first-boot",
|
||||
},
|
||||
{
|
||||
text: "Access Olares securely",
|
||||
text: "Access Olares via VPN",
|
||||
link: "/one/access-olares-via-vpn",
|
||||
},
|
||||
{
|
||||
text: "Access Olares via .local domain",
|
||||
link: "/one/access-olares-via-local-domain",
|
||||
},
|
||||
{
|
||||
text: "Redeem membership",
|
||||
link: "/one/redeem-membership",
|
||||
@@ -202,10 +206,6 @@ export const oneSidebar: DefaultTheme.Sidebar = {
|
||||
}
|
||||
]
|
||||
},
|
||||
{
|
||||
text: "Create a bootable USB",
|
||||
link: "/one/create-drive",
|
||||
},
|
||||
]
|
||||
},
|
||||
{
|
||||
@@ -216,14 +216,28 @@ export const oneSidebar: DefaultTheme.Sidebar = {
|
||||
link: "/one/update",
|
||||
},
|
||||
{
|
||||
text: "Back up & restore",
|
||||
text: "Back up & restore data",
|
||||
link: "/one/backup-resotre",
|
||||
},
|
||||
{
|
||||
text: "Factory reset",
|
||||
link: "/one/factory-reset",
|
||||
text: "Restore Olares One",
|
||||
collapsed: true,
|
||||
items: [
|
||||
{
|
||||
text: "Factory reset",
|
||||
link: "/one/factory-reset",
|
||||
},
|
||||
{
|
||||
text: "Restore BIOS defaults",
|
||||
link: "/one/factory-reset-in-bios",
|
||||
},
|
||||
{
|
||||
text: "Reinstall Olares OS",
|
||||
link: "/one/create-drive",
|
||||
},
|
||||
],
|
||||
},
|
||||
]
|
||||
},
|
||||
],
|
||||
}
|
||||
}
|
||||
|
||||
@@ -24,11 +24,15 @@ export const oneSidebar: DefaultTheme.Sidebar = {
|
||||
link: "/zh/one/first-boot",
|
||||
},
|
||||
{
|
||||
text: "Access Olares securely",
|
||||
text: "Access Olares via VPN",
|
||||
link: "/zh/one/access-olares-via-vpn",
|
||||
},
|
||||
{
|
||||
text: "Redeem Olares Space membership",
|
||||
text: "Access Olares via .local domain",
|
||||
link: "/zh/one/access-olares-via-local-domain",
|
||||
},
|
||||
{
|
||||
text: "Redeem membership",
|
||||
link: "/zh/one/redeem-membership",
|
||||
},
|
||||
]
|
||||
@@ -165,7 +169,7 @@ export const oneSidebar: DefaultTheme.Sidebar = {
|
||||
},
|
||||
{
|
||||
text: "Connect two Olares One",
|
||||
link: "/zh/one/connect-two-olares-one"
|
||||
link: "/zh/one/connect-two-olares-one",
|
||||
// items:
|
||||
// [
|
||||
// {
|
||||
@@ -202,10 +206,6 @@ export const oneSidebar: DefaultTheme.Sidebar = {
|
||||
}
|
||||
]
|
||||
},
|
||||
{
|
||||
text: "Create a bootable USB",
|
||||
link: "/zh/one/create-drive",
|
||||
},
|
||||
]
|
||||
},
|
||||
{
|
||||
@@ -216,14 +216,28 @@ export const oneSidebar: DefaultTheme.Sidebar = {
|
||||
link: "/zh/one/update",
|
||||
},
|
||||
{
|
||||
text: "Back up & restore",
|
||||
text: "Back up & restore data",
|
||||
link: "/zh/one/backup-resotre",
|
||||
},
|
||||
{
|
||||
text: "Factory reset",
|
||||
link: "/zh/one/factory-reset",
|
||||
text: "Restore Olares One",
|
||||
collapsed: true,
|
||||
items: [
|
||||
{
|
||||
text: "Factory reset",
|
||||
link: "/zh/one/factory-reset",
|
||||
},
|
||||
{
|
||||
text: "Restore BIOS defaults",
|
||||
link: "/zh/one/factory-reset-in-bios",
|
||||
},
|
||||
{
|
||||
text: "Reinstall Olares OS",
|
||||
link: "/zh/one/create-drive",
|
||||
},
|
||||
],
|
||||
},
|
||||
]
|
||||
},
|
||||
],
|
||||
}
|
||||
}
|
||||
|
||||
@@ -43,6 +43,10 @@ const side = {
|
||||
{
|
||||
text: "应用市场应用缺失",
|
||||
link: "/zh/manual/help/ts-missing-apps",
|
||||
},
|
||||
{
|
||||
text: "LarePass VPN 无法使用",
|
||||
link: "/zh/manual/help/ts-larepass-vpn-not-working",
|
||||
}
|
||||
],
|
||||
},
|
||||
@@ -146,7 +150,6 @@ const side = {
|
||||
},
|
||||
{
|
||||
"text": "Olares 应用",
|
||||
"link": "/zh/manual/olares/",
|
||||
"items": [
|
||||
{ "text": "桌面", "link": "/zh/manual/olares/desktop" },
|
||||
{
|
||||
@@ -462,10 +465,10 @@ const side = {
|
||||
text: "设置自定义域名",
|
||||
link: "/zh/manual/best-practices/set-custom-domain",
|
||||
},
|
||||
{
|
||||
/*{
|
||||
text: "使用 Wise 管理知识",
|
||||
link: "/zh/manual/best-practices/organize-content",
|
||||
},
|
||||
},*/
|
||||
{
|
||||
text: "安装多节点",
|
||||
link: "/zh/manual/best-practices/install-olares-multi-node",
|
||||
|
||||
25
docs/developer/develop/app-env-index.md
Normal file
@@ -0,0 +1,25 @@
|
||||
---
|
||||
outline: [2, 3]
|
||||
description: Learn how variables are injected during Olares app deployment, including declarative environment variables (.Values.olaresEnv) and system-injected runtime Helm values (.Values.*).
|
||||
---
|
||||
|
||||
# Environment variables overview
|
||||
|
||||
Olares apps use app-service to inject runtime context and configuration into the app's `values.yaml`. In Helm templates, you can reference these values via `.Values.*`.
|
||||
|
||||
:::info Variables and Helm values
|
||||
In this document, "variables" mainly refer to Helm values. They are not automatically passed into container environment variables. If you need them inside containers, explicitly map them to `env:` in your templates.
|
||||
:::
|
||||
|
||||
## How variables are injected
|
||||
|
||||
Olares injects variables through two channels:
|
||||
|
||||
- **Declarative environment variables**: The developer declares variables under `envs` in `OlaresManifest.yaml`. At deployment, app-service resolves and injects the values into `.Values.olaresEnv` in `values.yaml`.
|
||||
|
||||
- **System-injected runtime variables**: Injected automatically by Olares at deployment time. No declaration is required, though some values are only available after you declare the relevant dependency, such as middleware.
|
||||
|
||||
## Next steps
|
||||
|
||||
1. [Declarative environment variables](app-env-vars.md): Field reference for the `envs` schema, including variable mapping and variable references.
|
||||
2. [System-injected runtime variables](app-sys-injected-variables.md): Full reference for all system-injected runtime variables.
|
||||
199
docs/developer/develop/app-env-vars.md
Normal file
@@ -0,0 +1,199 @@
|
||||
---
|
||||
outline: [2, 4]
|
||||
description: Declare and validate app configuration via envs in `OlaresManifest.yaml`, and reference values in templates through `.Values.olaresEnv`.
|
||||
---
|
||||
# Declarative environment variables
|
||||
|
||||
Use `envs` in `OlaresManifest.yaml` to declare the configuration parameters, such as passwords, API endpoints, or feature flags. During deployment, app-service resolves the values and injects them into `.Values.olaresEnv` in `values.yaml`. Reference them in Helm templates as <code v-pre>{{ .Values.olaresEnv.<envName> }}</code>.
|
||||
|
||||
## Variable sources
|
||||
|
||||
Declarative variables can obtain values from configurations managed outside the application:
|
||||
|
||||
- **System variables**: Environment variables defined at the Olares cluster level. They are set during system installation or centrally managed by administrators, and are shared by all users within the cluster.
|
||||
- **User variables**: Environment variables defined at the Olares user level. They are managed individually by each user, and are isolated from one another within the same cluster.
|
||||
|
||||
Applications cannot modify these variables directly. To use them, map the variable via the `valueFrom` field.
|
||||
|
||||
## Map environment variables
|
||||
|
||||
Both system environment variables and user environment variables use the same mapping mechanism via `valueFrom`.
|
||||
|
||||
The following example maps the system variable `OLARES_SYSTEM_CDN_SERVICE` to an application variable `APP_CDN_ENDPOINT`:
|
||||
|
||||
1. In `OlaresManifest.yaml`, declare an app variable under `envs` and set `valueFrom.envName` to the system variable name.
|
||||
|
||||
```yaml
|
||||
# Map system variable OLARES_SYSTEM_CDN_SERVICE to app variable APP_CDN_ENDPOINT
|
||||
olaresManifest.version: '0.10.0'
|
||||
olaresManifest.type: app
|
||||
|
||||
envs:
|
||||
- envName: APP_CDN_ENDPOINT
|
||||
required: true
|
||||
applyOnChange: true
|
||||
valueFrom:
|
||||
envName: OLARES_SYSTEM_CDN_SERVICE
|
||||
```
|
||||
|
||||
2. In your Helm template, reference the app variable via `.Values.olaresEnv.<envName>`.
|
||||
|
||||
```yaml
|
||||
# Use APP_CDN_ENDPOINT in a container environment variable
|
||||
env:
|
||||
- name: CDN_ENDPOINT
|
||||
value: "{{ .Values.olaresEnv.APP_CDN_ENDPOINT }}"
|
||||
```
|
||||
|
||||
At deployment, app-service resolves the referenced variable and injects the value into `values.yaml`:
|
||||
|
||||
```yaml
|
||||
# Injected by app-service into values.yaml at deployment
|
||||
olaresEnv:
|
||||
APP_CDN_ENDPOINT: "https://cdn.olares.com"
|
||||
```
|
||||
|
||||
For the full list of available environment variables, see [Variable references](#variable-references).
|
||||
|
||||
## Declaration fields
|
||||
|
||||
The following fields are available under each `envs` entry.
|
||||
|
||||
### envName
|
||||
|
||||
The name of the variable as injected into `values.yaml`. Reference it in templates as <code v-pre>{{ .Values.olaresEnv.<envName> }}</code>.
|
||||
|
||||
### default
|
||||
|
||||
The default value for the variable. Provided by the developer at authoring time. Users cannot modify it. Used when no value is supplied by the user or by `valueFrom`.
|
||||
|
||||
### valueFrom
|
||||
|
||||
Maps this variable to a system or user environment variable. When set, the current variable inherits all fields from the referenced variable (`type`, `editable`, `regex`, and so on). Any fields defined locally on the current variable are ignored. `default` and `options` have no effect when `valueFrom` is used.
|
||||
|
||||
**Example**: map the app variable `APP_CDN_ENDPOINT` to the system variable `OLARES_SYSTEM_CDN_SERVICE`.
|
||||
|
||||
```yaml
|
||||
# Map app env APP_CDN_ENDPOINT to system variable OLARES_SYSTEM_CDN_SERVICE
|
||||
envs:
|
||||
- envName: APP_CDN_ENDPOINT
|
||||
required: true
|
||||
applyOnChange: true
|
||||
valueFrom:
|
||||
envName: OLARES_SYSTEM_CDN_SERVICE
|
||||
```
|
||||
|
||||
### required
|
||||
|
||||
Boolean. When `true`, the variable must have a value for installation to proceed. If no `default` is set, the user is prompted to enter one. After installation, the value cannot be set to empty.
|
||||
|
||||
### editable
|
||||
|
||||
Boolean. When `true`, the variable can be modified after installation.
|
||||
|
||||
### applyOnChange
|
||||
|
||||
Boolean. When `true`, changing this variable automatically restarts all apps or components that use it. When `false`, a change only takes effect after the app is upgraded or reinstalled. Stopping and starting the app manually has no effect.
|
||||
|
||||
### type
|
||||
|
||||
The expected type of the value. Used for validation before the value is accepted. Supported types: `int`, `bool`, `url`, `ip`, `domain`, `email`, `string`, `password`.
|
||||
|
||||
### regex
|
||||
|
||||
A regular expression the value must match. If validation fails, the value cannot be set and installation or upgrade may fail.
|
||||
|
||||
### options
|
||||
|
||||
Restricts the variable to a fixed list of allowed values. The system presents users with a selection UI.
|
||||
|
||||
**Example**: a dropdown list of supported Windows versions for installation.
|
||||
|
||||
```yaml
|
||||
# Dropdown: title shown in UI, value stored internally
|
||||
envs:
|
||||
- envName: VERSION
|
||||
options:
|
||||
- title: "Windows 11 Pro"
|
||||
value: "iso/Win11_24H2_English_x64.iso"
|
||||
- title: "Windows 7 Ultimate"
|
||||
value: "iso/win7_sp1_x64_1.iso"
|
||||
```
|
||||
|
||||
### remoteOptions
|
||||
|
||||
Loads the options list from a URL instead of defining it inline. The response body must be a JSON-encoded array in the same format as `options`.
|
||||
|
||||
**Example**: options fetched from a remote endpoint.
|
||||
|
||||
```yaml
|
||||
# Options list fetched from remote URL at install time
|
||||
envs:
|
||||
- envName: VERSION
|
||||
remoteOptions: https://app.cdn.olares.com/appstore/windows/version_options.json
|
||||
```
|
||||
|
||||
### description
|
||||
|
||||
A human-readable description of the variable's purpose and valid values. Displayed in the Olares interface.
|
||||
|
||||
## Variable references
|
||||
|
||||
### System environment variables
|
||||
|
||||
The following table lists system-level environment variables that can be referenced via `valueFrom`.
|
||||
|
||||
| Variable | Type | Default | Editable | Required | Description |
|
||||
| --- | --- | --- | --- | --- | --- |
|
||||
| `OLARES_SYSTEM_REMOTE_SERVICE` | `url` | `https://api.olares.com` | Yes | Yes | Remote service endpoint for Olares, such as Market and Olares Space. |
|
||||
| `OLARES_SYSTEM_CDN_SERVICE` | `url` | `https://cdn.olares.com` | Yes | Yes | CDN endpoint for system resources. |
|
||||
| `OLARES_SYSTEM_DOCKERHUB_SERVICE` | `url` | None | Yes | No | Docker Hub mirror or accelerator endpoint. |
|
||||
| `OLARES_SYSTEM_ROOT_PATH` | `string` | `/olares` | No | Yes | Olares root directory path. |
|
||||
| `OLARES_SYSTEM_ROOTFS_TYPE` | `string` | `fs` | No | Yes | Olares filesystem type. |
|
||||
| `OLARES_SYSTEM_CUDA_VERSION` | `string` | None | No | No | Host CUDA version. |
|
||||
|
||||
### User environment variables
|
||||
|
||||
All user environment variables are editable by the user.
|
||||
|
||||
#### User information
|
||||
|
||||
| Variable | Type | Default | Description |
|
||||
| --- | --- | --- | --- |
|
||||
| `OLARES_USER_EMAIL` | `string` | None | User email address. |
|
||||
| `OLARES_USER_USERNAME` | `string` | None | Username. |
|
||||
| `OLARES_USER_PASSWORD` | `password` | None | User password. |
|
||||
| `OLARES_USER_TIMEZONE` | `string` | None | User timezone. For example, `Asia/Shanghai`. |
|
||||
|
||||
#### SMTP settings
|
||||
|
||||
| Variable | Type | Default | Description |
|
||||
| --- | --- | --- | --- |
|
||||
| `OLARES_USER_SMTP_ENABLED` | `bool` | None | Whether to enable SMTP. |
|
||||
| `OLARES_USER_SMTP_SERVER` | `domain` | None | SMTP server domain. |
|
||||
| `OLARES_USER_SMTP_PORT` | `int` | None | SMTP server port. Typically `465` or `587`. |
|
||||
| `OLARES_USER_SMTP_USERNAME` | `string` | None | SMTP username. |
|
||||
| `OLARES_USER_SMTP_PASSWORD` | `password` | None | SMTP password or authorization code. |
|
||||
| `OLARES_USER_SMTP_FROM_ADDRESS` | `email` | None | Sender email address. |
|
||||
| `OLARES_USER_SMTP_SECURE` | `bool` | `"true"` | Whether to use a secure protocol. |
|
||||
| `OLARES_USER_SMTP_USE_TLS` | `bool` | None | Whether to use TLS. |
|
||||
| `OLARES_USER_SMTP_USE_SSL` | `bool` | None | Whether to use SSL. |
|
||||
| `OLARES_USER_SMTP_SECURITY_PROTOCOLS` | `string` | None | Security protocol. Allowed values: `tls`, `ssl`, `starttls`, `none`. |
|
||||
|
||||
#### Mirror and proxy endpoints
|
||||
|
||||
| Variable | Type | Default | Description |
|
||||
| --- | --- | --- | --- |
|
||||
| `OLARES_USER_HUGGINGFACE_SERVICE` | `url` | `https://huggingface.co/` | Hugging Face service URL. |
|
||||
| `OLARES_USER_HUGGINGFACE_TOKEN` | `string` | None | Hugging Face access token. |
|
||||
| `OLARES_USER_PYPI_SERVICE` | `url` | `https://pypi.org/simple/` | PyPI mirror URL. |
|
||||
| `OLARES_USER_GITHUB_SERVICE` | `url` | `https://github.com/` | GitHub mirror URL. |
|
||||
| `OLARES_USER_GITHUB_TOKEN` | `string` | None | GitHub personal access token. |
|
||||
|
||||
#### API keys
|
||||
|
||||
| Variable | Type | Default | Description |
|
||||
| --- | --- | --- | --- |
|
||||
| `OLARES_USER_OPENAI_APIKEY` | `password` | None | OpenAI API key. |
|
||||
| `OLARES_USER_CUSTOM_OPENAI_SERVICE` | `url` | None | Custom OpenAI-compatible service URL. |
|
||||
| `OLARES_USER_CUSTOM_OPENAI_APIKEY` | `password` | None | API key for the custom OpenAI-compatible service. |
|
||||
216
docs/developer/develop/app-sys-injected-variables.md
Normal file
@@ -0,0 +1,216 @@
|
||||
---
|
||||
outline: [2, 4]
|
||||
description: Reference for runtime values injected into application `values.yaml` during Olares deployment.
|
||||
---
|
||||
|
||||
# System-injected runtime values
|
||||
|
||||
At deployment, Olares automatically injects a set of system-managed values into the app's `values.yaml`. These values are read-only and cover user identity, storage paths, cluster metadata, app dependencies, and middleware credentials.
|
||||
|
||||
Because they are Helm values, they are not automatically available inside containers. To pass one into a container, map it explicitly under `env:` in your deployment template.
|
||||
|
||||
## Use in your app
|
||||
|
||||
Reference these values directly in your Helm templates, such as `deployment.yaml`.
|
||||
|
||||
**Example**: pass the current username and Postgres host into container environment variables.
|
||||
|
||||
```yaml
|
||||
# Pass system-injected runtime values into container environment variables
|
||||
spec:
|
||||
containers:
|
||||
- name: my-app
|
||||
env:
|
||||
- name: APP_USER
|
||||
value: "{{ .Values.bfl.username }}"
|
||||
- name: DB_HOST
|
||||
value: "{{ .Values.postgres.host }}"
|
||||
```
|
||||
|
||||
For the full list of available values, see [Value reference](#value-reference).
|
||||
|
||||
## Value references
|
||||
|
||||
The Type column describes the Helm value data type. It does not correspond to the `type` field in `OlaresManifest.yaml`.
|
||||
|
||||
### User and identity
|
||||
|
||||
| Value | Type | Description |
|
||||
| --- | --- | --- |
|
||||
| `.Values.bfl.username` | String | Current username. |
|
||||
| `.Values.user.zone` | String | Current user's domain. |
|
||||
| `.Values.admin` | String | Administrator username. |
|
||||
|
||||
### Application and system information
|
||||
|
||||
| Value | Type | Description |
|
||||
| --- | --- | --- |
|
||||
| `.Values.domain` | Map\<String,String> | App entrance URLs. Each entry maps an entrance name to its URL. |
|
||||
| `.Values.sysVersion` | String | Current Olares system version. |
|
||||
| `.Values.deviceName` | String | Device name. |
|
||||
| `.Values.downloadCdnURL` | String | CDN address used for system resource downloads. |
|
||||
|
||||
### Storage paths
|
||||
|
||||
| Value | Type | Description |
|
||||
| --- | --- | --- |
|
||||
| `.Values.userspace.appData` | String | Cluster storage path for the app. Path: `/Data/<appname>`. |
|
||||
| `.Values.userspace.appCache` | String | Node-local cache path for the app. Path: `/Cache/<appname>`. |
|
||||
| `.Values.userspace.userData` | String | User's home data directory. Path: `/Files/Home/`. |
|
||||
| `.Values.sharedlib` | String | User's external storage directory. Path: `/Files/External/<devicename>/`. |
|
||||
|
||||
### Cluster hardware metadata
|
||||
|
||||
| Value | Type | Description |
|
||||
| --- | --- | --- |
|
||||
| `.Values.cluster.arch` | String | Cluster CPU architecture, such as `amd64`. Mixed-architecture clusters are not supported. |
|
||||
| `.Values.nodes` | List\<NodeInfo> | Hardware metadata for each node in the cluster. |
|
||||
|
||||
Each entry in `.Values.nodes` follows this structure:
|
||||
|
||||
```json
|
||||
// Single entry in the .Values.nodes list
|
||||
[
|
||||
{
|
||||
"cudaVersion": "12.9",
|
||||
"cpu": [
|
||||
{
|
||||
"coreNumber": 16,
|
||||
"arch": "amd64",
|
||||
"frequency": 4900000000,
|
||||
"model": "151",
|
||||
"modelName": "12th Gen Intel(R) Core(TM) i5-12600KF",
|
||||
"vendor": "GenuineIntel"
|
||||
}
|
||||
],
|
||||
"memory": {
|
||||
"total": 50351353856
|
||||
},
|
||||
"gpus": [
|
||||
{
|
||||
"vendor": "NVIDIA",
|
||||
"arch": "Ada Lovelace",
|
||||
"model": "4060",
|
||||
"memory": 17175674880,
|
||||
"modelName": "NVIDIA GeForce RTX 4060 Ti"
|
||||
}
|
||||
]
|
||||
}
|
||||
]
|
||||
```
|
||||
|
||||
### Application dependencies
|
||||
|
||||
When an app declares a dependency in `OlaresManifest.yaml`, Olares injects connection information into `values.yaml`.
|
||||
|
||||
| Value | Type | Description |
|
||||
| --- | --- | --- |
|
||||
| `.Values.deps` | Map\<String,Value> | Main entry host and port for each declared dependency. Keys follow the pattern `<entry_name>_host` and `<entry_name>_port`. |
|
||||
| `.Values.svcs` | Map\<String,Value> | All service hosts and ports for each declared dependency. Keys follow the pattern `<service_name>_host` and `<service_name>_port`. Port values are lists to support multiple ports per service. |
|
||||
|
||||
**Example**: for a dependency with entry name `aserver` and service name `aserver-svc`.
|
||||
|
||||
`.Values.deps`:
|
||||
```json
|
||||
{
|
||||
"aserver_host": "aserver-svc.<namespace>",
|
||||
"aserver_port": 80
|
||||
}
|
||||
```
|
||||
|
||||
`.Values.svcs`:
|
||||
```json
|
||||
{
|
||||
"aserver-svc_host": "aserver-svc.<namespace>",
|
||||
"aserver-svc_port": [80]
|
||||
}
|
||||
```
|
||||
|
||||
### Middleware values
|
||||
|
||||
Middleware values are injected only after you declare the middleware dependency in the `middleware` section of `OlaresManifest.yaml`.
|
||||
|
||||
PostgreSQL and Redis are preinstalled. MongoDB, MinIO, RabbitMQ, MySQL and MariaDB must be installed separately before your app can use them.
|
||||
|
||||
#### MariaDB
|
||||
|
||||
See [Integrate with MariaDB](/developer/develop/mw-integrate-with-mariadb.md) for installation and configuration details.
|
||||
|
||||
| Value | Type | Description |
|
||||
| --- | --- | --- |
|
||||
| `.Values.mariadb.host` | String | MariaDB host. |
|
||||
| `.Values.mariadb.port` | Number | MariaDB port. |
|
||||
| `.Values.mariadb.username` | String | MariaDB username. |
|
||||
| `.Values.mariadb.password` | String | MariaDB password. |
|
||||
| `.Values.mariadb.databases` | Map\<String,String> | Requested databases, keyed by database name. For example, a request for `app_db` is available at `.Values.mariadb.databases.app_db`. |
|
||||
|
||||
#### MinIO
|
||||
|
||||
See [Integrate with MinIO](/developer/develop/mw-integrate-with-minio.md) for installation and configuration details.
|
||||
|
||||
| Value | Type | Description |
|
||||
| --- | --- | --- |
|
||||
| `.Values.minio.host` | String | MinIO service host. |
|
||||
| `.Values.minio.port` | Number | MinIO service port. |
|
||||
| `.Values.minio.username` | String | MinIO access key. |
|
||||
| `.Values.minio.password` | String | MinIO secret key. |
|
||||
| `.Values.minio.buckets` | Map\<String,String> | Requested buckets, keyed by bucket name. For example, a request for `mybucket` is available at `.Values.minio.buckets.mybucket`. |
|
||||
|
||||
#### MongoDB
|
||||
|
||||
See [Integrate with MongoDB](/developer/develop/mw-integrate-with-mongodb.md) for installation and configuration details.
|
||||
|
||||
| Value | Type | Description |
|
||||
| --- | --- | --- |
|
||||
| `.Values.mongodb.host` | String | MongoDB host. |
|
||||
| `.Values.mongodb.port` | Number | MongoDB port. |
|
||||
| `.Values.mongodb.username` | String | MongoDB username. |
|
||||
| `.Values.mongodb.password` | String | MongoDB password. |
|
||||
| `.Values.mongodb.databases` | Map\<String,String> | Requested databases, keyed by database name. For example, a request for `app_db` is available at `.Values.mongodb.databases.app_db`. |
|
||||
|
||||
#### MySQL
|
||||
|
||||
See [Integrate with MySQL](/developer/develop/mw-integrate-with-mysql.md) for installation and configuration details.
|
||||
|
||||
| Value | Type | Description |
|
||||
| --- | --- | --- |
|
||||
| `.Values.mysql.host` | String | MySQL host. |
|
||||
| `.Values.mysql.port` | Number | MySQL port. |
|
||||
| `.Values.mysql.username` | String | MySQL username. |
|
||||
| `.Values.mysql.password` | String | MySQL password. |
|
||||
| `.Values.mysql.databases` | Map\<String,String> | Requested databases, keyed by database name. For example, a request for `app_db` is available at `.Values.mysql.databases.app_db`. |
|
||||
|
||||
#### PostgreSQL
|
||||
|
||||
See [Integrate with PostgreSQL](/developer/develop/mw-integrate-with-pg.md) for installation and configuration details.
|
||||
|
||||
| Value | Type | Description |
|
||||
| --- | --- | --- |
|
||||
| `.Values.postgres.host` | String | PostgreSQL host. |
|
||||
| `.Values.postgres.port` | Number | PostgreSQL port. |
|
||||
| `.Values.postgres.username` | String | PostgreSQL username. |
|
||||
| `.Values.postgres.password` | String | PostgreSQL password. |
|
||||
| `.Values.postgres.databases` | Map\<String,String> | Requested databases, keyed by database name. For example, a request for `app_db` is available at `.Values.postgres.databases.app_db`. |
|
||||
|
||||
#### RabbitMQ
|
||||
|
||||
See [Integrate with RabbitMQ](/developer/develop/mw-integrate-with-rabbitmq.md) for installation and configuration details.
|
||||
|
||||
| Value | Type | Description |
|
||||
| --- | --- | --- |
|
||||
| `.Values.rabbitmq.host` | String | RabbitMQ host. |
|
||||
| `.Values.rabbitmq.port` | Number | RabbitMQ port. |
|
||||
| `.Values.rabbitmq.username` | String | RabbitMQ username. |
|
||||
| `.Values.rabbitmq.password` | String | RabbitMQ password. |
|
||||
| `.Values.rabbitmq.vhosts` | Map\<String,String> | Requested vhosts, keyed by vhost name. For example, a request for `myvhost` is available at `.Values.rabbitmq.vhosts.myvhost`. |
|
||||
|
||||
#### Redis
|
||||
|
||||
See [Integrate with Redis](/developer/develop/mw-integrate-with-redis.md) for installation and configuration details.
|
||||
|
||||
| Value | Type | Description |
|
||||
| --- | --- | --- |
|
||||
| `.Values.redis.host` | String | Redis host. |
|
||||
| `.Values.redis.port` | Number | Redis port. |
|
||||
| `.Values.redis.password` | String | Redis password. |
|
||||
| `.Values.redis.namespaces` | Map\<String,String> | Requested namespaces, keyed by namespace name. For example, a request for `app_ns` is available at `.Values.redis.namespaces.app_ns`. |
|
||||
@@ -32,9 +32,8 @@ middleware:
|
||||
- name: aaa
|
||||
```
|
||||
|
||||
## Inject environment variables
|
||||
|
||||
In your deployment YAML, map the injected `.Values.elasticsearch.*` fields to the environment variables your app uses.
|
||||
## Map to environment variables
|
||||
In your deployment YAML, map the injected `.Values.elasticsearch.*` fields to the container environment variables your app requires.
|
||||
|
||||
**Example**
|
||||
```yaml
|
||||
@@ -59,14 +58,14 @@ containers:
|
||||
value: "{{ .Values.elasticsearch.indexes.aaa }}"
|
||||
```
|
||||
|
||||
## Elasticsearch Values reference
|
||||
## Elasticsearch values reference
|
||||
|
||||
Elasticsearch Values are predefined environment variables injected into `values.yaml` during deployment. They are system-managed and not user-editable.
|
||||
Elasticsearch values are predefined runtime values injected into `values.yaml` during deployment. They are system-managed and not user-editable.
|
||||
|
||||
| Key | Type | Description |
|
||||
|--|--|--|
|
||||
|`.Values.elasticsearch.host`| String | Elasticsearch service host |
|
||||
|`.Values.elasticsearch.port`| Number | Elasticsearch service port |
|
||||
|`.Values.elasticsearch.username`| String | Elasticsearch username |
|
||||
|`.Values.elasticsearch.password`| String | Elasticsearch password |
|
||||
|`.Values.elasticsearch.indexes` | Map<String,String> | The requested index name is used<br> as the key. For example, if you request `aaa`, the value is available at `.Values.elasticsearch.indexes.aaa`. |
|
||||
| Value | Type | Description |
|
||||
| --- | --- | --- |
|
||||
| `.Values.elasticsearch.host` | String | Elasticsearch service host. |
|
||||
| `.Values.elasticsearch.port` | Number | Elasticsearch service port. |
|
||||
| `.Values.elasticsearch.username` | String | Elasticsearch username. |
|
||||
| `.Values.elasticsearch.password` | String | Elasticsearch password. |
|
||||
| `.Values.elasticsearch.indexes` | Map\<String,String> | Requested indexes, keyed by index name. For example, a request for `aaa` is available at `.Values.elasticsearch.indexes.aaa`. |
|
||||
@@ -31,9 +31,8 @@ middleware:
|
||||
- name: aaa
|
||||
```
|
||||
|
||||
## Inject environment variables
|
||||
|
||||
In your deployment YAML, map the injected `.Values.mariadb.*` fields to the environment variables your app uses.
|
||||
## Map to environment variables
|
||||
In your deployment YAML, map the injected `.Values.mariadb.*` fields to the container environment variables your app requires.
|
||||
|
||||
**Example**
|
||||
```yaml
|
||||
@@ -59,14 +58,13 @@ containers:
|
||||
value: "{{ .Values.mariadb.databases.aaa }}"
|
||||
```
|
||||
|
||||
## MariaDB Values reference
|
||||
## MariaDB values reference
|
||||
MariaDB values are predefined runtime values injected into `values.yaml` during deployment. They are system-managed and not user-editable.
|
||||
|
||||
MariaDB Values are predefined environment variables injected into `values.yaml` during deployment. They are system-managed and not user-editable.
|
||||
|
||||
| Key | Type | Description |
|
||||
|--|--|--|
|
||||
| `.Values.mariadb.host` | String | MariaDB database host |
|
||||
| `.Values.mariadb.port` | Number | MariaDB database port |
|
||||
| `.Values.mariadb.username` | String | MariaDB database username |
|
||||
| `.Values.mariadb.password` | String | MariaDB database password |
|
||||
| `.Values.mariadb.databases` | Map<String,String> | The requested database name is used as the key. <br/>For example, if you request `aaa`, the value is available at `.Values.mariadb.databases.aaa`. |
|
||||
| Value | Type | Description |
|
||||
| --- | --- | --- |
|
||||
| `.Values.mariadb.host` | String | MariaDB host. |
|
||||
| `.Values.mariadb.port` | Number | MariaDB port. |
|
||||
| `.Values.mariadb.username` | String | MariaDB username. |
|
||||
| `.Values.mariadb.password` | String | MariaDB password. |
|
||||
| `.Values.mariadb.databases` | Map\<String,String> | Requested databases, keyed by database name. For example, a request for `app_db` is available at `.Values.mariadb.databases.app_db`. |
|
||||
@@ -31,9 +31,8 @@ middleware:
|
||||
- name: mybucket
|
||||
```
|
||||
|
||||
## Inject environment variables
|
||||
|
||||
In your deployment YAML, map the injected `.Values.minio.*` fields to the environment variables your app uses.
|
||||
## Map to environment variables
|
||||
In your deployment YAML, map the injected `.Values.minio.*` fields to the container environment variables your app requires.
|
||||
|
||||
**Example**
|
||||
```yaml
|
||||
@@ -60,14 +59,14 @@ containers:
|
||||
value: "{{ .Values.minio.buckets.mybucket }}"
|
||||
```
|
||||
|
||||
## MinIO Values reference
|
||||
## MinIO values reference
|
||||
|
||||
MinIO Values are predefined environment variables injected into `values.yaml` during deployment. They are system-managed and not user-editable.
|
||||
MinIO values are predefined runtime values injected into `values.yaml` during deployment. They are system-managed and not user-editable.
|
||||
|
||||
| Key | Type | Description |
|
||||
|--|--|--|
|
||||
| `.Values.minio.host` | String | MinIO service host |
|
||||
| `.Values.minio.port` | Number | MinIO service port |
|
||||
| `.Values.minio.username` | String | MinIO access key |
|
||||
| `.Values.minio.password` | String | MinIO secret key |
|
||||
| `.Values.minio.buckets` | Map<String,String> | The requested bucket name is used as the key. <br>For example, if you request `mybucket`, the value is available at `.Values.minio.buckets.mybucket`. |
|
||||
| Value | Type | Description |
|
||||
| --- | --- | --- |
|
||||
| `.Values.minio.host` | String | MinIO service host. |
|
||||
| `.Values.minio.port` | Number | MinIO service port. |
|
||||
| `.Values.minio.username` | String | MinIO access key. |
|
||||
| `.Values.minio.password` | String | MinIO secret key. |
|
||||
| `.Values.minio.buckets` | Map\<String,String> | Requested buckets, keyed by bucket name. For example, a request for `mybucket` is available at `.Values.minio.buckets.mybucket`. |
|
||||
@@ -35,9 +35,9 @@ middleware:
|
||||
# Please make sure each line is a complete query.
|
||||
```
|
||||
|
||||
## Inject environment variables
|
||||
## Map to environment variables
|
||||
|
||||
In your deployment YAML, map the injected `.Values.mongodb.*` fields to the environment variables your app uses.
|
||||
In your deployment YAML, map the injected `.Values.mongodb.*` fields to the container environment variables your app requires.
|
||||
|
||||
**Example**
|
||||
```yaml
|
||||
@@ -63,14 +63,14 @@ containers:
|
||||
value: "{{ .Values.mongodb.databases.app_db }}"
|
||||
```
|
||||
|
||||
## MongoDB Values reference
|
||||
## MongoDB values reference
|
||||
|
||||
MongoDB Values are predefined environment variables injected into `values.yaml` during deployment. They are system-managed and not user-editable.
|
||||
MongoDB values are predefined runtime values injected into `values.yaml` during deployment. They are system-managed and not user-editable.
|
||||
|
||||
| Key | Type | Description |
|
||||
|--|--|--|
|
||||
| `.Values.mongodb.host` | String | MongoDB database host |
|
||||
| `.Values.mongodb.port` | Number | MongoDB database port |
|
||||
| `.Values.mongodb.username` | String | MongoDB database username |
|
||||
| `.Values.mongodb.password` | String | MongoDB database password |
|
||||
| `.Values.mongodb.databases` | Map<String,String> | The requested database name is used as the key. <br/>For example, if you request `app_db`, the value is available at `.Values.mongodb.databases.app_db`. |
|
||||
| Value | Type | Description |
|
||||
| --- | --- | --- |
|
||||
| `.Values.mongodb.host` | String | MongoDB host. |
|
||||
| `.Values.mongodb.port` | Number | MongoDB port. |
|
||||
| `.Values.mongodb.username` | String | MongoDB username. |
|
||||
| `.Values.mongodb.password` | String | MongoDB password. |
|
||||
| `.Values.mongodb.databases` | Map\<String,String> | Requested databases, keyed by database name. For example, a request for `app_db` is available at `.Values.mongodb.databases.app_db`. |
|
||||
@@ -31,9 +31,9 @@ middleware:
|
||||
- name: aaa
|
||||
```
|
||||
|
||||
## Inject environment variables
|
||||
## Map to environment variables
|
||||
|
||||
In your deployment YAML, map the injected `.Values.mysql.*` fields to the environment variables your app uses.
|
||||
In your deployment YAML, map the injected `.Values.mysql.*` fields to the container environment variables your app requires.
|
||||
|
||||
**Example**
|
||||
```yaml
|
||||
@@ -59,14 +59,14 @@ containers:
|
||||
value: "{{ .Values.mysql.databases.aaa }}"
|
||||
```
|
||||
|
||||
## MySQL Values reference
|
||||
## MySQL values reference
|
||||
|
||||
MySQL Values are predefined environment variables injected into `values.yaml` during deployment. They are system-managed and not user-editable.
|
||||
MySQL values are predefined runtime values injected into `values.yaml` during deployment. They are system-managed and not user-editable.
|
||||
|
||||
| Key | Type | Description |
|
||||
|--|--|--|
|
||||
| `.Values.mysql.host` | String | MySQL database host |
|
||||
| `.Values.mysql.port` | Number | MySQL database port |
|
||||
| `.Values.mysql.username` | String | MySQL database username |
|
||||
| `.Values.mysql.password` | String | MySQL database password |
|
||||
| `.Values.mysql.databases` | Map<String,String> | The requested database name is used as the key. <br/>For example, if you request `aaa`, the value is available at `.Values.mysql.databases.aaa`. |
|
||||
| Value | Type | Description |
|
||||
| --- | --- | --- |
|
||||
| `.Values.mysql.host` | String | MySQL host. |
|
||||
| `.Values.mysql.port` | Number | MySQL port. |
|
||||
| `.Values.mysql.username` | String | MySQL username. |
|
||||
| `.Values.mysql.password` | String | MySQL password. |
|
||||
| `.Values.mysql.databases` | Map\<String,String> | Requested databases, keyed by database name. For example, a request for `app_db` is available at `.Values.mysql.databases.app_db`. |
|
||||
@@ -38,9 +38,9 @@ middleware:
|
||||
- COMMIT;
|
||||
```
|
||||
|
||||
## Inject environment variables
|
||||
## Map to environment variables
|
||||
|
||||
In your deployment YAML, map the injected `.Values.postgres.*` fields to the environment variables your app uses.
|
||||
In your deployment YAML, map the injected `.Values.postgres.*` fields to the container environment variables your app requires.
|
||||
|
||||
**Example**
|
||||
```yaml
|
||||
@@ -69,13 +69,14 @@ containers:
|
||||
value: {{ .Values.postgres.password }}
|
||||
```
|
||||
|
||||
## PostgreSQL Values reference
|
||||
## PostgreSQL values reference
|
||||
|
||||
PostgreSQL Values are predefined environment variables injected into `values.yaml` during deployment. They are system-managed and not user-editable.
|
||||
| Key | Type | Description |
|
||||
|--|--|--|
|
||||
| `.Values.postgres.host` | String | PostgreSQL database host |
|
||||
| `.Values.postgres.port` | Number | PostgreSQL database port |
|
||||
| `.Values.postgres.username` | String | PostgreSQL database username |
|
||||
| `.Values.postgres.password` | String | PostgreSQL database password |
|
||||
| `.Values.postgres.databases` | Map<String,String> | The requested database name is used as the key. <br>For example, if you request `app_db`, the value is available at `.Values.postgres.databases.app_db`|
|
||||
PostgreSQL values are predefined runtime values injected into `values.yaml` during deployment. They are system-managed and not user-editable.
|
||||
|
||||
| Value | Type | Description |
|
||||
| --- | --- | --- |
|
||||
| `.Values.postgres.host` | String | PostgreSQL host. |
|
||||
| `.Values.postgres.port` | Number | PostgreSQL port. |
|
||||
| `.Values.postgres.username` | String | PostgreSQL username. |
|
||||
| `.Values.postgres.password` | String | PostgreSQL password. |
|
||||
| `.Values.postgres.databases` | Map\<String,String> | Requested databases, keyed by database name. For example, a request for `app_db` is available at `.Values.postgres.databases.app_db`. |
|
||||
@@ -31,9 +31,9 @@ middleware:
|
||||
- name: aaa
|
||||
```
|
||||
|
||||
## Inject environment variables
|
||||
## Map to environment variables
|
||||
|
||||
In your deployment YAML, map the injected `.Values.rabbitmq.*` fields to the environment variables your app uses.
|
||||
In your deployment YAML, map the injected `.Values.rabbitmq.*` fields to the container environment variables your app requires.
|
||||
|
||||
**Example**
|
||||
```yaml
|
||||
@@ -78,14 +78,14 @@ portMQ := os.Getenv("RABBITMQ_PORT")
|
||||
url := fmt.Sprintf("amqp://%s:%s@%s:%s/%s", user, password, host, portMQ, vhost)
|
||||
```
|
||||
|
||||
## RabbitMQ Values reference
|
||||
## RabbitMQ values reference
|
||||
|
||||
RabbitMQ Values are predefined environment variables injected into `values.yaml` during deployment. They are system-managed and not user-editable.
|
||||
RabbitMQ values are predefined runtime values injected into `values.yaml` during deployment. They are system-managed and not user-editable.
|
||||
|
||||
| Key | Type | Description |
|
||||
|--|--|--|
|
||||
| `.Values.rabbitmq.host` | String | RabbitMQ service host |
|
||||
| `.Values.rabbitmq.port` | Number | RabbitMQ service port |
|
||||
| `.Values.rabbitmq.username` | String | RabbitMQ username |
|
||||
| `.Values.rabbitmq.password` | String | RabbitMQ password |
|
||||
| `.Values.rabbitmq.vhosts` | Map<String,String> | The requested vhost name is used as the key. <br/>For example, if you request `aaa`, the value is available at `.Values.rabbitmq.vhosts.aaa`. |
|
||||
| Value | Type | Description |
|
||||
| --- | --- | --- |
|
||||
| `.Values.rabbitmq.host` | String | RabbitMQ host. |
|
||||
| `.Values.rabbitmq.port` | Number | RabbitMQ port. |
|
||||
| `.Values.rabbitmq.username` | String | RabbitMQ username. |
|
||||
| `.Values.rabbitmq.password` | String | RabbitMQ password. |
|
||||
| `.Values.rabbitmq.vhosts` | Map\<String,String> | Requested vhosts, keyed by vhost name. For example, a request for `myvhost` is available at `.Values.rabbitmq.vhosts.myvhost`. |
|
||||
@@ -25,9 +25,9 @@ middleware:
|
||||
namespace: db0
|
||||
```
|
||||
|
||||
## Inject environment variables
|
||||
## Map to environment variables
|
||||
|
||||
In your deployment YAML, map the injected `.Values.redis.*` fields to the environment variables your app uses.
|
||||
In your deployment YAML, map the injected `.Values.redis.*` fields to the container environment variables your app requires.
|
||||
|
||||
**Example**
|
||||
```yaml
|
||||
@@ -54,12 +54,13 @@ containers:
|
||||
value: {{ .Values.redis.namespaces.<namespace> }}
|
||||
```
|
||||
|
||||
## Redis Values reference
|
||||
## Redis values reference
|
||||
|
||||
Redis Values are predefined environment variables injected into `values.yaml` during deployment. They are system-managed and not user-editable.
|
||||
| Key | Type | Description |
|
||||
|--|--|--|
|
||||
| `.Values.redis.host` | String | Redis service host |
|
||||
| `.Values.redis.port` | Number | Redis service port |
|
||||
| `.Values.redis.password`| String | Redis service password |
|
||||
| `.Values.redis.namespaces` | Map<String, String> | The requested namespace is used as the key. <br>For example, if you request `app_ns`, the value is available at `.Values.redis.namespaces.app_ns`. |
|
||||
Redis values are predefined runtime values injected into `values.yaml` during deployment. They are system-managed and not user-editable.
|
||||
|
||||
| Value | Type | Description |
|
||||
| --- | --- | --- |
|
||||
| `.Values.redis.host` | String | Redis host. |
|
||||
| `.Values.redis.port` | Number | Redis port. |
|
||||
| `.Values.redis.password` | String | Redis password. |
|
||||
| `.Values.redis.namespaces` | Map\<String,String> | Requested namespaces, keyed by namespace name. For example, a request for `app_ns` is available at `.Values.redis.namespaces.app_ns`. |
|
||||
@@ -7,7 +7,15 @@ outline: [2, 3]
|
||||
Every **Olares Application Chart** should include an `OlaresManifest.yaml` file in the root directory. `OlaresManifest.yaml` provides all the essential information about an Olares App. Both the **Olares Market protocol** and the Olares depend on this information to distribute and install applications.
|
||||
|
||||
:::info NOTE
|
||||
Latest Olares Manifest version: `0.10.0`
|
||||
Latest Olares Manifest version: `0.11.0`
|
||||
- Removed deprecated fields of sysData
|
||||
- Updated the example of shared app
|
||||
- Added the apiVersion
|
||||
- Added the sharedEntrance section
|
||||
|
||||
:::
|
||||
:::details Changelog
|
||||
`0.10.0`
|
||||
- Modified the `categories` field
|
||||
- Added the `provider` field in the Permission section
|
||||
- Added the Provider section, to allow apps to expose specific service interfaces within the cluster
|
||||
@@ -15,8 +23,7 @@ Latest Olares Manifest version: `0.10.0`
|
||||
- Removed some deprecated fields from the Option section
|
||||
- Added the `allowMultipleInstall` field, allowing the app to be installed as multiple independent instances
|
||||
- Added the Envs section, to define environment variables required by the application
|
||||
:::
|
||||
:::details Changelog
|
||||
|
||||
`0.9.0`
|
||||
- Added a `conflict` field in `options` to declare incompatible applications
|
||||
- Removed `analytics` field in `options`
|
||||
@@ -82,7 +89,7 @@ spec:
|
||||
website: https://link.to.your.website
|
||||
sourceCode: https://link.to.sourceCode
|
||||
submitter: Submitter's Name
|
||||
language:
|
||||
locale:
|
||||
- en
|
||||
doc: https://link.to.documents
|
||||
supportArch:
|
||||
@@ -130,6 +137,13 @@ olaresManifest.version: 1.1.0
|
||||
olaresManifest.version: '2.2'
|
||||
olaresManifest.version: "3.0.122"
|
||||
```
|
||||
## apiVersion
|
||||
- Type: `string`
|
||||
- Optional
|
||||
- Accepted Value: `v1`,`v2`
|
||||
- Default: `v1`
|
||||
|
||||
For shared applications, use version `v2`, which supports multiple subcharts in a single OAC. For other applications, use `v1`.
|
||||
|
||||
## Metadata
|
||||
|
||||
@@ -152,7 +166,7 @@ metadata:
|
||||
### name
|
||||
|
||||
- Type: `string`
|
||||
- Accepted Value: `[a-z][a-z0-9]?`
|
||||
- Accepted Value: `^[a-z][a-z0-9]{0,29}$`
|
||||
|
||||
App’s namespace in Olares, lowercase alphanumeric characters only. It can be up to 30 characters, and needs to be consistent with `FolderName` and `name` field in `Chart.yaml`.
|
||||
|
||||
@@ -160,7 +174,7 @@ App’s namespace in Olares, lowercase alphanumeric characters only. It can be u
|
||||
|
||||
- Type: `string`
|
||||
|
||||
The title of your app title shown in the Olares Market. Must be within `30` characters.
|
||||
The title of your app shown in the Olares Market. Must be within `30` characters.
|
||||
|
||||
### description
|
||||
|
||||
@@ -189,8 +203,7 @@ The **Chart Version** of the application. It should be incremented each time the
|
||||
Used to display your app on different category page in Olares Market.
|
||||
|
||||
Accepted Value for OS 1.11:
|
||||
|
||||
`Blockchain`, `Utilities`, `Social Network`, `Entertainment`, `Productivity`
|
||||
- `Blockchain`, `Utilities`, `Social Network`, `Entertainment`, `Productivity`
|
||||
|
||||
Accepted Value for OS 1.12:
|
||||
- `Creativity`
|
||||
@@ -201,14 +214,13 @@ Accepted Value for OS 1.12:
|
||||
- `Utilities_v112` (displayed as Utilities)
|
||||
- `AI`
|
||||
|
||||
|
||||
:::info NOTE
|
||||
Olares Market categories were updated in OS 1.12.0. To ensure your app is compatible with both versions 1.11 and 1.12, include category values for both versions in your configuration.
|
||||
:::
|
||||
|
||||
## Entrances
|
||||
|
||||
The number of entrances through which to access the app. You must specify at least 1 access method, with a maximum of 10 allowed.
|
||||
The entrances (up to 10) that users can use to access the app. At least 1 is required.
|
||||
|
||||
:::info Example
|
||||
```yaml
|
||||
@@ -322,6 +334,24 @@ To ensure a seamless user experience, you can enable this option by setting it t
|
||||
```
|
||||
:::
|
||||
|
||||
|
||||
## sharedEntrances
|
||||
|
||||
A shared entrance is an internal address provided by a shared application for other applications within the cluster to access. The field configuration for shared entrances is basically the same as for regular entrances. A typical shared entrance configuration is shown below.
|
||||
|
||||
:::info Example
|
||||
```yaml
|
||||
sharedEntrances:
|
||||
- name: ollamav2
|
||||
host: sharedentrances-ollama
|
||||
port: 0
|
||||
title: Ollama API
|
||||
icon: https://app.cdn.olares.com/appstore/ollama/icon.png
|
||||
invisible: true
|
||||
authLevel: internal
|
||||
```
|
||||
:::
|
||||
|
||||
## Ports
|
||||
|
||||
Specify exposed ports
|
||||
@@ -338,15 +368,50 @@ ports:
|
||||
```
|
||||
:::
|
||||
|
||||
### exposePort
|
||||
- Type: `int`
|
||||
- Optional
|
||||
- Accepted Value: `0-65535`, except reserved ports `22`, `80`, `81`, `443`, `444`, `2379`, `18088`.
|
||||
|
||||
Olares will expose the ports you specify for an application, which are accessible via the application domain name in the local network, for example: `84864c1f.your_olares_id.olares.com:46879`. For each port you expose, Olares configures both TCP and UDP with the same port number.
|
||||
|
||||
When the `addToTailscaleAcl` field is set to `true`, the system will automatically assign a random port and add it to the Tailscale ACLs.
|
||||
|
||||
|
||||
:::info NOTE
|
||||
The exposed ports can only be accessed on the local network or through a VPN.
|
||||
:::
|
||||
|
||||
### protocol
|
||||
- Type: `string`
|
||||
- Optional
|
||||
- Accepted Value: `udp`, `tcp`
|
||||
|
||||
The protocol used for the exposed port. If specified, Olares exposes only the specified protocol. If omitted, Olares exposes both UDP and TCP by default.
|
||||
|
||||
### addToTailscaleAcl
|
||||
- Type: `boolean`
|
||||
- Optional
|
||||
- Default: `false`
|
||||
|
||||
When the `addToTailscaleAcl` field is set to `true`, the system will automatically assign a random port and add it to the Tailscale ACLs.
|
||||
|
||||
## Tailscale
|
||||
- Type: `map`
|
||||
- Optional
|
||||
|
||||
Allow applications to add Access Control Lists (ACL) in Tailscale to open specified ports.
|
||||
|
||||
:::info Example
|
||||
```yaml
|
||||
tailscale:
|
||||
acls:
|
||||
- proto: tcp
|
||||
dst:
|
||||
- "*:46879"
|
||||
- proto: "" # Optional. If not specified, all supported protocols will be allowed.
|
||||
dst:
|
||||
- "*:4557"
|
||||
```
|
||||
:::
|
||||
|
||||
## Permission
|
||||
|
||||
:::info Example
|
||||
@@ -380,51 +445,6 @@ Whether the app requires read and write permission to the `Data` folder. If `.Va
|
||||
|
||||
Whether the app requires read and write permission to user's `Home` folder. List all directories that the application needs to access under the user's `Home`. All `userData` directory configured in the deployment YAML, must be included here.
|
||||
|
||||
### sysData
|
||||
|
||||
- Type: `list<map>`
|
||||
- Optional
|
||||
|
||||
Declare the list of APIs that this app needs to access.
|
||||
|
||||
:::info NOTE
|
||||
This configuration has been deprecated since version 1.12.0.
|
||||
:::
|
||||
|
||||
:::info Example
|
||||
```yaml
|
||||
sysData:
|
||||
- group: service.bfl
|
||||
dataType: app
|
||||
version: v1
|
||||
ops:
|
||||
- InstallDevApp
|
||||
- dataType: legacy_prowlarr
|
||||
appName: prowlarr
|
||||
port: 9696
|
||||
group: api.prowlarr
|
||||
version: v2
|
||||
ops:
|
||||
- All
|
||||
```
|
||||
:::
|
||||
|
||||
All system API [providers](../advanced/provider.md) are list below:
|
||||
| Group | version | dataType | ops |
|
||||
| ----------- | ----------- | ----------- | ----------- |
|
||||
| service.appstore | v1 | app | InstallDevApp, UninstallDevApp
|
||||
| message-dispatcher.system-server | v1 | event | Create, List
|
||||
| service.desktop | v1 | ai_message | AIMessage
|
||||
| service.did | v1 | did | ResolveByDID, ResolveByName, Verify
|
||||
| api.intent | v1 | legacy_api | POST
|
||||
| service.intent | v1 | intent | RegisterIntentFilter, UnregisterIntentFilter, SendIntent, QueryIntent, ListDefaultChoice, CreateDefaultChoice, RemoveDefaultChoice, ReplaceDefaultChoice
|
||||
| service.message | v1 | message | GetContactLogs, GetMessages, Message
|
||||
| service.notification | v1 | message | Create
|
||||
| service.notification | v1 | token | Create
|
||||
| service.search | v1 | search | Input, Delete, InputRSS, DeleteRSS, QueryRSS, QuestionAI
|
||||
| secret.infisical | v1 | secret | CreateSecret, RetrieveSecret
|
||||
| secret.vault | v1 | key | List, Info, Sign
|
||||
|
||||
### provider
|
||||
|
||||
- Type: `list<map>`
|
||||
@@ -461,25 +481,6 @@ provider:
|
||||
```
|
||||
:::
|
||||
|
||||
## Tailscale
|
||||
- Type: `map`
|
||||
- Optional
|
||||
|
||||
Allow applications to add Access Control Lists (ACL) in Tailscale to open specified ports.
|
||||
|
||||
:::info Example
|
||||
```yaml
|
||||
tailscale:
|
||||
acls:
|
||||
- proto: tcp
|
||||
dst:
|
||||
- "*:46879"
|
||||
- proto: "" # Optional. If not specified, all supported protocols will be allowed.
|
||||
dst:
|
||||
- "*:4557"
|
||||
```
|
||||
:::
|
||||
|
||||
## Spec
|
||||
Additional information about the application, primarily used for display in the Olares Market.
|
||||
|
||||
@@ -607,7 +608,7 @@ When set to `true`, Olares forces the application to run under user ID `1000` (a
|
||||
- Type: `map`
|
||||
- Optional
|
||||
|
||||
The Olares provides highly available middleware services. Developers do not need to install middleware repeatedly. Just simply add required middleware here, You can then directly use the corresponding middleware information in the application's deployment YAML file.
|
||||
Olares provides highly available middleware services. Developers do not need to install middleware repeatedly. Add the required middleware here, then use the corresponding middleware values in the application's deployment YAML file.
|
||||
|
||||
Use the `scripts` field to specify scripts that should be executed after the database is created. Additionally, use the `extension` field to add the corresponding extension in the database.
|
||||
|
||||
@@ -803,10 +804,10 @@ Use the middleware information in deployment YAML
|
||||
|
||||
## Options
|
||||
|
||||
Configure system-related options here.
|
||||
Configure Olares OS related options here.
|
||||
|
||||
### policies
|
||||
- Type: `map`
|
||||
- Type: `list<map>`
|
||||
- Optional
|
||||
|
||||
Define detailed access control for subdomains of the app.
|
||||
@@ -823,38 +824,35 @@ options:
|
||||
```
|
||||
:::
|
||||
|
||||
### clusterScoped
|
||||
### appScope
|
||||
- Type: `map`
|
||||
- Optional
|
||||
|
||||
Whether this app is installed for all users in an Olares cluster.
|
||||
Specifies whether the app should be installed for all users in the Olares cluster. For shared apps, set `clusterScoped` to `true` and provide the current app's name in the `appRef` field.
|
||||
|
||||
:::info Example For Server
|
||||
:::info Example of ollamav2
|
||||
```yaml
|
||||
metadata:
|
||||
name: gitlab
|
||||
name: ollamav2
|
||||
options:
|
||||
appScope:
|
||||
{{- if and .Values.admin .Values.bfl.username (eq .Values.admin .Values.bfl.username) }} # Only the administrator installs the shared service
|
||||
clusterScoped: true
|
||||
appRef:
|
||||
- gitlabclienta #app name of clients
|
||||
- gitlabclientb
|
||||
```
|
||||
:::
|
||||
|
||||
:::info Example For Client
|
||||
```yaml
|
||||
metadata:
|
||||
name: gitlabclienta
|
||||
options:
|
||||
- ollamav2 # the name of current app specified in metadata.name
|
||||
{{- else }}
|
||||
clusterScoped: false
|
||||
{{- end }}
|
||||
dependencies:
|
||||
- name: olares
|
||||
version: ">=0.3.6-0"
|
||||
version: '>=1.12.3-0'
|
||||
type: system
|
||||
- name: gitlab #app name of server
|
||||
version: ">=0.0.1"
|
||||
{{- if and .Values.admin .Values.bfl.username (eq .Values.admin .Values.bfl.username) }}
|
||||
{{- else }}
|
||||
type: application
|
||||
mandatory: true
|
||||
version: '>=1.0.1'
|
||||
mandatory: true # Other users install the client, depend on the shared service installed by the admin
|
||||
{{- end }}
|
||||
```
|
||||
:::
|
||||
|
||||
@@ -880,6 +878,24 @@ options:
|
||||
```
|
||||
:::
|
||||
|
||||
### conflicts
|
||||
- Type: `list<map>`
|
||||
- Optional
|
||||
|
||||
List other applications that conflict with this app here. Conflicting apps must be uninstalled before this app can be installed.
|
||||
|
||||
:::info Example
|
||||
```yaml
|
||||
options:
|
||||
conflicts:
|
||||
- name: comfyui
|
||||
type: application
|
||||
- name: comfyuiclient
|
||||
type: application
|
||||
```
|
||||
:::
|
||||
|
||||
|
||||
### mobileSupported
|
||||
- Type: `boolean`
|
||||
- Default: `false`
|
||||
@@ -927,9 +943,8 @@ apiTimeout: 0
|
||||
:::
|
||||
|
||||
|
||||
|
||||
### allowedOutboundPorts
|
||||
- Type: `map`
|
||||
- Type: `list<int>`
|
||||
- Optional
|
||||
|
||||
The specified ports will be opened to allow external access via non-HTTP protocols, such as SMTP.
|
||||
@@ -1027,4 +1042,4 @@ provider:
|
||||
paths: ["/api*"] # API paths to expose; cannot consist of * only
|
||||
verbs: ["*"] # Supported: post, get, put, delete, patch; "*" allows all methods
|
||||
```
|
||||
:::
|
||||
:::
|
||||
|
||||
@@ -15,128 +15,147 @@ To customize the installation process, you can set the environment variables bef
|
||||
export KUBE_TYPE=k8s \
|
||||
&& curl -sSfL https://olares.sh | bash -
|
||||
```
|
||||
|
||||
Or, if you have already downloaded the installation script `install.sh`:
|
||||
|
||||
```bash
|
||||
# Specify Kubernetes (k8s) instead of k3s
|
||||
export KUBE_TYPE=k8s && bash install.sh
|
||||
```
|
||||
Both methods achieve the same result. The environment variable `KUBE_TYPE` will be passed to the script, and the script will use it to modify its behavior.
|
||||
|
||||
Both methods achieve the same result. The environment variable `KUBE_TYPE` is passed to the installation script and modifies its behavior accordingly.
|
||||
|
||||
## Environment variables reference
|
||||
|
||||
The section lists all the environment variables, along with their default values, optional values, and descriptions. Configure them as needed.
|
||||
The section lists all the environment variables, along with their default values, optional values, and descriptions. Configure them as needed.
|
||||
|
||||
### `CLOUDFLARE_ENABLE`
|
||||
Specifies whether to enable the Cloudflare proxy.
|
||||
### CLOUDFLARE_ENABLE
|
||||
|
||||
Specifies whether to enable the Cloudflare proxy.
|
||||
- **Valid values**:
|
||||
- `0` (disable)
|
||||
- `1` (enable)
|
||||
- **Default**: `0`
|
||||
|
||||
### FRP_AUTH_METHOD
|
||||
|
||||
Sets the FRP authentication method.
|
||||
- **Valid values**:
|
||||
- `jws `
|
||||
- `token` (requires `FRP_AUTH_TOKEN`)
|
||||
- (empty) – No authentication
|
||||
- **Default**: `jws`
|
||||
|
||||
### FRP_AUTH_TOKEN
|
||||
|
||||
Specifies the token for FRP communication (required if `FRP_AUTH_METHOD=token`).
|
||||
- **Valid values**: Any non-empty string
|
||||
- **Default**: None
|
||||
|
||||
### FRP_ENABLE
|
||||
|
||||
Specifies whether to enable FRP for internal network tunneling. Requires additional FRP-related variables if using a custom server.
|
||||
- **Valid values**:
|
||||
- `0` (disable)
|
||||
- `1` (enable)
|
||||
- **Default**: `0`
|
||||
|
||||
### FRP_PORT
|
||||
|
||||
Specifies the FRP server's listening port.
|
||||
- **Valid values**: An integer in the range `1–65535`
|
||||
- **Default**: `7000` (if not set or set to `0`)
|
||||
|
||||
### JUICEFS
|
||||
|
||||
Installs [JuiceFS](https://juicefs.com/) alongside Olares.
|
||||
- **Valid values**: `1`
|
||||
- **Default**: None (does not install JuiceFS if not set)
|
||||
|
||||
### KUBE_TYPE
|
||||
|
||||
Determines the Kubernetes distribution to install.
|
||||
- **Valid values**:
|
||||
- `k8s`(full Kubernetes)
|
||||
- `k3s` (lightweight Kubernetes)
|
||||
- **Default**: `k3s`
|
||||
|
||||
### LOCAL_GPU_ENABLE
|
||||
Specifies whether to enable GPU support and install related drivers.
|
||||
- **Valid values**:
|
||||
- `0` (disable)
|
||||
- `1` (enable)
|
||||
- **Default**: `0`
|
||||
|
||||
### LOCAL_GPU_SHARE
|
||||
|
||||
Specifies whether to enable GPU sharing. Applies only if GPU is enabled.
|
||||
- **Valid values**:
|
||||
- `0` (disable)
|
||||
- `1` (enable)
|
||||
- **Default**: `0`
|
||||
- `0` (disable)
|
||||
- `1` (enable)
|
||||
- **Default**: `0`
|
||||
|
||||
### `FRP_AUTH_METHOD`
|
||||
Sets the FRP authentication method.
|
||||
- **Valid values**:
|
||||
- `jws`
|
||||
- `token` (requires `FRP_AUTH_TOKEN`)
|
||||
- (empty) – No authentication
|
||||
- **Default**: `jws`
|
||||
### NVIDIA_CONTAINER_REPO_MIRROR
|
||||
|
||||
### `FRP_AUTH_TOKEN`
|
||||
Specifies the token for FRP communication (required if `FRP_AUTH_METHOD=token`).
|
||||
- **Valid values**: Any non-empty string
|
||||
- **Default**: None
|
||||
Specifies the APT repository mirror for installing NVIDIA Container Toolkit.
|
||||
- **Valid values**:
|
||||
- `nvidia.github.io`
|
||||
- `mirrors.ustc.edu.cn` (recommended for better connectivity in mainland China)
|
||||
- **Default**: `nvidia.github.io`
|
||||
|
||||
### `FRP_ENABLE`
|
||||
Specifies whether to enable FRP for internal network tunneling. Requires additional FRP-related variables if using a custom server.
|
||||
- **Valid values**:
|
||||
- `0` (disable)
|
||||
- `1` (enable)
|
||||
- **Default**: `0`
|
||||
### PREINSTALL
|
||||
|
||||
### `FRP_PORT`
|
||||
Specifies the FRP server's listening port.
|
||||
- **Valid values**: An integer in the range `1–65535`
|
||||
- **Default**: `7000` (if not set or set to `0`)
|
||||
Runs only the pre-installation phase (system dependency setup) without proceeding to the full Olares installation.
|
||||
- **Valid values**: `1`
|
||||
- **Default**: None (performs full installation if not set)
|
||||
|
||||
### `JUICEFS`
|
||||
Installs [JuiceFS](https://juicefs.com/) alongside Olares.
|
||||
- **Valid values**: `1`
|
||||
- **Default**: None (does not install JuiceFS if not set)
|
||||
### PUBLICLY_ACCESSIBLE
|
||||
|
||||
### `KUBE_TYPE`
|
||||
Determines the Kubernetes distribution to install.
|
||||
- **Valid values**:
|
||||
- `k8s` (full Kubernetes)
|
||||
- `k3s` (lightweight Kubernetes)
|
||||
- **Default**: `k3s`
|
||||
|
||||
### `LOCAL_GPU_ENABLE`
|
||||
Specifies whether to enable GPU support and install related drivers.
|
||||
- **Valid values**:
|
||||
- `0` (disable)
|
||||
- `1` (enable)
|
||||
- **Default**: `0`
|
||||
|
||||
### `LOCAL_GPU_SHARE`
|
||||
Specifies whether to enable GPU sharing. Applies only if GPU is enabled.
|
||||
- **Valid values**:
|
||||
- `0` (disable)
|
||||
- `1` (enable)
|
||||
- **Default**: `0`
|
||||
|
||||
### `NVIDIA_CONTAINER_REPO_MIRROR`
|
||||
Specifies the APT repository mirror for installing NVIDIA Container Toolkit.
|
||||
- **Valid values**:
|
||||
- `nvidia.github.io`
|
||||
- `mirrors.ustc.edu.cn` (recommended for better connectivity in mainland China)
|
||||
- **Default**: `nvidia.github.io`
|
||||
|
||||
### `PREINSTALL`
|
||||
Runs only the pre-installation phase (system dependency setup) without proceeding to the full Olares installation.
|
||||
- **Valid values**: `1`
|
||||
- **Default**: None (performs full installation if not set)
|
||||
|
||||
### `PUBLICLY_ACCESSIBLE`
|
||||
Explicitly specifies that this machine is accessible publicly on the internet, and a reverse proxy should not be used.
|
||||
- **Valid values**:
|
||||
- `0` (false)
|
||||
- `1` (true)
|
||||
- **Default**: `0`
|
||||
- `0` (false)
|
||||
- `1` (true)
|
||||
- **Default**: `0`
|
||||
|
||||
### REGISTRY_MIRRORS
|
||||
|
||||
### `REGISTRY_MIRRORS`
|
||||
Specifies a custom Docker registry mirror for faster image pulls.
|
||||
- **Valid values**: `https://mirrors.olares.com` or any other valid URL
|
||||
- **Default**: `https://registry-1.docker.io`
|
||||
Specifies a custom Docker registry mirror for faster image pulls.
|
||||
- **Valid values**: `https://mirrors.olares.com` or any other valid URL
|
||||
- **Default**: `https://registry-1.docker.io`
|
||||
|
||||
### `TERMINUS_IS_CLOUD_VERSION`
|
||||
Marks the machine explicitly as a cloud instance.
|
||||
- **Valid values**: `true`
|
||||
- **Default**: None
|
||||
### TERMINUS_IS_CLOUD_VERSION
|
||||
|
||||
### `TERMINUS_OS_DOMAINNAME`
|
||||
Sets the domain name before installation to skip the interactive prompt.
|
||||
- **Valid values**: Any valid domain name
|
||||
- **Default**: None (prompts for domain name if not set)
|
||||
Marks the machine explicitly as a cloud instance.
|
||||
- **Valid values**: `true`
|
||||
- **Default**: None
|
||||
|
||||
### `TERMINUS_OS_EMAIL`
|
||||
Specifies the email address to use instead of a generated one.
|
||||
- **Valid values**: Any valid email address
|
||||
- **Default**: None (a temporary email is generated if not set)
|
||||
### TERMINUS_OS_DOMAINNAME
|
||||
|
||||
### `TERMINUS_OS_PASSWORD`
|
||||
Specifies the password to use instead of a generated one.
|
||||
- **Valid values**: A valid password with 6–32 characters
|
||||
- **Default**: A randomly generated 8-character password
|
||||
Sets the domain name before installation to skip the interactive prompt.
|
||||
- **Valid values**: Any valid domain name
|
||||
- **Default**: None (prompts for domain name if not set)
|
||||
|
||||
### `TERMINUS_OS_USERNAME`
|
||||
Specifies the username before installation to skip the interactive prompt.
|
||||
- **Valid values**: Any valid username (2–250 characters, excluding reserved keywords)
|
||||
- **Default**: None (prompts for username if not set)
|
||||
- **Validation**: Reserved keywords include `user`, `system`, `space`, `default`, `os`, `kubesphere`, `kube`, `kubekey`, `kubernetes`, `gpu`, `tapr`, `bfl`, `bytetrade`, `project`, `pod`
|
||||
### TERMINUS_OS_EMAIL
|
||||
|
||||
### `TOKEN_MAX_AGE`
|
||||
Sets the maximum validity period for a token (in seconds).
|
||||
- **Valid values**: Any integer (in seconds)
|
||||
Specifies the email address to use instead of a generated one.
|
||||
- **Valid values**: Any valid email address
|
||||
- **Default**: None (a temporary email is generated if not set)
|
||||
|
||||
### TERMINUS_OS_PASSWORD
|
||||
|
||||
Specifies the password to use instead of a generated one.
|
||||
- **Valid values**: A valid password with 6–32 characters
|
||||
- **Default**: A randomly generated 8-character password
|
||||
|
||||
### TERMINUS_OS_USERNAME
|
||||
|
||||
Specifies the username before installation to skip the interactive prompt.
|
||||
- **Valid values**: Any valid username (2–250 characters, excluding reserved keywords)
|
||||
- **Default**: None (prompts for username if not set)
|
||||
- **Validation**: Reserved keywords include `user`, `system`, `space`, `default`, `os`, `kubesphere`, `kube`, `kubekey`, `kubernetes`, `gpu`, `tapr`, `bfl`, `bytetrade`, `project`, `pod`.
|
||||
|
||||
### TOKEN_MAX_AGE
|
||||
|
||||
Sets the maximum validity period for a token (in seconds).
|
||||
- **Valid values**: Any integer (in seconds)
|
||||
- **Default**: `31536000` (365 days)
|
||||
@@ -3,6 +3,7 @@ outline: [2,3]
|
||||
description: Learn the different methods to access Olares services locally for improved speed and offline capability.
|
||||
---
|
||||
# Access Olares services locally
|
||||
|
||||
Olares is designed to provide seamless access to your self-hosted services anytime, anywhere.
|
||||
|
||||
However, accessing your devices locally provides several advantages:
|
||||
@@ -11,7 +12,6 @@ However, accessing your devices locally provides several advantages:
|
||||
- **Offline independence**: Access your data and apps even when your internet service is unavailable.
|
||||
|
||||
## Objectives
|
||||
|
||||
By the end of this tutorial, you will learn how to:
|
||||
|
||||
- Establish a secure, high-speed local connection using the LarePass VPN.
|
||||
@@ -34,74 +34,48 @@ There are four ways to establish a local connection:
|
||||
## Method 1: Enable LarePass VPN
|
||||
The LarePass VPN is designed to secure your connection while optimizing performance. When enabled, LarePass detects if you are on the same network as your device and switches to **Intranet** mode.
|
||||
|
||||
:::tip Always enable VPN for remote access
|
||||
Keep LarePass VPN enabled. It automatically prioritizes the fastest available route to ensure you always get the best speed possible without manual switching.
|
||||
:::
|
||||
:::info iOS and macOS setup
|
||||
On iOS or macOS, you may be prompted to add a VPN Configuration to your system settings the first time you enable the feature. Allow this to complete the setup.
|
||||
:::
|
||||
<!--@include: ../../reusables/larepass-vpn.md{19,24}-->
|
||||
|
||||
Enable the LarePass VPN directly on the device you are currently using to access Olares.
|
||||
|
||||
<tabs>
|
||||
<template #On-LarePass-mobile-client>
|
||||
|
||||
1. Open the LarePass app, and go to **Settings**.
|
||||
2. In the **My Olares** card, toggle on the VPN switch.
|
||||
|
||||

|
||||
</template>
|
||||
<template #On-LarePass-desktop-client>
|
||||
|
||||
1. Open the LarePass app, and click your avatar in the top-left corner to open the user menu.
|
||||
2. Toggle on the switch for **VPN connection**.
|
||||
|
||||

|
||||
</template>
|
||||
</tabs>
|
||||
|
||||
Once enabled, check the status indicator in LarePass to verify the connection type:
|
||||
|
||||
| Status | Description |
|
||||
|:-------------|:---------------------------------------------------------|
|
||||
| **Intranet** | Direct connection via your local LAN IP. Fastest speeds. |
|
||||
| **P2P** | Direct encrypted tunnel between devices. High speed. |
|
||||
| **DERP** | Routed via a secure relay server. Used as a fallback. |
|
||||
<!--@include: ../../reusables/larepass-vpn.md{26,50}-->
|
||||
|
||||
## Method 2: Use `.local` domain
|
||||
If you prefer not to install additional apps, you can access services using the `.local` domain. There are two domain formats available depending on your operating system.
|
||||
|
||||
:::info Use HTTP protocol
|
||||
The `.local` domain does not support HTTPS. You must explicitly use `http://` at the beginning of the URL.
|
||||
:::
|
||||
If you prefer not to install additional apps, you can access services using the `.local` domain. There are two domain formats available depending on your operating system.
|
||||
|
||||
### Single-level domain (All operating systems)
|
||||
:::warning Supported for community apps only
|
||||
Olares system apps such as Desktop and Files do not support this URL format and will not load correctly.
|
||||
:::
|
||||
This format uses a single-level domain by connecting the entrance ID and the username with hyphens (`-`).
|
||||
- **Default URL**:
|
||||
```plain
|
||||
https://<entrance_id>.<username>.olares.com
|
||||
```
|
||||
- **Local-access URL**:
|
||||
```plain
|
||||
http://<entrance_id>-<username>-olares.local
|
||||
```
|
||||
|
||||
### Multi-level domain (macOS and iOS only)
|
||||
Apple devices support local service discovery via [Bonjour](https://developer.apple.com/bonjour/) (zero‑configuration networking), which can resolve multi‑label domains under `.local` on macOS and iOS. This allows a local URL format that mirrors the remote address.
|
||||
**Standard URL**
|
||||
```plain
|
||||
https://<entrance_id>.<username>.olares.com
|
||||
```
|
||||
**Local URL**
|
||||
```plain
|
||||
http://<entrance_id>-<username>-olares.local
|
||||
```
|
||||
|
||||
### Multi-level domain
|
||||
|
||||
The multi-level format below matches the structure of your standard Olares URL. Use it as shown.
|
||||
|
||||
<!--@include: ../../reusables/local-domain.md{7,23}-->
|
||||
|
||||
- **Default URL**:
|
||||
```plain
|
||||
https://<entrance_id>.<username>.olares.com
|
||||
```
|
||||
- **Local-access URL**:
|
||||
```plain
|
||||
http://<entrance_id>.<username>.olares.local
|
||||
```
|
||||

|
||||
|
||||
#### macOS and iOS
|
||||
Apple devices support local service discovery via [Bonjour](https://developer.apple.com/bonjour/) (zero‑configuration networking), which can resolve multi‑label domains under `.local` on macOS and iOS.
|
||||
|
||||
Therefore, no extra setup is needed. You can directly use local URL in your browser.
|
||||
|
||||
#### Windows
|
||||
|
||||
<!--@include: ../../reusables/local-domain.md{26,40}-->
|
||||
|
||||
## Method 3: Configure local DNS
|
||||
For a seamless experience where standard URLs resolve to your local IP address automatically, you can configure your network DNS. This configuration ensures consistent access across all devices on the network without requiring individual client setup.
|
||||
|
||||
@@ -212,39 +186,7 @@ If the IP address starts with `192.168`, it indicates successful configuration.
|
||||
|
||||
|
||||
## FAQs
|
||||
### Why doesn't LarePass VPN work on my Mac anymore?
|
||||
If you successfully enabled the VPN previously, but it has stopped working, you might need to reset the system extension.
|
||||
:::info
|
||||
Depending on your macOS version, the UI might look slightly different.
|
||||
:::
|
||||
1. Open **System Settings**, search for "Extension", and select **Login Items & Extensions**.
|
||||
2. Scroll to the **Network Extensions** section and click the info icon (ⓘ) to view loaded extensions.
|
||||
3. Find LarePass, click the three dots (...), and select **Delete Extension**.
|
||||
4. Confirm the uninstallation.
|
||||
5. Restart your Mac and re-enable the VPN in the LarePass desktop client.
|
||||
|
||||
### Why can't I enable LarePass VPN on Windows?
|
||||
Third-party antivirus software might mistakenly flag the LarePass desktop client as suspicious, preventing it from launching the VPN service.
|
||||
<!--@include: ../../reusables/larepass-vpn.md{50,57}-->
|
||||
|
||||
If prompted by your antivirus when opening LarePass for the first time, allow the application to continue.
|
||||
|
||||
If the VPN still fails to enable:
|
||||
1. Open your security software and check if LarePass was blocked.
|
||||
2. Add the main LarePass executable to the allowlist or exclusions of your antivirus.
|
||||
3. Restart LarePass and enable the VPN.
|
||||
|
||||
### Why the `.local` domain does not work in Chrome (macOS)?
|
||||
Chrome may fail to access local URLs if macOS blocks local network permissions.
|
||||
To enable access:
|
||||
1. Open Apple menu and go to **System Settings**.
|
||||
2. Go to **Privacy & Security** > **Local Network**.
|
||||
3. Find Google Chrome and Google Chrome Helper in the list and enable the toggles.
|
||||
{width=400}
|
||||
|
||||
4. Restart Chrome and try accessing the local URL again.
|
||||
|
||||
### Why does the application fail to load in an iFrame when using a `.local` domain on Chrome (macOS)?
|
||||
Chrome might default to HTTPS when using local domains, and you might see a "connection not secure" warning.
|
||||

|
||||
|
||||
To address this, explicitly add the HTTP protocol (`http://`) to the beginning of the URL. This tells Chrome it's a local, non-encrypted connection, which is expected on your home network.
|
||||
<!--@include: ../../reusables/local-domain.md{42,75}-->
|
||||
@@ -1,81 +1,48 @@
|
||||
---
|
||||
outline: [2,3]
|
||||
description: Learn how to access your Olares services securely using the LarePass VPN.
|
||||
description: Learn how to access your Olares services securely using LarePass VPN or the .local domain.
|
||||
---
|
||||
# Access Olares services securely using LarePass VPN
|
||||
# Access Olares services securely
|
||||
|
||||
Typically, you access Olares services through a browser using a URL like `https://desktop.<username>.olares.com`. This way, you can reach your services from any device at any time.
|
||||
Typically, you access Olares services through a browser using a URL like `https://desktop.<username>.olares.com`. This way, you can reach your services from any device at any time. You can access Olares securely from your home network or from elsewhere.
|
||||
|
||||
While this address works from anywhere, it's recommended to enable the LarePass VPN to ensure your connection is always secure and efficient. The client automatically detects your network environment and selects the best connection method:
|
||||
- **At home**: It establishes a direct **Intranet** connection to allow faster file transfers on your local network.
|
||||
- **From remote**: It switches to a secure encrypted tunnel to ensure you remain connected safely when accessing remotely.
|
||||
- [Using LarePass VPN](#using-larepass-vpn): Use this whether you are on your home network or away.
|
||||
- [Using the .local domain](#using-the-local-domain): Use this only when your client device and Olares are on the same LAN.
|
||||
|
||||
## Download LarePass
|
||||
To use the secure VPN connection, the LarePass client must be installed on the device you are using.
|
||||
- **Mobile**: Use the LarePass app installed during the Olares ID creation process.
|
||||
- **Desktop**: Download and install the LarePass desktop client.
|
||||
## Using LarePass VPN
|
||||
|
||||
1. Visit <AppLinkGlobal />.
|
||||
2. Download the version compatible with your operating system.
|
||||
It is recommended to enable the LarePass VPN to ensure your connection is always secure and efficient. The client automatically detects your network environment and selects the best connection method:
|
||||
|
||||
## Enable LarePass VPN
|
||||
Once installed, enable the VPN directly on the device you are using to access Olares.
|
||||
- **At home**: It establishes a direct Intranet connection to allow faster file transfers on your local network.
|
||||
- **From remote**: It switches to a secure encrypted tunnel so you remain connected safely when accessing remotely.
|
||||
|
||||
:::tip Always enable VPN for remote access
|
||||
Keep LarePass VPN enabled. It automatically prioritizes the fastest available route to ensure you always get the best speed possible without manual switching.
|
||||
:::
|
||||
:::info iOS and macOS setup
|
||||
On iOS or macOS, you may be prompted to add a VPN Configuration to your system settings the first time you enable the feature. Allow this to complete the setup.
|
||||
:::
|
||||
<!--@include: ../../reusables/larepass-vpn.md{19,24}-->
|
||||
|
||||
<tabs>
|
||||
<template #On-LarePass-mobile-client>
|
||||
Enable the LarePass VPN directly on the device you are currently using to access Olares.
|
||||
|
||||
1. Open the LarePass app and go to **Settings**.
|
||||
2. In the **My Olares** card, toggle on the VPN switch.
|
||||
<!--@include: ../../reusables/larepass-vpn.md{26,50}-->
|
||||
|
||||

|
||||
</template>
|
||||
<template #On-LarePass-desktop-client>
|
||||
## Using the .local domain
|
||||
|
||||
1. Open the LarePass app and click your avatar in the top-left corner to open the user menu.
|
||||
2. Toggle on the switch for **VPN connection**.
|
||||
Use the `.local` domain when your device and Olares are on the same LAN.
|
||||
|
||||

|
||||
</template>
|
||||
</tabs>
|
||||
### URL format
|
||||
|
||||
## Verify the connection type
|
||||
Once enabled, check the status indicator in LarePass to verify the connection type:
|
||||
<!--@include: ../../reusables/local-domain.md{7,23}-->
|
||||
|
||||
| Status | Description |
|
||||
|:-------------|:---------------------------------------------------------|
|
||||
| **Intranet** | Direct connection via your local LAN IP. Fastest speeds. |
|
||||
| **P2P** | Direct encrypted tunnel between devices. High speed. |
|
||||
| **DERP** | Routed via a secure relay server. Used as a fallback. |
|
||||
### macOS
|
||||
|
||||
## FAQs
|
||||
### Why doesn't LarePass VPN work on my Mac anymore?
|
||||
If you successfully enabled the VPN previously, but it has stopped working, you might need to reset the system extension.
|
||||
:::info
|
||||
Depending on your macOS version, the UI might look slightly different.
|
||||
:::
|
||||
1. Open **System Settings**, search for "Extension", and select **Login Items & Extensions**.
|
||||
2. Scroll to the **Network Extensions** section and click the info icon (ⓘ) to view loaded extensions.
|
||||
3. Find LarePass, click the three dots (...), and select **Delete Extension**.
|
||||
4. Confirm the uninstallation.
|
||||
5. Restart your Mac and re-enable the VPN in the LarePass desktop client.
|
||||
No setup is needed. Use the local URL in your browser (for example, `http://desktop.<username>.olares.local`).
|
||||
|
||||
### Why can't I enable LarePass VPN on Windows?
|
||||
Third-party antivirus software might mistakenly flag the LarePass desktop client as suspicious, preventing it from launching the VPN service.
|
||||
### Windows
|
||||
<!--@include: ../../reusables/local-domain.md{26,40}-->
|
||||
|
||||
If prompted by your antivirus when opening LarePass for the first time, allow the application to continue.
|
||||
### FAQs
|
||||
|
||||
If the VPN still fails to enable:
|
||||
1. Open your security software and check if LarePass was blocked.
|
||||
2. Add the main LarePass executable to the allowlist or exclusions of your antivirus.
|
||||
3. Restart LarePass and enable the VPN.
|
||||
<!--@include: ../../reusables/larepass-vpn.md{50,57}-->
|
||||
|
||||
<!--@include: ../../reusables/local-domain.md{42,75}-->
|
||||
|
||||
## Learn more
|
||||
- [Access Olares locally](../best-practices/local-access.md): Explore detailed instructions for all available local network connection methods.
|
||||
- [Network](../../developer/concepts/network.md): Learn about the different entry points in Olares.
|
||||
- [Network](../../developer/concepts/network.md): Learn about the different entry points in Olares.
|
||||
|
||||
65
docs/manual/help/ts-larepass-vpn-not-working.md
Normal file
@@ -0,0 +1,65 @@
|
||||
---
|
||||
outline: [2, 3]
|
||||
description: Troubleshoot LarePass VPN not working on macOS or Windows.
|
||||
---
|
||||
|
||||
# LarePass VPN not working
|
||||
|
||||
Use this guide when the LarePass VPN toggle does nothing, the VPN stays stuck in "connecting", or a previously working VPN connection suddenly stops on macOS or Windows.
|
||||
|
||||
## Condition
|
||||
|
||||
**macOS**
|
||||
- Clicking the VPN toggle in the LarePass desktop client does nothing, or the VPN status stays stuck in "connecting".
|
||||
- LarePass VPN used to work on this device but now fails to connect or drops immediately.
|
||||
**Windows**
|
||||
- Clicking the VPN toggle in the LarePass desktop client does nothing, or the VPN cannot be enabled.
|
||||
|
||||
## Cause
|
||||
|
||||
- **macOS**: LarePass VPN requires both a system-level network extension and a VPN configuration to be fully set up. If you skipped or did not complete either step during the initial setup prompt, or if the network extension has become stuck or corrupted, macOS will block LarePass from creating the VPN tunnel.
|
||||
|
||||
- **Windows**: Third-party antivirus or security software may mistakenly flag the LarePass desktop client as suspicious, preventing the VPN service from starting.
|
||||
|
||||
## Solution
|
||||
|
||||
### macOS
|
||||
|
||||
Reset the network extension and complete the full setup flow to restore the VPN.
|
||||
|
||||
:::info
|
||||
Depending on your macOS version, the UI might look slightly different.
|
||||
:::
|
||||
|
||||
1. Open **System Settings**, search for "Extension", and select **Extensions**.
|
||||
2. Scroll to the **Network Extensions** section and click <span class="material-symbols-outlined">info</span> to view loaded extensions.
|
||||
{width=70%}
|
||||
|
||||
3. Find **LarePass**, click the three dots (**...**), and select **Delete Extension**.
|
||||
4. Confirm the uninstallation.
|
||||
5. Restart your Mac.
|
||||
6. Open the LarePass desktop client and re-enable the VPN.
|
||||
7. Complete the system prompts to restore the extension and VPN configuration:
|
||||
|
||||
a. When macOS prompts to add the LarePass network extension, click **Open System Settings**.
|
||||
{width=40%}
|
||||
|
||||
b. Toggle on **LarePass**.
|
||||
{width=70%}
|
||||
|
||||
c. When prompted to add VPN configurations, click **Allow**.
|
||||
{width=40%}
|
||||
|
||||
### Windows
|
||||
|
||||
:::info LarePass blocked on first launch
|
||||
If your antivirus blocked LarePass when you first opened it after installation, allow the app in your security software before following the steps below.
|
||||
:::
|
||||
|
||||
1. In your antivirus or security software, open the **Allowlist**, **Exclusions**, or **Exceptions** settings.
|
||||
2. Add the main LarePass executable or installation directory to the allowlist. Common locations include:
|
||||
- `C:\Users\<your-username>\AppData\Local\LarePass\`
|
||||
- `C:\Program Files\LarePass\`
|
||||
3. Apply the changes and restart your antivirus or security software if required.
|
||||
4. Quit and reopen the LarePass desktop client.
|
||||
5. Try enabling **VPN connection** again from within LarePass.
|
||||
@@ -65,13 +65,38 @@ Upon completion, you will receive an Organization Olares ID.
|
||||
</template>
|
||||
</Tabs>
|
||||
|
||||
## Import an existing account
|
||||
## Import an account
|
||||
|
||||
You can also set up an account by importing an existing Olares ID:
|
||||
You can import an existing Olares ID to LarePass using its 12-word mnemonic phrase to access your Olares services on a new device or another LarePass client.
|
||||
|
||||
:::tip Back up mnemonic phrase
|
||||
You must have already [backed up the mnemonic phrase](back-up-mnemonics.md) for the Olares ID to import.
|
||||
Make sure you have already [backed up the mnemonic phrase](back-up-mnemonics.md) for the Olares ID to import.
|
||||
:::
|
||||
|
||||
1. In LarePass app, tap **Import an account**.
|
||||
2. Enter the 12-word mnemonic phrase to import your Olares ID.
|
||||
<Tabs>
|
||||
<template #iOS-&-Android>
|
||||
|
||||
1. Open the LarePass app.
|
||||
2. Tap your profile avatar.
|
||||
3. On the Switch account page, tap **Add a new account** at the bottom.
|
||||
4. Tap **Import an account**.
|
||||
5. Enter the 12-word mnemonic phrase for your Olares ID.
|
||||
|
||||
</template>
|
||||
<template #macOS-&-Windows>
|
||||
|
||||
1. Open the LarePass desktop client.
|
||||
2. Click your profile avatar.
|
||||
3. Click **Switch account**.
|
||||
4. Click **Add a new account** at the bottom.
|
||||
5. Enter the 12-word mnemonic phrase for your Olares ID.
|
||||
|
||||
</template>
|
||||
<template #Chrome-extension>
|
||||
|
||||
1. Open the LarePass extension in Chrome.
|
||||
2. Click the options icon above your profile avatar.
|
||||
3. Click **Add a new account**.
|
||||
4. Enter the 12-word mnemonic phrase for your Olares ID.
|
||||
</template>
|
||||
</Tabs>
|
||||
@@ -9,37 +9,46 @@ LarePass is the official cross-platform client software for Olares. It acts as a
|
||||
|
||||

|
||||
|
||||
|
||||
## Key features
|
||||
- Account and identity management
|
||||
- Secure file access and sync
|
||||
- Device and network management
|
||||
- Password and secret management
|
||||
- Knowledge collection
|
||||
|
||||
### Account & identity management
|
||||
Create and manage your Olares ID, connect integrations with other services, and back up your credentials securely.
|
||||
- [Create an Olares ID](create-account.md)
|
||||
- [Back up mnemonics](back-up-mnemonics.md)
|
||||
- [Set or reset local password](back-up-mnemonics.md#set-up-local-password)
|
||||
- [Manage integrations](integrations.md)
|
||||
## Download LarePass
|
||||
|
||||
### Secure file access & sync
|
||||
- [Manage files with LarePass](manage-files.md)
|
||||
### iOS
|
||||
Visit the [App Store product page](https://apps.apple.com/us/app/larepass/id6448082605) to download LarePass.
|
||||
|
||||
### Device & network management
|
||||
Activate and manage Olares devices, and securely connect to Olares via LarePass VPN.
|
||||
- [Activate your Olares device](activate-olares.md)
|
||||
- [Upgrade Olares](manage-olares.md#upgrade-olares)
|
||||
- [Log in to Olares with 2FA](activate-olares.md#two-factor-verification-with-larepass)
|
||||
- [Manage Olares](manage-olares.md)
|
||||
- [Switch networks](manage-olares.md#switch-from-wired-to-wireless-network)
|
||||
- [Enable VPN for remote access](private-network.md)
|
||||
### Android
|
||||
Visit the [Google Play product page](https://play.google.com/store/apps/details?id=com.terminus.termipass), or download the latest APK directly from the [LarePass website](https://www.olares.com/larepass).
|
||||
|
||||
### Password & secret management
|
||||
Use Vault to autofill credentials, store passwords, and generate 2FA codes across devices.
|
||||
- [Autofill passwords](/manual/larepass/autofill.md)
|
||||
- [Generate 2FA codes](/manual/larepass/two-factor-verification.md)
|
||||
### macOS & Windows
|
||||
Download the latest desktop client from the [LarePass website](https://www.olares.com/larepass).
|
||||
|
||||
### Knowledge collection
|
||||
Use LarePass to collect web content and follow RSS feeds.
|
||||
- [Collect content via LarePass extension](manage-knowledge.md#collect-content-via-the-larepass-extension)
|
||||
- [Subscribe to RSS feeds](manage-knowledge.md#subscribe-to-rss-feeds)
|
||||
### Chrome extension
|
||||
|
||||
The LarePass extension allows you to collect content and manage passwords directly from your browser. It currently supports Google Chrome only and must be installed manually.
|
||||
|
||||
:::warning Keep the extension folder
|
||||
Your browser loads the extension from the folder you select. If you delete, move, or rename that folder, the extension will stop working.
|
||||
Extract the ZIP file to a permanent location, such as a folder under your user directory, rather than a temporary directory.
|
||||
:::
|
||||
|
||||
1. Visit the [LarePass website](https://www.olares.com/larepass) and download the extension ZIP file.
|
||||
2. Extract the ZIP file to a permanent folder on your computer.
|
||||
3. In Chrome, go to `chrome://extensions/`.
|
||||
4. Enable **Developer mode** in the top-right corner.
|
||||
5. Click **Load unpacked** and select the extracted extension folder.
|
||||
|
||||
:::tip Quick access
|
||||
After installation, click the puzzle icon in your browser toolbar and pin the LarePass extension for one-click access.
|
||||
:::
|
||||
|
||||
## Set up account
|
||||
- On mobile devices, you can [create an Olares ID](/manual/larepass/create-account.md#create-an-olares-id) directly in the app.
|
||||
- On the desktop client or Chrome extension, you must [import an Olares account](/manual/larepass/create-account.md#import-an-account).
|
||||
|
||||
## Feature comparison
|
||||
|
||||
@@ -180,39 +189,3 @@ Use LarePass to collect web content and follow RSS feeds.
|
||||
</tr>
|
||||
</tbody>
|
||||
</table>
|
||||
|
||||
|
||||
## Download and install LarePass
|
||||
|
||||
Get the latest version for your device at the [LarePass website](https://www.olares.com/larepass).
|
||||
|
||||
### Install the LarePass browser extension
|
||||
|
||||
<tabs>
|
||||
<template #Install-from-Chrome-Web-Store>
|
||||
|
||||
1. Search for **LarePass** in the [Chrome Web Store](https://chrome.google.com/webstore).
|
||||
2. Open the details page and click **Add to Chrome**.
|
||||
3. Log into the LarePass extension by importing your Olares ID:
|
||||
- Open the LarePass extension, and click **Import an account**.
|
||||
- Enter the mnemonics for your Olares ID.
|
||||
- Enter your Olares password to complete login.
|
||||
|
||||
</template>
|
||||
|
||||
<template #Install-offline>
|
||||
|
||||
1. Visit [https://www.olares.com/larepass](https://www.olares.com/larepass) and download the extension ZIP file.
|
||||
2. Go to `chrome://extensions/` in your browser.
|
||||
3. Enable **Developer mode** in the top-right corner.
|
||||
4. Click **Load unpacked** and select the extracted LarePass extension folder.
|
||||
5. Log in:
|
||||
- Open the LarePass extension, and click **Import an account**.
|
||||
- Enter the mnemonics for your Olares ID.
|
||||
- Enter your Olares password to complete login.
|
||||
</template>
|
||||
</tabs>
|
||||
|
||||
:::tip Quick access
|
||||
After installation, pin the LarePass extension from Chrome’s extension menu for one-click access.
|
||||
:::
|
||||
|
||||
@@ -1,53 +1,53 @@
|
||||
# Get familiar with Desktop
|
||||
|
||||
The Desktop application serves as the primary interface for user interaction with the Olares system. It offers an intuitive and efficient way to manage and utilize both built-in system applications and those you install.
|
||||
Desktop is the primary interface for interacting with Olares. From here, you can open and manage built-in system apps as well as the apps you install.
|
||||
|
||||
## Desktop concepts
|
||||
## Desktop basics
|
||||
|
||||
![Desktp[]](/images/manual/olares/desktop.png)
|
||||

|
||||
|
||||
### Dock & Launchpad
|
||||
### Dock
|
||||
|
||||
* **Dock:** An application quick-launch bar located on the side of the screen.
|
||||
* **Launchpad:** Accessed by clicking the "Launchpad" icon on the Dock, it displays all installed applications.
|
||||
The Dock is an application quick-launch bar on the left side of the screen. Use it to open frequently used apps and access key Desktop features.
|
||||
|
||||
### Launchpad
|
||||
|
||||
Launchpad shows all installed applications. Click the Launchpad icon in the Dock to open it.
|
||||
|
||||
### Application windows
|
||||
|
||||
* Applications open in "window" mode by default.
|
||||
* Windows support standard operations: dragging, resizing, minimizing, maximizing, and closing.
|
||||
* **Search:** Enables quick application launching, file searching, and more.
|
||||
By default, applications open in window mode as an embedded page within Desktop. You can manage windows like you would on a standard computer:
|
||||
|
||||
## Use the Launchpad
|
||||
- Drag the title bar to move the window.
|
||||
- Drag the window edges to resize it.
|
||||
- Minimize, maximize, or close the window.
|
||||
- Click <i class="material-symbols-outlined">open_in_new</i> to open the app in a new browser tab.
|
||||
|
||||
From the Launchpad, you can:
|
||||
:::info
|
||||
Some applications only support opening in a browser tab.
|
||||
:::
|
||||
|
||||
* View all installed applications.
|
||||
* Click an application icon to open it.
|
||||
* Drag icons to reorder them within the Launchpad.
|
||||
* Drag an icon to the Dock for quick access.
|
||||
### Search and notifications
|
||||
|
||||
- **Search**: Quickly launch applications and find supported content across Olares.
|
||||
- **Notifications**: Click the notification icon to view system and application notifications.
|
||||
|
||||
## Use Launchpad
|
||||
|
||||
From Launchpad, you can:
|
||||
|
||||
- View all installed applications.
|
||||
- Click an application icon to open it.
|
||||
- Drag icons to reorder them within Launchpad.
|
||||
- Drag an icon to the Dock for quick access.
|
||||
|
||||
### Uninstall applications
|
||||
|
||||
1. Press and hold an application icon to enter the editing mode.
|
||||
2. If an "X" appears in the top-right corner of the application icon, click it to delete the application.
|
||||
1. Press and hold an application icon to enter editing mode.
|
||||
2. If a <i class="material-symbols-outlined">close_small</i> icon appears in the top-left corner of the app icon, click it to uninstall the application.
|
||||
|
||||
::: tip Note
|
||||
Built-in system applications such as Files, Market, and Profile cannot be uninstalled.
|
||||
:::
|
||||
|
||||
### Control application windows
|
||||
|
||||
You can access applications via two modes.
|
||||
|
||||
By default, applications open in "window" mode, which is an iframe page embedded within the desktop. You can manipulate these windows much like standard computer windows:
|
||||
|
||||
* Drag the title bar to move the window.
|
||||
* Drag the window's edges to resize it.
|
||||
* Minimize, maximize, or close the window.
|
||||
* Click the <i class="material-symbols-outlined">open_in_new</i> button to open the application in a new browser tab.
|
||||
|
||||
::: tip Note
|
||||
Some applications only support opening in a tabbed view.
|
||||
:::info
|
||||
Built-in system applications such as Files, Market, and Settings cannot be uninstalled.
|
||||
:::
|
||||
|
||||
## Search within Olares
|
||||
|
||||
@@ -15,9 +15,10 @@ To unlock the full potential of Wise, it is recommended to install the following
|
||||
|
||||
- **Rss Subscribe**: Use it to subscribe to RSS feeds directly while browsing web pages.
|
||||
- **YT-DLP**: Use it to download audio and video from supported web pages into Wise.
|
||||
- **Twitter/X plugin**: Use it to save posts and download attached files from Twitter/X into Wise.
|
||||
|
||||
:::tip
|
||||
Wise works without these apps, but in-browser subscription and media download will be unavailable until you install them.
|
||||
Wise works without these apps, but some features require them, such as in-browser subscriptions, media downloads, and Twitter/X link recognition and saving.
|
||||
:::
|
||||
|
||||
## Build your library
|
||||
@@ -40,6 +41,10 @@ Import files directly from your computer, including PDFs, EPUBs, audio, video, a
|
||||
|
||||
1. Click <i class="material-symbols-outlined">add_circle</i> in the bottom-left menu bar, and select **Upload**.
|
||||
2. Select one or more files from your local computer.
|
||||
:::tip
|
||||
You can also drag and drop files into the Wise interface.
|
||||
:::
|
||||
3. In the Upload files window, select the destination folder, then click **Confirm**.
|
||||
|
||||
#### Add items via link
|
||||
|
||||
@@ -52,11 +57,16 @@ If a link requires login or other access control, Wise may need cookies to fetch
|
||||
1. Click <i class="material-symbols-outlined">add_circle</i> in the bottom-left menu bar, and select **Add Link**.
|
||||
2. Paste or type a URL.
|
||||
|
||||
Wise analyzes the link and lists all actions available:
|
||||
- **Save to library**: The content will be saved as an item in your library and added to **Inbox**.
|
||||
Wise analyzes the link and lists all the available actions:
|
||||
- **Save to library**: The content will be saved as an item in your library and added to **Inbox**. Twitter/X posts are supported when the Twitter/X plugin is installed.
|
||||
- **Subscribe to RSS feed**: If Wise detects one or more RSS feeds for the site, they will be listed here. Select the feed you want to follow, and new items from that feed will be automatically [added to **Feeds**](./subscribe).
|
||||
{width=300}
|
||||
- **Download file**: If Wise detects videos or other downloadable files on the page, this option will appear. Select the file you want to download to save it for offline access. **[YT-DLP](https://market.olares.com/app/market.olares/ytdlp)** is required.
|
||||
- **Download file**: If Wise detects downloadable media (such as audio, video, or attached files in Twitter/X posts), this option will appear. Select the file you want to download to save it for offline access.
|
||||
:::tip Install helper services
|
||||
Some downloads require helper services:
|
||||
- [YT-DLP](https://market.olares.com/app/market.olares/ytdlp) is commonly used to download audio or video from supported pages when downloadable media is available.
|
||||
- [Twitter/X plugin](https://market.olares.com/app/market.olares/twitter) is required to download attached files from Twitter/X posts.
|
||||
:::
|
||||
{width=300}
|
||||
|
||||
Newly saved items will appear under their content type.
|
||||
@@ -72,22 +82,23 @@ You can also save content to Wise directly from your browser using the [LarePass
|
||||
|
||||
Items saved via LarePass are added to your Wise library and appear in the main **Inbox** folder and under the appropriate content type.
|
||||
|
||||
### Monitor and manage media downloads
|
||||
### Monitor and manage file tasks
|
||||
|
||||
When you add new audio or video content, Wise automatically creates download tasks and save media files to Olares. This:
|
||||
Wise tracks background transfer tasks in two lists:
|
||||
|
||||
- Ensures your media is available offline.
|
||||
- Protects your library if the original source is removed.
|
||||
- Makes it faster to open and play items.
|
||||
- **Download list**: Created when you add downloadable media. Wise downloads the files to Olares so you can access them offline.
|
||||
- **Upload list**: Created when you upload local files into Wise. Wise tracks the upload progress and results.
|
||||
|
||||
To manage all download tasks:
|
||||
To manage transfer tasks:
|
||||
|
||||
1. Go to **<i class="material-symbols-outlined">settings</i> Settings** > **Transmission** > **Download**.
|
||||
2. Review the list of media downloads and their status.
|
||||
3. You can:
|
||||
|
||||
- Click <i class="material-symbols-outlined">folder_open</i> to locate a downloaded file in Files.
|
||||
- Click <i class="material-symbols-outlined">do_not_disturb_on</i> to remove it from the list.
|
||||
1. Go to **<i class="material-symbols-outlined">settings</i> Settings** > **Download list** or **Upload list**.
|
||||
2. Use the tabs to filter tasks:
|
||||
- Download list tabs: **All**, **Downloading**, **Completed**, **Failed**
|
||||
- Upload list tabs: **All**, **Uploading**, **Completed**, **Failed**.
|
||||
3. Review the task list and status.
|
||||
4. You can:
|
||||
- Click <i class="material-symbols-outlined">folder_open</i> to locate the transferred file in Files.
|
||||
- Click <i class="material-symbols-outlined">do_not_disturb_on</i> to remove it from the list.
|
||||
|
||||
## Use reading tools
|
||||
|
||||
|
||||
@@ -5,9 +5,9 @@ description: Manage cookies for Wise so it can access protected websites and fee
|
||||
|
||||
# Manage cookies for Wise
|
||||
|
||||
Some websites require a login to access their content. To allow Wise to fetch content from these protected sources, you may need to upload cookies so it can authenticate the connection.
|
||||
Some websites require you to log in to access their content. To allow Wise to fetch content from these protected sources, you may need to upload cookies so Wise can authenticate its requests.
|
||||
|
||||
This grants Wise permission to pass login checks, ensuring that features like **Save to library** or **Subscribe to RSS feed** work securely on restricted sites.
|
||||
This allows Wise to authenticate access, ensuring that features like **Save to library**, **Subscribe to RSS feed** and **Download file** work securely on restricted sites.
|
||||
|
||||
This guide explains how to manage cookies in Olares for Wise.
|
||||
|
||||
|
||||
41
docs/one/access-olares-via-local-domain.md
Normal file
@@ -0,0 +1,41 @@
|
||||
---
|
||||
outline: [2, 3]
|
||||
description: Learn how to access your Olares services on the same network using the `.local` domain.
|
||||
head:
|
||||
- - meta
|
||||
- name: keywords
|
||||
content: Olares, .local domain, local access
|
||||
---
|
||||
|
||||
# Access Olares via .local domain
|
||||
|
||||
When your computer or phone is on the same local network as Olares One, you can use a `.local` domain to reach your Olares services so traffic stays on your LAN.
|
||||
|
||||
## Prerequisites
|
||||
|
||||
**Hardware**
|
||||
- Olares One is set up and connected to your network.
|
||||
- A client device (computer or phone) on the same network as Olares One.
|
||||
|
||||
**LarePass** (Required for Windows)
|
||||
- The LarePass desktop client is installed on your Windows device.
|
||||
- You have imported your Olares ID on the LarePass desktop client.
|
||||
|
||||
## URL format
|
||||
|
||||
<!--@include: ../reusables/local-domain.md{10,23}-->
|
||||
|
||||
## macOS
|
||||
|
||||
No setup is needed. Use the local URL in your browser (for example, `http://desktop.<username>.olares.local`).
|
||||
|
||||
## Windows
|
||||
|
||||
<!--@include: ../reusables/local-domain.md{26,40}-->
|
||||
|
||||
## Troubleshooting
|
||||
|
||||
<!--@include: ../reusables/local-domain.md{42,75}-->
|
||||
|
||||
## Learn more
|
||||
- [Access Olares services locally](../manual/best-practices/local-access.md): DNS configuration, hosts file, and other local access methods.
|
||||
@@ -21,75 +21,17 @@ While this address works from anywhere, it's recommended to enable the LarePass
|
||||
- A client device (computer or mobile phone) with internet access.
|
||||
|
||||
## Step 1: Download LarePass
|
||||
To use the secure VPN connection, the LarePass client must be installed on the device you are using to access Olares.
|
||||
|
||||
- **Mobile**: Use the LarePass app installed during the Olares ID creation process.
|
||||
- **Desktop**: Download and install the LarePass desktop client.
|
||||
|
||||
1. Visit <AppLinkGlobal />.
|
||||
2. Download the version compatible with your operating system.
|
||||
3. Install the application and log in with your Olares ID.
|
||||
<!--@include: ../reusables/larepass-vpn.md{7,16}-->
|
||||
|
||||
## Step 2: Enable LarePass VPN
|
||||
Once installed, enable the VPN directly on the device.
|
||||
|
||||
:::tip Always enable VPN for remote access
|
||||
Keep LarePass VPN enabled. It automatically prioritizes the fastest available route to ensure you always get the best speed possible without manual switching.
|
||||
:::
|
||||
:::info iOS and macOS setup
|
||||
On iOS or macOS, you may be prompted to add a VPN Configuration to your system settings the first time you enable the feature. Allow this to complete the setup.
|
||||
:::
|
||||
|
||||
<tabs>
|
||||
<template #On-LarePass-mobile-client>
|
||||
|
||||
1. Open the LarePass app and go to **Settings**.
|
||||
2. In the **My Olares** card, toggle on the VPN switch.
|
||||
|
||||

|
||||
</template>
|
||||
<template #On-LarePass-desktop-client>
|
||||
|
||||
1. Open the LarePass app and click your avatar in the top-left corner to open the user menu.
|
||||
2. Toggle on the switch for **VPN connection**.
|
||||
|
||||

|
||||
</template>
|
||||
</tabs>
|
||||
<!--@include: ../reusables/larepass-vpn.md{18,41}-->
|
||||
|
||||
## Step 3: Verify the connection type
|
||||
Once enabled, check the status indicator in LarePass to confirm how you are connected:
|
||||
|
||||
| Status | Description |
|
||||
|:-------------|:---------------------------------------------------------|
|
||||
| **Intranet** | Direct connection via your local LAN IP. Fastest speeds. |
|
||||
| **P2P** | Direct encrypted tunnel between devices. High speed. |
|
||||
| **DERP** | Routed via a secure relay server. Used as a fallback. |
|
||||
<!--@include: ../reusables/larepass-vpn.md{42,49}-->
|
||||
|
||||
## Troubleshooting
|
||||
### Why doesn't LarePass VPN work on my Mac anymore?
|
||||
If the VPN was working previously but has stopped, you might need to reset the system extension.
|
||||
|
||||
:::info
|
||||
Depending on your macOS version, the UI might look slightly different.
|
||||
:::
|
||||
1. Open System Settings, search for "Extension", and select **Login Items & Extensions**.
|
||||
2. Scroll to the **Network Extensions** section and click the info icon (ⓘ) to view loaded extensions.
|
||||
3. Find LarePass, click the three dots (...), and select **Delete Extension**.
|
||||
4. Restart your Mac.
|
||||
5. Open the LarePass desktop client and re-enable the VPN.
|
||||
|
||||
### Why can't I enable LarePass VPN on Windows?
|
||||
Third-party antivirus software may mistakenly flag the LarePass client, blocking the VPN service.
|
||||
|
||||
If prompted by your antivirus when opening LarePass for the first time, allow the application to continue.
|
||||
|
||||
If the VPN still fails to enable:
|
||||
1. Check your antivirus software to see if LarePass was blocked.
|
||||
2. Add the main LarePass executable to the allowlist or exclusions of your antivirus.
|
||||
3. Restart LarePass and try enabling the VPN again.
|
||||
|
||||
## Learn more
|
||||
- [Access Olares locally](../manual/best-practices/local-access.md): Explore detailed instructions for all available local network connection methods.
|
||||
- [Access Olares terminal](access-terminal-ssh.md): Learn how to connect to the host shell using SSH or the Control Hub web terminal.
|
||||
- [Network](../developer/concepts/network.md): Learn about the different entry points in Olares.
|
||||
<!--@include: ../reusables/larepass-vpn.md{50,57}-->
|
||||
@@ -9,23 +9,14 @@ head:
|
||||
|
||||
# Connect to Olares One via SSH <Badge type="tip" text="10 min" />
|
||||
|
||||
Certain development and operational tasks, such as connecting Olares One with other devices to form a cluster, require direct command-line access.
|
||||
|
||||
Olares One is primarily used as a headless device, so you can access the terminal remotely without a monitor or keyboard connected to it.
|
||||
Because Olares One is a headless device, you access its terminal remotely rather than through a directly connected monitor or keyboard. This is required for tasks such as cluster setup, system configuration, and maintenance.
|
||||
|
||||
You can connect to the host shell using one of the following methods:
|
||||
- **Control Hub Terminal** is a web-based interface for direct root access. It is recommended for quick tasks.
|
||||
- **Secure Shell (SSH)** is the standard protocol for remote management and complex operations.
|
||||
|
||||
## Before you begin
|
||||
|
||||
- The default username and password for Olares One are both `olares`.
|
||||
:::warning Reset default SSH password
|
||||
Even if you primarily use the Control Hub terminal, you must reset this password immediately in **Settings** > **My hardware** to secure your device against unauthorized access.
|
||||
:::
|
||||
- SSH access grants powerful control over the system. Ensure you keep your credentials secure.
|
||||
- **Control Hub Terminal** is a web-based interface for direct `root` access. It is recommended for quick or occasional tasks.
|
||||
- **Secure Shell (SSH)** is the standard protocol for remote management and more advanced or automated operations.
|
||||
|
||||
## Prerequisites
|
||||
|
||||
**Hardware**
|
||||
- Your Olares One is set up and connected to a network.
|
||||
- A client device, such as a computer, is required to access the terminal.
|
||||
@@ -33,11 +24,9 @@ You can connect to the host shell using one of the following methods:
|
||||
**Experience**
|
||||
- Basic familiarity with terminal commands and the command-line interface (CLI).
|
||||
|
||||
**LarePass** (Required for remote access)
|
||||
- The LarePass app is installed on your device. This is required only if you plan to connect via SSH from a remote location outside your local network.
|
||||
|
||||
## Method 1: Access via Control Hub
|
||||
For quick access without configuring SSH clients, you can use the web-based terminal built directly into Control Hub.
|
||||
|
||||
For quick access without configuring an SSH client, use the web-based terminal built into Control Hub.
|
||||
|
||||
1. Open the Control Hub app.
|
||||
2. In the left sidebar, under the **Terminal** section, click **Olares**.
|
||||
@@ -46,64 +35,79 @@ For quick access without configuring SSH clients, you can use the web-based term
|
||||
You can now execute system commands directly in the embedded terminal.
|
||||
|
||||
:::tip Run as `root`
|
||||
The Control Hub terminal runs as `root` by default. You do not need to use `sudo` before commands.
|
||||
The Control Hub terminal runs as `root` by default. You do not need to prefix commands with `sudo`.
|
||||
:::
|
||||
|
||||
## Method 2: Access via SSH
|
||||
|
||||
SSH establishes a secure session over the network, allowing you to use command-line operations for Olares One on your current device.
|
||||
SSH establishes an encrypted session over the network, allowing you to run command-line operations on Olares One from your current device.
|
||||
|
||||
### Get IP address of Olares One
|
||||
To connect via SSH, you first need to find the internal IP address of your Olares One.
|
||||
### Step 1: Get the local IP address of Olares One
|
||||
|
||||
1. Open the LarePass app, and go to **Settings** > **System** to navigate to the **Olares management** page.
|
||||

|
||||
|
||||
2. Tap on the device card.
|
||||
3. Scroll down to the **Network** section. You can find the **Intranet IP** there.
|
||||
2. Tap the Olares One device card.
|
||||
3. Scroll down to the **Network** section and note the **Intranet IP**.
|
||||
|
||||
:::tip Check via Control Hub
|
||||
You can check the IP using the `ifconfig` command in the Control Hub terminal.
|
||||
|
||||
Look for your active connection, typically named `enp3s0` (wired) or `wlo1` (wireless). The IP address follows `inet`.
|
||||
Look for your active interface, typically `enp3s0` (wired) or `wlo1` (wireless). The IP address appears after `inet`.
|
||||
:::
|
||||
### Connect via SSH (local network)
|
||||
If your computer and the Olares One are on the same Wi-Fi or LAN:
|
||||
|
||||
1. Open a terminal on your computer.
|
||||
2. Run the `ssh` command using Olares One's local IP address:
|
||||
```bash
|
||||
ssh <username>@<host_ip_address>
|
||||
```
|
||||
For example:
|
||||
### Step 2: Check SSH password in Vault
|
||||
|
||||
```bash
|
||||
ssh olares@192.168.31.155
|
||||
```
|
||||
3. Enter the host password when prompted.
|
||||
<!--@include: ./reusables-reset-ssh.md{7,16}-->
|
||||
|
||||
### Connect via SSH (remote access)
|
||||
If you are away from home, you can use LarePass VPN to bridge the connection securely.
|
||||
### Step 3: Connect via SSH
|
||||
The default username for Olares One is `olares`.
|
||||
|
||||
#### Allow SSH access via VPN
|
||||
For security, SSH access via VPN is disabled by default. You must enable it once.
|
||||
1. On Olares, open the Settings app.
|
||||
2. Navigate to **VPN**.
|
||||
3. Toggle on **Allow SSH via VPN**.
|
||||
1. Open a terminal on your computer.
|
||||
2. Run the following command, replacing `<local_ip_address>` with the Intranet IP:
|
||||
```bash
|
||||
ssh olares@<local_ip_address>
|
||||
```
|
||||
3. When prompted, enter the SSH password.
|
||||
|
||||
#### Enable LarePass VPN
|
||||
1. Open the LarePass desktop client on your computer.
|
||||
2. Click your avatar in the top-left corner and toggle on **VPN connection**.
|
||||

|
||||
## Advanced: SSH into Olares One from a different network
|
||||
|
||||
3. Open a terminal on your computer.
|
||||
4. Run the `ssh` command using Olares One's local IP address. LarePass handles the routing automatically.
|
||||
```bash
|
||||
ssh <username>@<host_ip_address>
|
||||
```
|
||||
For example:
|
||||
If you are not on the same local network as Olares One, use LarePass VPN to establish a secure connection without exposing your device to the internet.
|
||||
|
||||
```bash
|
||||
ssh olares@192.168.31.155
|
||||
```
|
||||
5. Enter the host password when prompted.
|
||||
### Step 1: Find the Tailscale IP of Olares One
|
||||
|
||||
1. On Olares, go to **Settings** > **VPN** > **View VPN connection status**.
|
||||
2. Find **olares**, and click it to expand the connection details.
|
||||
3. Locate the IP address that starts with `100.64`, and note it down.
|
||||
{width=80%}
|
||||
|
||||
### Step 2: Check SSH password in Vault
|
||||
|
||||
<!--@include: ./reusables-reset-ssh.md{7,16}-->
|
||||
|
||||
### Step 3: Allow SSH access via VPN
|
||||
|
||||
1. On Olares, go to **Settings** > **VPN**.
|
||||
2. Toggle on **Allow SSH via VPN**.
|
||||
3. On your computer, open the LarePass desktop client.
|
||||
4. Click your avatar in the top-left corner and toggle on **VPN connection**.
|
||||

|
||||
|
||||
### Step 4: Connect via SSH
|
||||
The default username for Olares One is `olares`.
|
||||
1. Open a terminal on your computer.
|
||||
2. Run the following command, replacing `<tailscale_ip_address>` with the Tailscale IP address:
|
||||
```bash
|
||||
ssh olares@<tailscale_ip_address>
|
||||
```
|
||||
:::info
|
||||
After you enable SSH over VPN, the first SSH access is slower because VPN routes are being applied. Wait a short time for the connection to complete.
|
||||
:::
|
||||
3. When prompted, enter the SSH password.
|
||||
|
||||
:::tip Connect using the local IP address instead
|
||||
If **Subnet routes** is enabled in **Settings** > **VPN**, all devices on Olares One's local network become reachable through the VPN. You can then SSH using the local IP address (`192.168.x.x`) instead of the Tailscale IP (`100.64.x.x`), even when accessing from a different network.
|
||||
:::
|
||||
|
||||
## Reset SSH password
|
||||
<!--@include: ./reusables-reset-ssh.md{19,}-->
|
||||
|
||||
@@ -1,65 +1,84 @@
|
||||
---
|
||||
outline: [2, 3]
|
||||
description: Learn how to create a bootable USB installer for Olares OS using balenaEtcher.
|
||||
description: Reinstall Olares OS on Olares One using a bootable USB drive to restore the device to a clean initial state.
|
||||
head:
|
||||
- - meta
|
||||
- name: keywords
|
||||
content: Olares, Olares One, install Olares, bootable USB, ISO, balenaEtcher
|
||||
content: Olares One, reinstall, Olares OS, bootable USB, installation USB
|
||||
---
|
||||
|
||||
# Create a bootable USB drive <Badge type="tip" text="15 min"/>
|
||||
# Reinstall Olares OS using bootable USB <Badge type="tip" text="15 min"/>
|
||||
|
||||
To reinstall or recover Olares OS on your Olares One, you must create a bootable USB installation drive. This drive allows you to reset the device to its factory state.
|
||||
Reinstalling Olares OS returns your Olares One to a clean initial state. You can do this using the bootable USB drive included with Olares One.
|
||||
|
||||
:::warning Data loss warning
|
||||
This process will erase all data on your USB drive. If you have important files on the drive, back them up before proceeding.
|
||||
:::
|
||||
:::warning Image compatibility
|
||||
Olares One requires a specific system image designed for its hardware. If you install the generic self-hosted ISO, Olares One will fail to boot.
|
||||
:::warning Data loss
|
||||
This will permanently delete all accounts, settings, and data on the device. This action cannot be undone.
|
||||
:::
|
||||
|
||||
## Prerequisites
|
||||
- USB flash drive: A drive with 8 GB or higher capacity.
|
||||
:::info
|
||||
Ensure that your USB drive is empty or backed up. The flashing process re-formats the drive, which means existing data on it will be permanently deleted.
|
||||
:::
|
||||
- Computer: A Windows, macOS, or Linux computer to perform the setup.
|
||||
- Internet connection: Stable network for downloading the image file and related software.
|
||||
**Hardware**<br>
|
||||
- The bootable USB drive that came with Olares One.
|
||||
:::tip Don't have the USB drive?
|
||||
Download the [Olares One ISO](https://cdn.olares.com/one/v1.12.4-amd64.iso), which is device-specific and different from the standard Olares ISO, and flash it to a USB drive (8 GB or larger) using a tool such as [Balena Etcher](https://etcher.balena.io/).
|
||||
:::
|
||||
- A monitor and keyboard connected to Olares One.
|
||||
|
||||
## Step 1. Download Olares image
|
||||
## Step 1: Boot from the USB drive
|
||||
|
||||
Click to download the [ISO image for Olares One](https://cdn.olares.com/one/olares.iso). The file `olares.iso` will be saved to your computer.
|
||||
1. Insert the bootable USB drive into Olares One.
|
||||
2. Power on Olares One or restart it if it is already running.
|
||||
3. When the Olares logo appears, immediately press the **Delete** key repeatedly to enter **BIOS setup**.
|
||||

|
||||
|
||||
## Step 2. Install flashing tool
|
||||
4. Navigate to the **Boot** tab, set **Boot Option #1** to the USB drive, and then press **Enter**.
|
||||

|
||||
|
||||
It is recommended to use balenaEtcher for this task because it is free, easy to use, and works on all major operating systems.
|
||||
5. Press **F10**, then select **Yes** to save and exit.
|
||||

|
||||
|
||||
1. Go to the [balenaEtcher website](https://etcher.balena.io/).
|
||||
2. Download and install the version appropriate for your computer (Windows, macOS, or Linux).
|
||||
|
||||
## Step 3. Flash the drive
|
||||
Olares One will restart and boot into the Olares installer interface.
|
||||
|
||||
Use balenaEtcher to turn your USB stick into a bootable installer.
|
||||
## Step 2: Install Olares to disk
|
||||
|
||||
1. Insert your USB flash drive into the computer.
|
||||
2. Open balenaEtcher.
|
||||
3. Follow the steps on the screen:
|
||||
1. From the installer interface, select **Install Olares to Hard Disk** and press **Enter**.
|
||||

|
||||
|
||||
a. Click **Flash from file** and select the Olares ISO file you downloaded.
|
||||
2. When prompted for the installation target, the installer shows a list of available disks. Type `/dev/` followed by the disk name (e.g. `nvme0n1`) from that list and press **Enter**.
|
||||

|
||||
|
||||
b. Click **Select target** and select your USB drive.
|
||||
For example, to install to `nvme0n1`, enter:
|
||||
```bash
|
||||
/dev/nvme0n1
|
||||
```
|
||||
|
||||
c. Click **Flash!** to start writing the installer to the USB drive.
|
||||
3. When you see prompts about NVIDIA GPU drivers, press **Enter** to accept the default.
|
||||

|
||||
|
||||

|
||||
4. When you see the message below, the reinstallation is complete:
|
||||
```bash
|
||||
Installation completed successfully!
|
||||
```
|
||||
|
||||
4. When the flashing process is completed, the USB drive is ready to use, and you can safely eject it.
|
||||
5. Remove the USB drive, then press **Ctrl + Alt + Delete** to restart.
|
||||
|
||||
## Next steps
|
||||
## Step 3: Verify the installation
|
||||
|
||||
You can now insert the bootable USB drive into Olares One or other target hardware to begin the installation.
|
||||
After the reboot, the system starts in a clean factory state and shows a text-based Ubuntu login prompt.
|
||||
|
||||
## Resources
|
||||
1. Log in with the default credentials:
|
||||
- **Username**: `olares`
|
||||
- **Password**: `olares`
|
||||

|
||||
|
||||
- [Install Olares via ISO](../manual/get-started/install-linux-iso.md)
|
||||
- [Install Olares](../manual/get-started/install-olares.md)
|
||||
- [Installation FAQs](../manual/help/installation.md)
|
||||
2. (Optional) Run the following command to verify the installation:
|
||||
```bash
|
||||
sudo olares-check
|
||||
```
|
||||
Example output:
|
||||

|
||||
|
||||
|
||||
## Step 4: Complete activation via LarePass
|
||||
|
||||
You can then activate Olares One again via LarePass. For detailed instructions, see [First boot](first-boot.md).
|
||||
@@ -21,15 +21,16 @@ This dual-drive configuration physically isolates the systems. This ensures Olar
|
||||
|
||||
## Step 1: Boot into BIOS
|
||||
1. Insert the Windows USB boot drive into a USB port on Olares One.
|
||||
2. Power on Olares One or restart if it is already running.
|
||||
3. Immediately press and hold the **Delete** key repeatedly until the BIOS setup screen appears.
|
||||
2. Power on Olares One or restart it if it is already running.
|
||||
3. When the Olares logo appears, immediately press the **Delete** key repeatedly to enter **BIOS setup**.
|
||||

|
||||
|
||||
## Step 2: Boot from USB
|
||||
|
||||
1. Navigate to the **Boot** tab using the arrow keys on your keyboard.
|
||||
2. Locate **Boot Option #1** or **Boot Override** and select your USB flash drive.
|
||||
3. Press **Enter** to boot from the USB drive immediately.
|
||||
4. The system will restart and load the Windows installation interface.
|
||||
2. Set **Boot Option #1** to your Windows USB flash drive, and press **Enter**.
|
||||
3. Press **F10**, then select **Yes** to save and exit BIOS.
|
||||
4. The system restarts and boots from the USB drive into the Windows installation interface.
|
||||
|
||||
## Step 3: Install Windows
|
||||
1. Follow the on-screen prompts to begin the Windows installation.
|
||||
@@ -49,16 +50,16 @@ Because the operating systems are on separate physical drives, you switch betwee
|
||||
|
||||
### Switch to Olares OS
|
||||
1. Restart Olares One.
|
||||
2. Press **Delete** repeatedly to enter BIOS.
|
||||
2. Press the **Delete** key repeatedly to enter **BIOS setup**.
|
||||
3. Go to the **Boot** tab.
|
||||
4. Set **Boot Option #1** to the SSD containing Olares OS.
|
||||
5. Press **F4** to confirm.
|
||||
5. Press **F10** to save and exit BIOS.
|
||||
|
||||
### Switch to Windows
|
||||
1. Restart Olares One.
|
||||
2. Press **Delete** repeatedly to enter BIOS.
|
||||
2. Press the **Delete** key repeatedly to enter **BIOS setup**.
|
||||
3. Set **Boot Option #1** to the secondary SSD containing Windows.
|
||||
4. Press **F4** to confirm.
|
||||
4. Press **F10** to save and exit BIOS.
|
||||
|
||||
## Resources
|
||||
- [Install NVIDIA drivers on Windows](install-nvidia-driver.md)
|
||||
|
||||
@@ -34,11 +34,13 @@ Partitioning a drive carries a risk of data loss. If you have important data on
|
||||
|
||||
## Step 1: Install Windows
|
||||
1. Insert the Windows USB boot drive into a USB port on Olares One.
|
||||
2. Power on Olares One or restart if it is already running.
|
||||
3. Immediately press and hold the **Delete** key repeatedly until the BIOS setup screen appears.
|
||||
2. Power on Olares One or restart it if it is already running.
|
||||
3. When the Olares logo appears, immediately press the **Delete** key repeatedly to enter **BIOS setup**.
|
||||

|
||||
|
||||
4. Navigate to the **Boot** tab using the arrow keys on your keyboard.
|
||||
5. Locate **Boot Option #1** or **Boot Override** and select your USB flash drive.
|
||||
6. Press **Enter** to boot from the USB drive immediately.
|
||||
5. Set **Boot Option #1** to your Windows USB flash drive, and press **Enter**.
|
||||
6. Press **F10**, then select **Yes** to save and exit BIOS. The system restarts and boots from the USB drive into the Windows installation interface.
|
||||
7. Follow the on-screen prompts to begin the Windows installation.
|
||||
8. When the installation finishes and the system restarts, unplug the Windows USB drive.
|
||||
|
||||
@@ -59,13 +61,14 @@ The system will boot into Windows automatically.
|
||||
Olares OS runs on top of a Linux kernel. You will install Ubuntu to serve as the host system.
|
||||
|
||||
1. Insert the Ubuntu USB drive and restart Olares One.
|
||||
2. Press **Delete** repeatedly to enter BIOS, then select the USB drive as the boot device.
|
||||
3. Follow the installer prompts until you reach the **Installation type** screen.
|
||||
4. Select **Install Ubuntu alongside Windows Boot Manager**.
|
||||
2. When the Olares logo appears, press the **Delete** key repeatedly to enter **BIOS setup**.
|
||||
3. Navigate to the **Boot** tab, set **Boot Option #1** to your Ubuntu USB flash drive, and then press **Enter**.
|
||||
4. Press **F10**, then select **Yes** to save and exit BIOS. The system restarts and boots from the USB drive into the Ubuntu installer.
|
||||
5. Follow the installer prompts until you reach the **Installation type** screen.
|
||||
:::tip
|
||||
If this option does not appear, select the manual installation option to manually assign the unallocated space to Ubuntu.
|
||||
:::
|
||||
5. When the installation finishes and the system restarts, unplug the Ubuntu USB drive.
|
||||
6. When the installation finishes and the system restarts, unplug the Ubuntu USB drive.
|
||||
|
||||
The system will boot into Ubuntu automatically.
|
||||
|
||||
@@ -120,17 +123,17 @@ After setup is complete, the LarePass app returns to the home screen, and the br
|
||||
You switch between Windows and Olares using the BIOS boot priority.
|
||||
### Switch to Olares OS
|
||||
1. Restart Olares One.
|
||||
2. Press **Delete** repeatedly to enter BIOS.
|
||||
2. Press the **Delete** key repeatedly to enter **BIOS setup**.
|
||||
3. Go to the **Boot** tab.
|
||||
4. Set **Boot Override** to Ubuntu.
|
||||
5. Press **F4** to confirm.
|
||||
5. Press **F10** to save and exit BIOS.
|
||||
|
||||
### Switch to Windows
|
||||
1. Restart Olares One.
|
||||
2. Press **Delete** repeatedly to enter BIOS.
|
||||
2. Press the **Delete** key repeatedly to enter **BIOS setup**.
|
||||
3. Go to the **Boot** tab.
|
||||
4. Set **Boot Override** to Windows.
|
||||
5. Press **F4** to confirm.
|
||||
5. Press **F10** to save and exit BIOS.
|
||||
|
||||
## Troubleshooting
|
||||
|
||||
|
||||
39
docs/one/factory-reset-in-bios.md
Normal file
@@ -0,0 +1,39 @@
|
||||
---
|
||||
outline: [2, 3]
|
||||
description: Learn how to restore BIOS defaults on Olares One to return the device to its initial setup state.
|
||||
head:
|
||||
- - meta
|
||||
- name: keywords
|
||||
content: Olares One, BIOS defaults, restore, BIOS setup
|
||||
---
|
||||
# Restore BIOS defaults <Badge type="tip" text="10 min" />
|
||||
|
||||
Restoring BIOS defaults resets the firmware configuration and returns your Olares One to its initial setup state. If you have a monitor and keyboard connected, you can perform this directly in BIOS.
|
||||
|
||||
:::warning Data loss
|
||||
This will permanently delete all accounts, settings, and data on the device. This action cannot be undone.
|
||||
:::
|
||||
|
||||
## Prerequisites
|
||||
**Hardware**<br>
|
||||
- A wired keyboard connected to your Olares One.
|
||||
- A monitor connected to your Olares One.
|
||||
|
||||
## Step 1: Load optimized defaults in BIOS
|
||||
|
||||
1. Power on Olares One or restart it if it is already running.
|
||||
2. When the Olares logo appears, immediately press the **Delete** key repeatedly to enter **BIOS setup**.
|
||||

|
||||
|
||||
3. Press **F9**, then select **Yes** to restore factory settings.
|
||||

|
||||
|
||||
4. Press **F10**, then select **Yes** to save and exit. The device restarts automatically.
|
||||

|
||||
|
||||
Once finished, Olares One reboots into the initial setup phase.
|
||||
|
||||
## Step 2: Complete activation via LarePass
|
||||
|
||||
You can then activate Olares One again via LarePass. For detailed instructions, see [First boot](first-boot.md).
|
||||
|
||||
@@ -1,28 +1,22 @@
|
||||
---
|
||||
outline: [2, 3]
|
||||
description: Learn how to restore your Olares One to factory settings using LarePass.
|
||||
description: Learn how to factory reset your Olares One using LarePass.
|
||||
head:
|
||||
- - meta
|
||||
- name: keywords
|
||||
content: Factory reset, Olares One
|
||||
content: factory reset, Olares One, LarePass
|
||||
---
|
||||
# Reset to factory settings <Badge type="tip" text="10 min" />
|
||||
# Factory reset via LarePass <Badge type="tip" text="10 min" />
|
||||
|
||||
Resetting to factory settings returns your Olares One to the initial setup state.
|
||||
If you have already activated Olares One and want to return it to the factory state, you can perform a reset in LarePass.
|
||||
|
||||
:::warning Data loss
|
||||
This will permanently delete all accounts, settings, and data on the device. This action cannot be undone.
|
||||
:::
|
||||
|
||||
## Learning objectives
|
||||
|
||||
By the end of this tutorial, you will learn how to:
|
||||
- Perform a factory reset from LarePass.
|
||||
- Complete the required confirmation and local password verification.
|
||||
|
||||
## Prerequisites
|
||||
|
||||
Before starting, ensure that:
|
||||
**Hardware**<br>
|
||||
- Olares One is powered on.
|
||||
- Your phone and Olares One are on the same network.
|
||||
- You are signed in to LarePass as an administrator.
|
||||
@@ -30,15 +24,17 @@ Before starting, ensure that:
|
||||
## Reset Olares One to factory settings
|
||||
|
||||
1. Open LarePass on your phone and go to **Settings**.
|
||||
2. In the **My Olares** card, tap **System** to enter the **Olares management** page.
|
||||
2. In the **My Olares** card, tap **System** to open the **Olares management** page.
|
||||
3. Tap **Restore to factory settings**.
|
||||
4. Review the risk prompt, then tap **Restore to factory settings** to continue.
|
||||
4. Review the risk prompt carefully, then tap **Restore to factory settings** to continue.
|
||||

|
||||
|
||||
5. Enter your local LarePass lock screen password and tap **Confirm**.
|
||||
5. Enter your local LarePass lock-screen password and tap **Confirm**.
|
||||

|
||||
|
||||
If you have not set a local password, you will be prompted to set one first.
|
||||
6. Wait for the reset process to complete.
|
||||
|
||||
Once finished, Olares One reboots into the initial setup phase. You will be redirected to the activation flow, where you can scan the local network to reinstall or reactivate Olares.
|
||||
Once finished, Olares One reboots into the initial setup phase. You are redirected to the activation flow, where you can scan the local network to reactivate Olares.
|
||||
|
||||
For detailed instructions, see [First boot](first-boot.md).
|
||||
@@ -89,21 +89,17 @@ Your Olares ID is secured by a unique 12-word mnemonic phrase. This phrase is th
|
||||
4. Enter the local password as prompted.
|
||||
5. Write the 12 words onto the **Recovery Sheet**, and then store the sheet in a secure, offline location.
|
||||
|
||||
### Reset SSH password
|
||||
|
||||
<!--@include: ./reusables-reset-ssh.md{7,16}-->
|
||||
|
||||
For instructions on how to SSH into Olares One, see [Connect to Olares One via SSH](access-terminal-ssh.md).
|
||||
|
||||
### Access Olares services securely
|
||||
For secure remote access without complex network configuration, it is recommended to enable the LarePass VPN.
|
||||
|
||||
See [Access Olares services securely using LarePass VPN](access-olares-via-vpn.md).
|
||||
|
||||
### Reset SSH password
|
||||
If you plan to connect to your Olares One via terminal (SSH), you must update the default SSH password.
|
||||
|
||||
1. Open Olares Settings, on the **My hardware** page, click **Reset SSH password**.
|
||||
2. In the dialog, enter a new SSH password that meets all strength requirements, then click **OK**.
|
||||
3. Open the LarePass app and scan the QR code shown on the screen.
|
||||
4. Click **Confirm** on LarePass to finish.
|
||||
|
||||
For details, see [Connect to Olares One via SSH](access-terminal-ssh.md).
|
||||
|
||||
### Explore
|
||||
Olares OS comes with pre-installed system apps. You can also browse the **Market** to download additional applications that best suit your needs.
|
||||
|
||||
|
||||
@@ -4,12 +4,12 @@ description: Learn how to redeem your complimentary Olares Space Basic membershi
|
||||
head:
|
||||
- - meta
|
||||
- name: keywords
|
||||
content: Olares, Olares One, Olares Space, redeem membership card, kickstarter backers, Basic plan
|
||||
content: Olares, Olares One, Olares Space, redeem membership card, Basic plan, kickstarter backers
|
||||
---
|
||||
|
||||
# Redeem Olares Space membership <Badge type="tip" text="Kickstarter Backers Only" />
|
||||
# Redeem Olares Space membership
|
||||
|
||||
If you backed Olares One on Kickstarter, your package includes an "Olares Space Membership" card. This card grants you a complimentary 2-year Basic membership to use the enhanced connectivity services provided by Olares Space.
|
||||
Depending on your purchase channel such as the Kickstarter campaign, your Olares One package might include an Olares Space Membership card. This card grants you a complimentary 2-year Basic membership to use the enhanced connectivity services provided by Olares Space.
|
||||
|
||||
:::tip Olares One is a one-time purchase
|
||||
Your Olares One hardware and system updates are free forever.
|
||||
@@ -24,6 +24,7 @@ Olares Space is a secure connectivity platform that extends the capabilities of
|
||||
* **Remote access (FRP)**: High-speed remote connection with 50 GB of monthly traffic at speeds up to 50 Mbps. This includes access to regional acceleration nodes for faster response times. If you exceed the monthly quota, speed is throttled to 5 Mbps. The free alternative is to use the LarePass VPN or host your own FRP server.
|
||||
|
||||
## Log in to Olares Space
|
||||
|
||||
1. Go to https://space.olares.com.
|
||||
|
||||

|
||||
@@ -40,21 +41,23 @@ Olares Space is a secure connectivity platform that extends the capabilities of
|
||||

|
||||
|
||||
## Redeem Basic plan
|
||||
|
||||
:::info
|
||||
The 2-year validity period begins the moment you successfully bind your email to an Olares ID.
|
||||
:::
|
||||
To redeem your benefits, you must verify the email address associated with your Kickstarter order using the Olares Space dashboard.
|
||||
|
||||
To redeem the Basic plan benefits, you must link your account to the email address associated with your purchase order using the Olares Space dashboard. For example, the email associated with your Kickstarter order.
|
||||
|
||||
1. In Olares Space, from the left navigation pane, click **Usage & billing**.
|
||||
2. On the **Account email** tab, click **Email address**.
|
||||
|
||||

|
||||
|
||||
3. In the **Add email** window, enter the email address used for your Kickstarter order.
|
||||
3. In the **Add email** window, enter the email address used for your purchase order.
|
||||
|
||||

|
||||
|
||||
4. Click **Send verification code**.
|
||||
|
||||
5. Follow the on-screen instructions to complete the verification.
|
||||
|
||||
:::tip
|
||||
@@ -67,29 +70,32 @@ To redeem your benefits, you must verify the email address associated with your
|
||||
|
||||

|
||||
|
||||
## Switch membership to a different Olares ID
|
||||
## Transfer membership to a different Olares ID
|
||||
|
||||
:::warning Validity period adjustment
|
||||
Transferring your membership to a new Olares ID reduces your remaining validity period by one month. If you transfer multiple times within the same month, the deduction only occurs once.
|
||||
:::
|
||||
:::warning Changing your bound email
|
||||
The Basic membership is tied strictly to the specific email address used on Kickstarter. If you change the email, you will lose the Basic membership immediately.
|
||||
Transferring your membership to a new Olares ID reduces your remaining validity period by one month. If you transfer multiple times within the same calendar month, the deduction only occurs once.
|
||||
:::
|
||||
|
||||
If you want to move your Basic membership to a new Olares ID:
|
||||
:::warning Changing bound email
|
||||
The Basic membership is tied strictly to the specific email address used for your purchase order. If you change the email, the current account loses the Basic membership immediately.
|
||||
:::
|
||||
|
||||
If you want to transfer your Basic membership to a new Olares ID:
|
||||
|
||||
1. Log in to Olares Space with your old Olares ID.
|
||||
2. Go to **Usage & billing** > **Account email**.
|
||||
3. Click **Unbind** to remove the Kickstarter email from the account email settings.
|
||||
3. Click **Unbind** to remove the purchase order email from the account email settings.
|
||||
|
||||

|
||||
|
||||
4. Click **Send verification code**.
|
||||
5. Follow the on-screen instructions to complete the verification.
|
||||
|
||||
A notification message will confirm that the email was removed. Your account automatically changes to the Free plan.
|
||||
A notification message will confirm that the email was removed. The current account changes to the Free plan immediately.
|
||||
|
||||
6. Log in to Olares Space with the new Olares ID.
|
||||
7. Bind and verify the Kickstarter email using the steps in the [Activate membership](#activate-membership) section. This will immediately upgrade the new Olares ID to the Basic plan.
|
||||
7. Bind the purchase order email using the steps in the [Redeem Basic plan](#redeem-basic-plan) section. This will upgrade the new Olares ID to the Basic plan immediately.
|
||||
|
||||
## Resources
|
||||
|
||||
- [Monitor traffic in Olares Space](space.md)
|
||||
|
||||
27
docs/one/reusables-reset-ssh.md
Normal file
@@ -0,0 +1,27 @@
|
||||
---
|
||||
search: false
|
||||
---
|
||||
## Reset SSH password
|
||||
|
||||
### Reset upon activation
|
||||
Right after you activate Olares, you will be prompted to reset the SSH password on the LarePass app. The password is automatically generated and saved to your Vault.
|
||||
|
||||
To view the saved password in Vault:
|
||||
|
||||
1. Tap **Vault** in the LarePass app. When prompted, enter your local password to unlock.
|
||||
2. In the top-left corner, tap **Authenticator** to open the side navigation, then tap **All vaults** to display all saved items.
|
||||

|
||||
|
||||
3. Find the item with the <span class="material-symbols-outlined">terminal</span> icon and tap it to reveal the password.
|
||||

|
||||
|
||||
### Reset in Olares Settings
|
||||
If you prefer to use an SSH password instead of the automatically generated one, you can manually reset the password in Settings.
|
||||
|
||||
1. Open Settings. On the **My Olares** page, select **My hardware**.
|
||||
2. Select **Reset SSH login password** at the bottom.
|
||||
{width=70%}
|
||||
|
||||
3. In the dialog, enter a new SSH password that meets all strength requirements, then click **OK**.
|
||||
4. Open the LarePass app and scan the QR code shown on the screen.
|
||||
5. Click **Confirm** on LarePass to finish.
|
||||
@@ -67,7 +67,12 @@ You need to access the Sunshine Web UI running on your Olares One to enter a pai
|
||||
|
||||
1. Copy the URL of your current Steam Headless browser tab.
|
||||
2. Open a new browser tab and modify the URL to access port `47990`. The address varies depending on your network.
|
||||
- **Same network**: Use HTTPS with your `.local` address. Either format works (dots or hyphens in the hostname):
|
||||
- **Same network**: Use HTTPS with your `.local` address. Either
|
||||
format works (dots or hyphens in the hostname):
|
||||
|
||||
:::info Sunshine and .local
|
||||
Use HTTPS (not HTTP) with your `.local` address for this app.
|
||||
:::
|
||||
|
||||
```plain
|
||||
https://139ebc4f0.<your Olares ID>.olares.local:47990
|
||||
@@ -135,9 +140,9 @@ The following steps demonstrate local streaming.
|
||||
|
||||
### Why can't I access the Sunshine Web UI using the `.local` address?
|
||||
|
||||
Olares supports `.local` addresses with the HTTP protocol for most services. The Sunshine Web UI is different because it requires HTTPS to secure local communication. If you use `http://` with your `.local` URL, the Sunshine page will not load.
|
||||
For most Olares services, you use HTTP with `.local` addresses. Sunshine is an exception and requires HTTPS to secure local communication. If you use `http://` with your `.local` URL, the Sunshine page will not load.
|
||||
|
||||
To fix this, use `https://` instead of `http://` in your browser's address bar (for example, `https://139ebc4f0.<your Olares ID>.olares.local:47990`).
|
||||
Use `https://` in your browser's address bar (for example, `https://139ebc4f0.<your Olares ID>.olares.local:47990`).
|
||||
|
||||
### Why isn't the game displaying in full screen?
|
||||
|
||||
|
||||
@@ -87,8 +87,8 @@ Make sure you check the **ACLs** for the specific instance you want to connect t
|
||||
|
||||
1. Open Settings, and navigate to **Application** > **Windows**.
|
||||
2. Under **Permissions**, click **ACLs**.
|
||||
3. Note the port number listed in the **Dst** column. You will need this for the connection step.
|
||||

|
||||
3. Note the port number listed in the **Port** column. You will need this for the connection step.
|
||||

|
||||
|
||||
#### Connect to Windows
|
||||
|
||||
@@ -97,6 +97,7 @@ The following steps show the macOS interface, but the workflow is similar on all
|
||||
:::
|
||||
|
||||
1. Open Windows from the Launchpad. Copy the domain from the address bar (exclude `https://` and any text after the domain).
|
||||

|
||||
2. Open the Windows App (or Remote Desktop) on your device.
|
||||
3. Add your Windows VM as an RDP connection.
|
||||
|
||||
|
||||
@@ -59,12 +59,12 @@ If you frequently save videos while browsing, the [LarePass extension](https://w
|
||||
|
||||
When you save a video to the library, Wise creates a record immediately, and the file download runs in the background.
|
||||
|
||||
1. In Wise, click <i class="material-symbols-outlined">settings</i> in the bottom-left menu bar, then select **Transmission**.
|
||||
2. In the Download tab, check the list of downloads and their status.
|
||||
3. You can:
|
||||
|
||||
- Click <i class="material-symbols-outlined">folder_open</i> to locate a downloaded file in Files.
|
||||
- Click <i class="material-symbols-outlined">do_not_disturb_on</i> to remove it from the list.
|
||||
1. In Wise, click <i class="material-symbols-outlined">settings</i> in the bottom-left menu bar, then select **Download list**.
|
||||
2. Use the tabs to filter tasks: **All**, **Downloading**, **Completed**, **Failed**.
|
||||
3. Review the task list and status.
|
||||
4. You can:
|
||||
- Click <i class="material-symbols-outlined">folder_open</i> to locate the transferred file in Files.
|
||||
- Click <i class="material-symbols-outlined">do_not_disturb_on</i> to remove it from the list.
|
||||
|
||||
Once the download is complete, you can play the video directly inside Wise even without an internet connection.
|
||||
|
||||
|
||||
|
After Width: | Height: | Size: 51 KiB |
BIN
docs/public/images/manual/help/ts-vpn-add-network-extension.png
Normal file
|
After Width: | Height: | Size: 43 KiB |
BIN
docs/public/images/manual/help/ts-vpn-add-vpn-configuration.png
Normal file
|
After Width: | Height: | Size: 35 KiB |
BIN
docs/public/images/manual/help/ts-vpn-network-extensions.png
Normal file
|
After Width: | Height: | Size: 35 KiB |
|
After Width: | Height: | Size: 30 KiB |
|
Before Width: | Height: | Size: 352 KiB After Width: | Height: | Size: 307 KiB |
BIN
docs/public/images/manual/use-cases/openclaw-connected1.png
Normal file
|
After Width: | Height: | Size: 215 KiB |
BIN
docs/public/images/manual/use-cases/openclaw-hatch-finish.png
Normal file
|
After Width: | Height: | Size: 59 KiB |